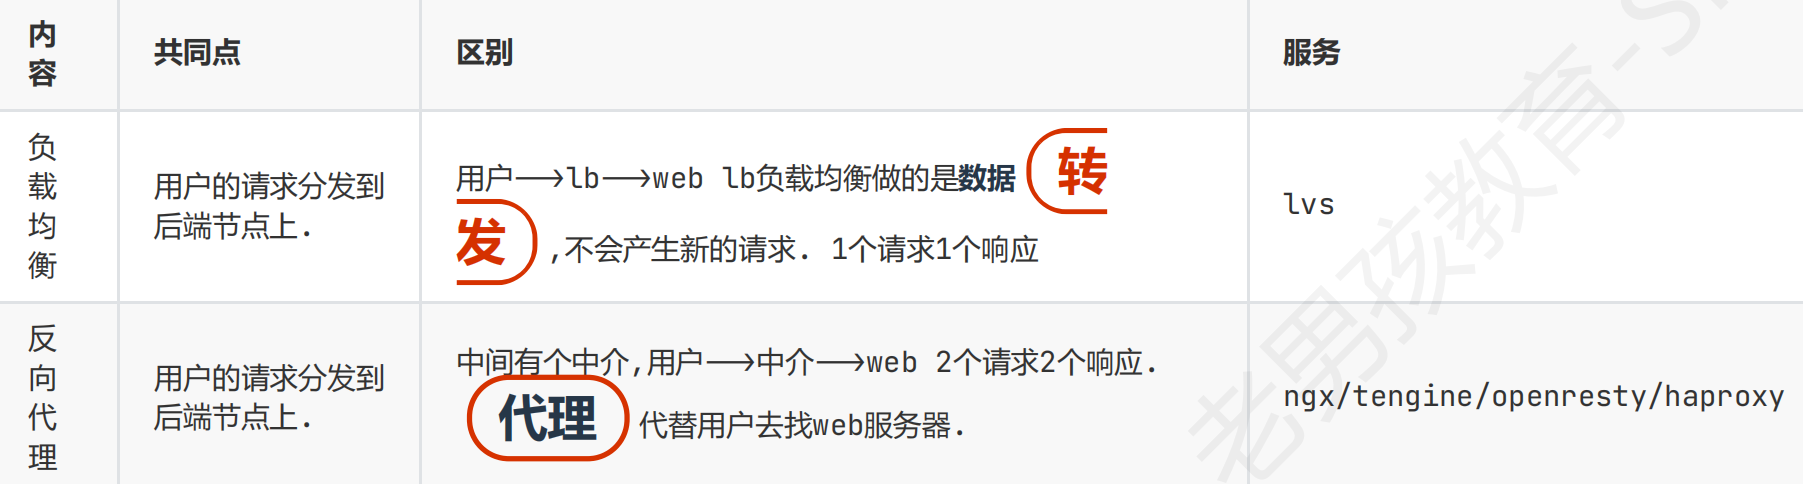
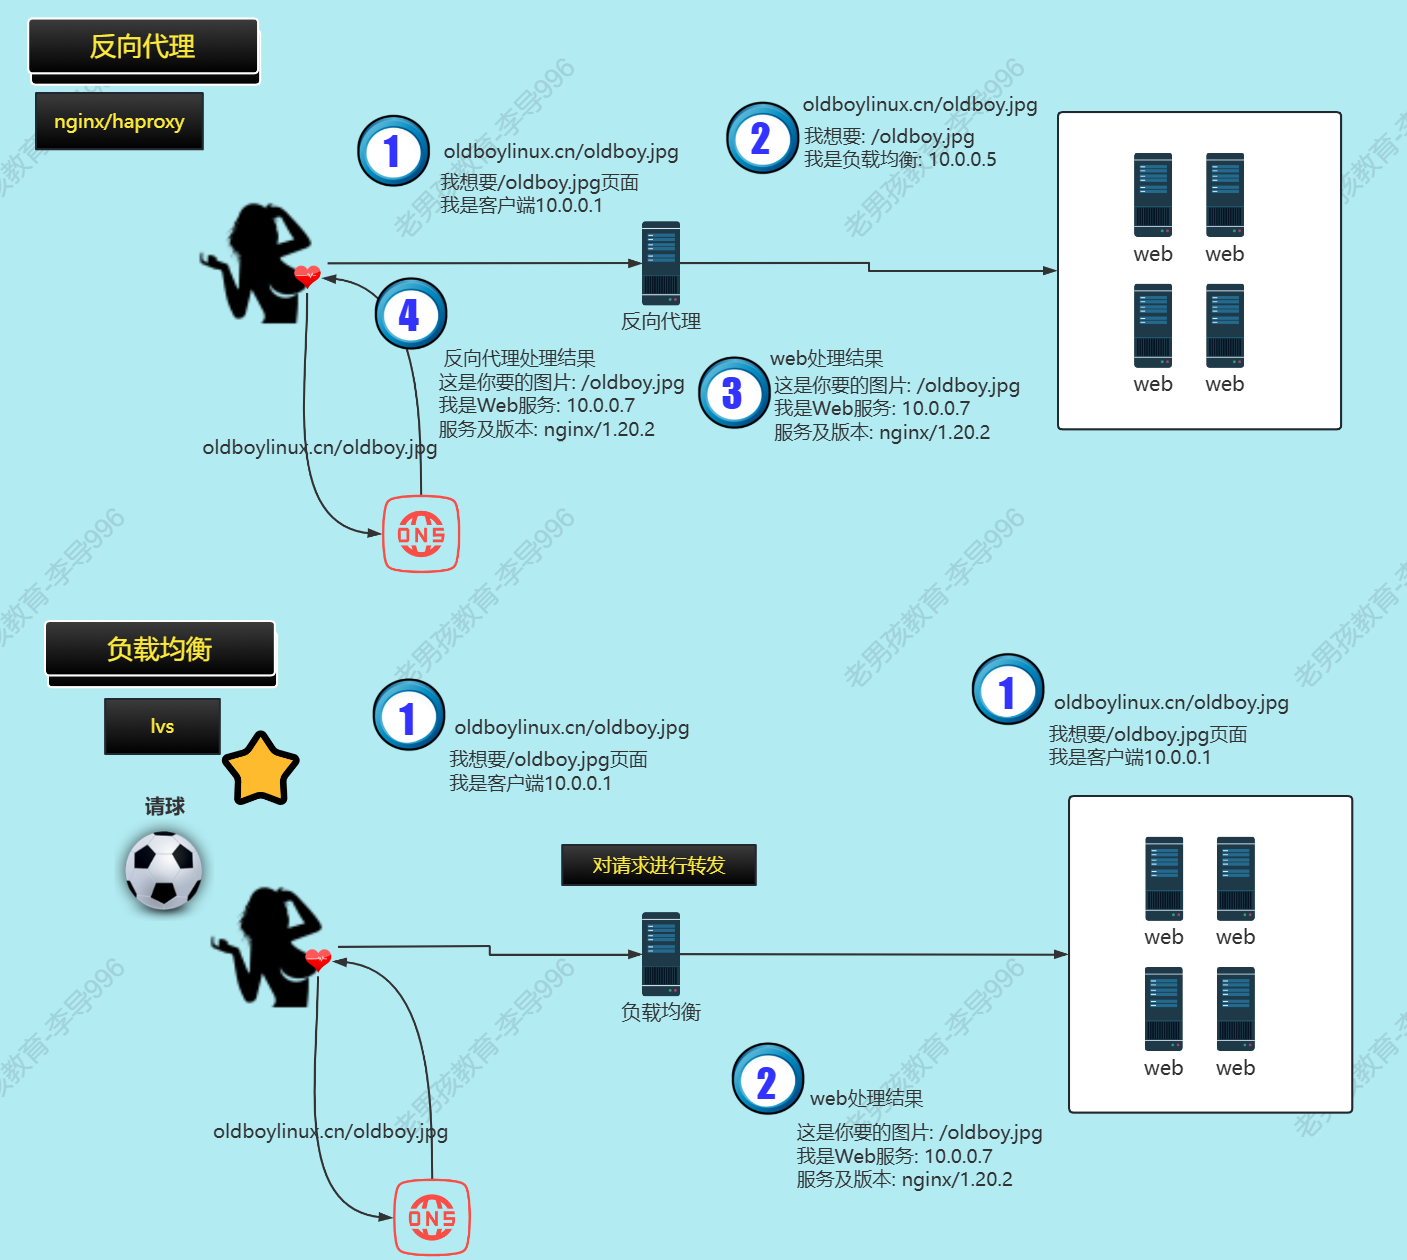
1 负载均衡 vs 反向代理
技术点总结–passwd:oldboylidao996
一般出现在面试中,如果不是一般认为这两个是一致的;区别在于处理用户请求的方式.
2 负载均衡案例
1) 案例背景:
随着网站访问量增加,单台web,无法满足需求.决定增加web服务器.
多台服务器就需要有个调度设备/服务,负载均衡.
负载均衡应用场景:拆分请求.
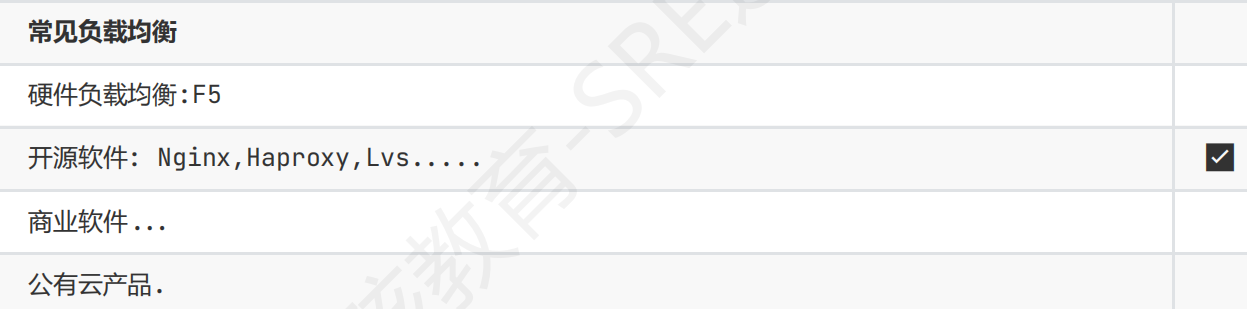
2) 选型:
nginx,haproxy的负载均衡属于反向代理,工作原理将请求拦截下来再发送给后端web服务器,因为没有真正将请求转发,请求两次,响应两次,一次请求客户向nginx,一次请求nginx向web服务器,
lvs属于严格意义上的负载均衡,直接对请求进行转发,web服务器处理完通过代理给用户或者直接给用户,一次请求一次响应
lvs性能最好,可以扛几十万并发,功能已经写入linux内核(国产)
3) 环境准备-配置web2lnmp
(负载均衡机器清单)
m01管理web2快速部署LNMP
LNMP的web1,web2连接lb01数据库,上传目录挂载nfs共享目录
详细步骤:
1.安装nginx,php
yum -y install nginx php php-bcmath php-cli php-common php-devel php-embedded php-fpm php-gd php-intl php-mbstring php-mysqlnd php-opcache php-pdo php-process php-xml php-json
2.创建www用户组,www用户
groupadd www useradd www -M -s /sbin/nologin
3.修改nginx站点目录配置文件/conf.d/blog.linuxjk.cn.conf(直接copy,与web1保持一致即可)
scp /etc/nginx/conf.d/blog.linuxjk.cn.conf root@web02:/etc/nginx/conf.d/
4.修改nginx,php用户为www,与nfs统一 修改nginx.conf
sed -n '/^user/p' /etc/nginx/nginx.conf | sed -r 's#(^user)(.*)(;$)#\1 www\3#g'
修改php-fpm.d/www.conf
scp /etc/php-fpm.d/www.conf root@web02:/etc/php-fpm.d/www.conf
修改php.ini(上传文件大小) scp /etc/php.ini root@web02:/etc/php.ini
5.检查配置是否正确 nginx -t php-fpm -t
6.设置开机自启动并启动nginx,php-fpm服务
systemctl restart php-fpm nginx
7.将站点内容传输到web2(注意:所有的网页目录内容都一致,包括wp-config.php,当前web1,2一起使用的远程服务器即db01)
scp -r /app/code/blog/* root@web02:/app/code/blog/
8.将upload目录下的内容转移出去
mv wp-content/uploads/* /tmp/test
9.web2 挂载 nfs
mount -t nfs 172.16.1.31:/ans_www/web1 /app/code/blog/wp-content/uploads
10.配置永久挂载将下面的追加到/etc/fstab
echo “172.16.1.31:/ans_www/web1/ /app/code/blog/wp-content/uploads nfs defaults 0 0” >> /etc/fstab
检查挂载成功 df -h ll wp-content/uploads/ 出现共享目录中的内容
11.修改站点目录,nginx工作目录权限
chown -R www:www /app/code/blog chown -R /var/log/nginx chown -R www:www /var/lib/nginx
12.设置windows的hosts解析,10.0.0.8 blog.linuxjk.cn 域名访问能正常使用上传等功能即可
4) 负载均衡配置(lb01)
首先安装nginx,然后写配置文件
[root@db01 ~]# cat /etc/nginx/conf.d/blog.linuxjk.cn.conf
upstream blog_pools {
server 10.0.0.7:80;
server 10.0.0.8:80;
}
server {
listen 80;
server_name blog.linuxjk.cn;
error_log /var/log/nginx/blog.linuxjk.cn_error.log notice;
access_log /var/log/nginx/blog.linuxjk.cn_access.log main;
location / {
proxy_pass http://blog_pools;
proxy_set_header Host  $http_host;
proxy_set_header X-Forwarded-For $proxy_add_x_forwarded_for;
}
}
proxy_set_header设置发往web服务器的请求头 HOST $http_host;
用于保持host,如果网站只有一个站点可以不加,web服务器有多个站点必须加,
如果不加这行指令:请求到达负载均衡后会去访问80端口的ip地址显示默认页面—listen default_server配置的location 中的index.html
5) 浏览器访问lb.linuxjk.cn静态站点做一个负载均衡抓包查看关键步骤和三次握手四次挥手)
首先部署web1,web2的静态页面,lb01做好负载均衡
web服务器配置文件:lb.linuxjk.cn.conf
[root@web02 ~]# cat /etc/nginx/conf.d/lb.linuxjk.cn.conf
server{
listen 80;
server_name lb.linuxjk.cn;
root /app/code/lb/;
error_log /var/log/nginx/lb_linuxjk_cn_error.log notice;
access_log /var/log/nginx/lb_linuxjk_cn_access.log main;
location / {
index index.html;
}
}
lb服务器配置文件:lb.linuxjk.cn.conf
upstream lb_test_pools{
server 10.0.0.7:80 weight=1 max_fails=3 fail_timeout=10s;
server 10.0.0.8:80 weight=1 max_fails=3 fail_timeout=10s;
}
server {
listen 80;
server_name lb.linuxjk.cn;
error_log /var/log/nginx/lb_linuxjk_cn_error.log notice;
access_log /var/log/nginx/lb_linuxjk_cn_access.log main;
location / {
proxy_pass http://lb_test_pools;
proxy_set_header HOST $http_host;
#下面的是为了解决web服务器日志文件中没有真实ip的问题
proxy_set_header X-Forwarded-For $proxy_add_x_forwarded_for;
#区别:在请求经过多个节点,最后到达web服务器时,
#X-Real-Ip只能显示一个真实ip,X-Forward-For 可以显示负载前面经过的所有ip
proxy_set_header X-Real-Ip $remote_addr;
}
}
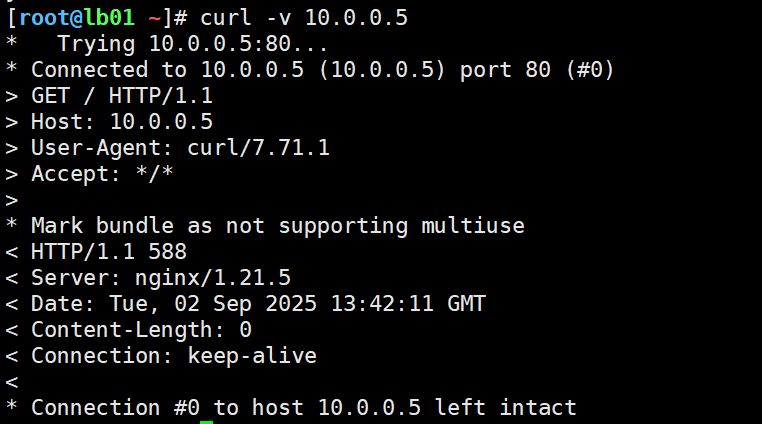
命令行访问负载均衡机器效果:
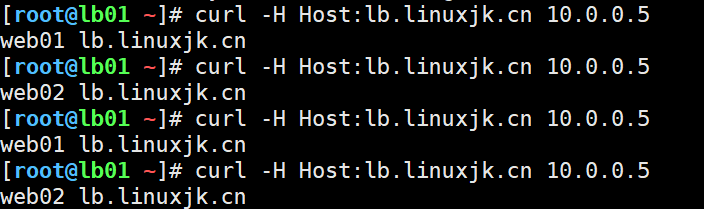
通过浏览器访问lb.oldboylinux.cn:
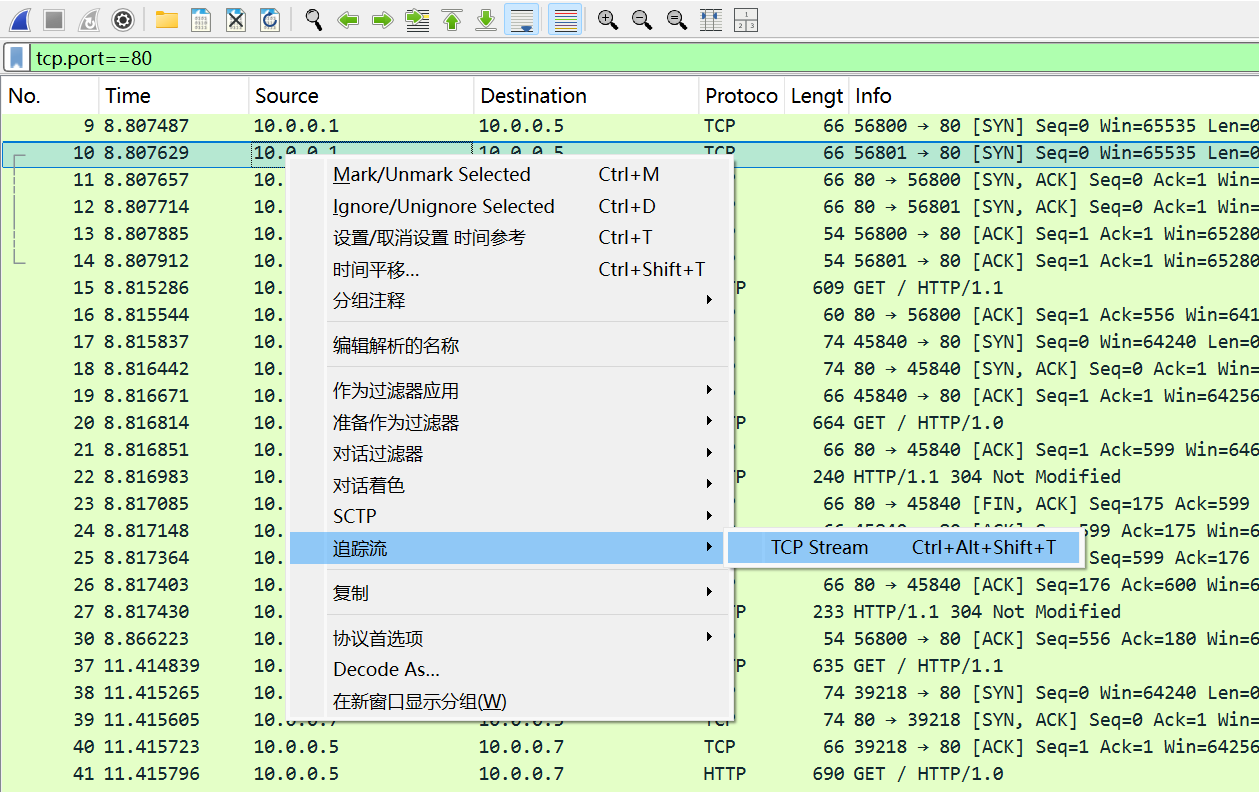
然后通过wireshark抓取vmnet8网卡的数据包,观察lb+web的请求与响应过程.
快速查看一个请求内的http包+握手/挥手数据:先tcp.port==80过滤,在其中一条右键追踪tcp流:非常适合分析完整会话
Wireshark会自动应用一个过滤器,只显示这个特定TCP连接的所有数据包,包括完整的三次握手、所有HTTP请求/响应、以及最后的四次挥手。同时,它还会在窗口底部为您重组整个会话的文本内容。
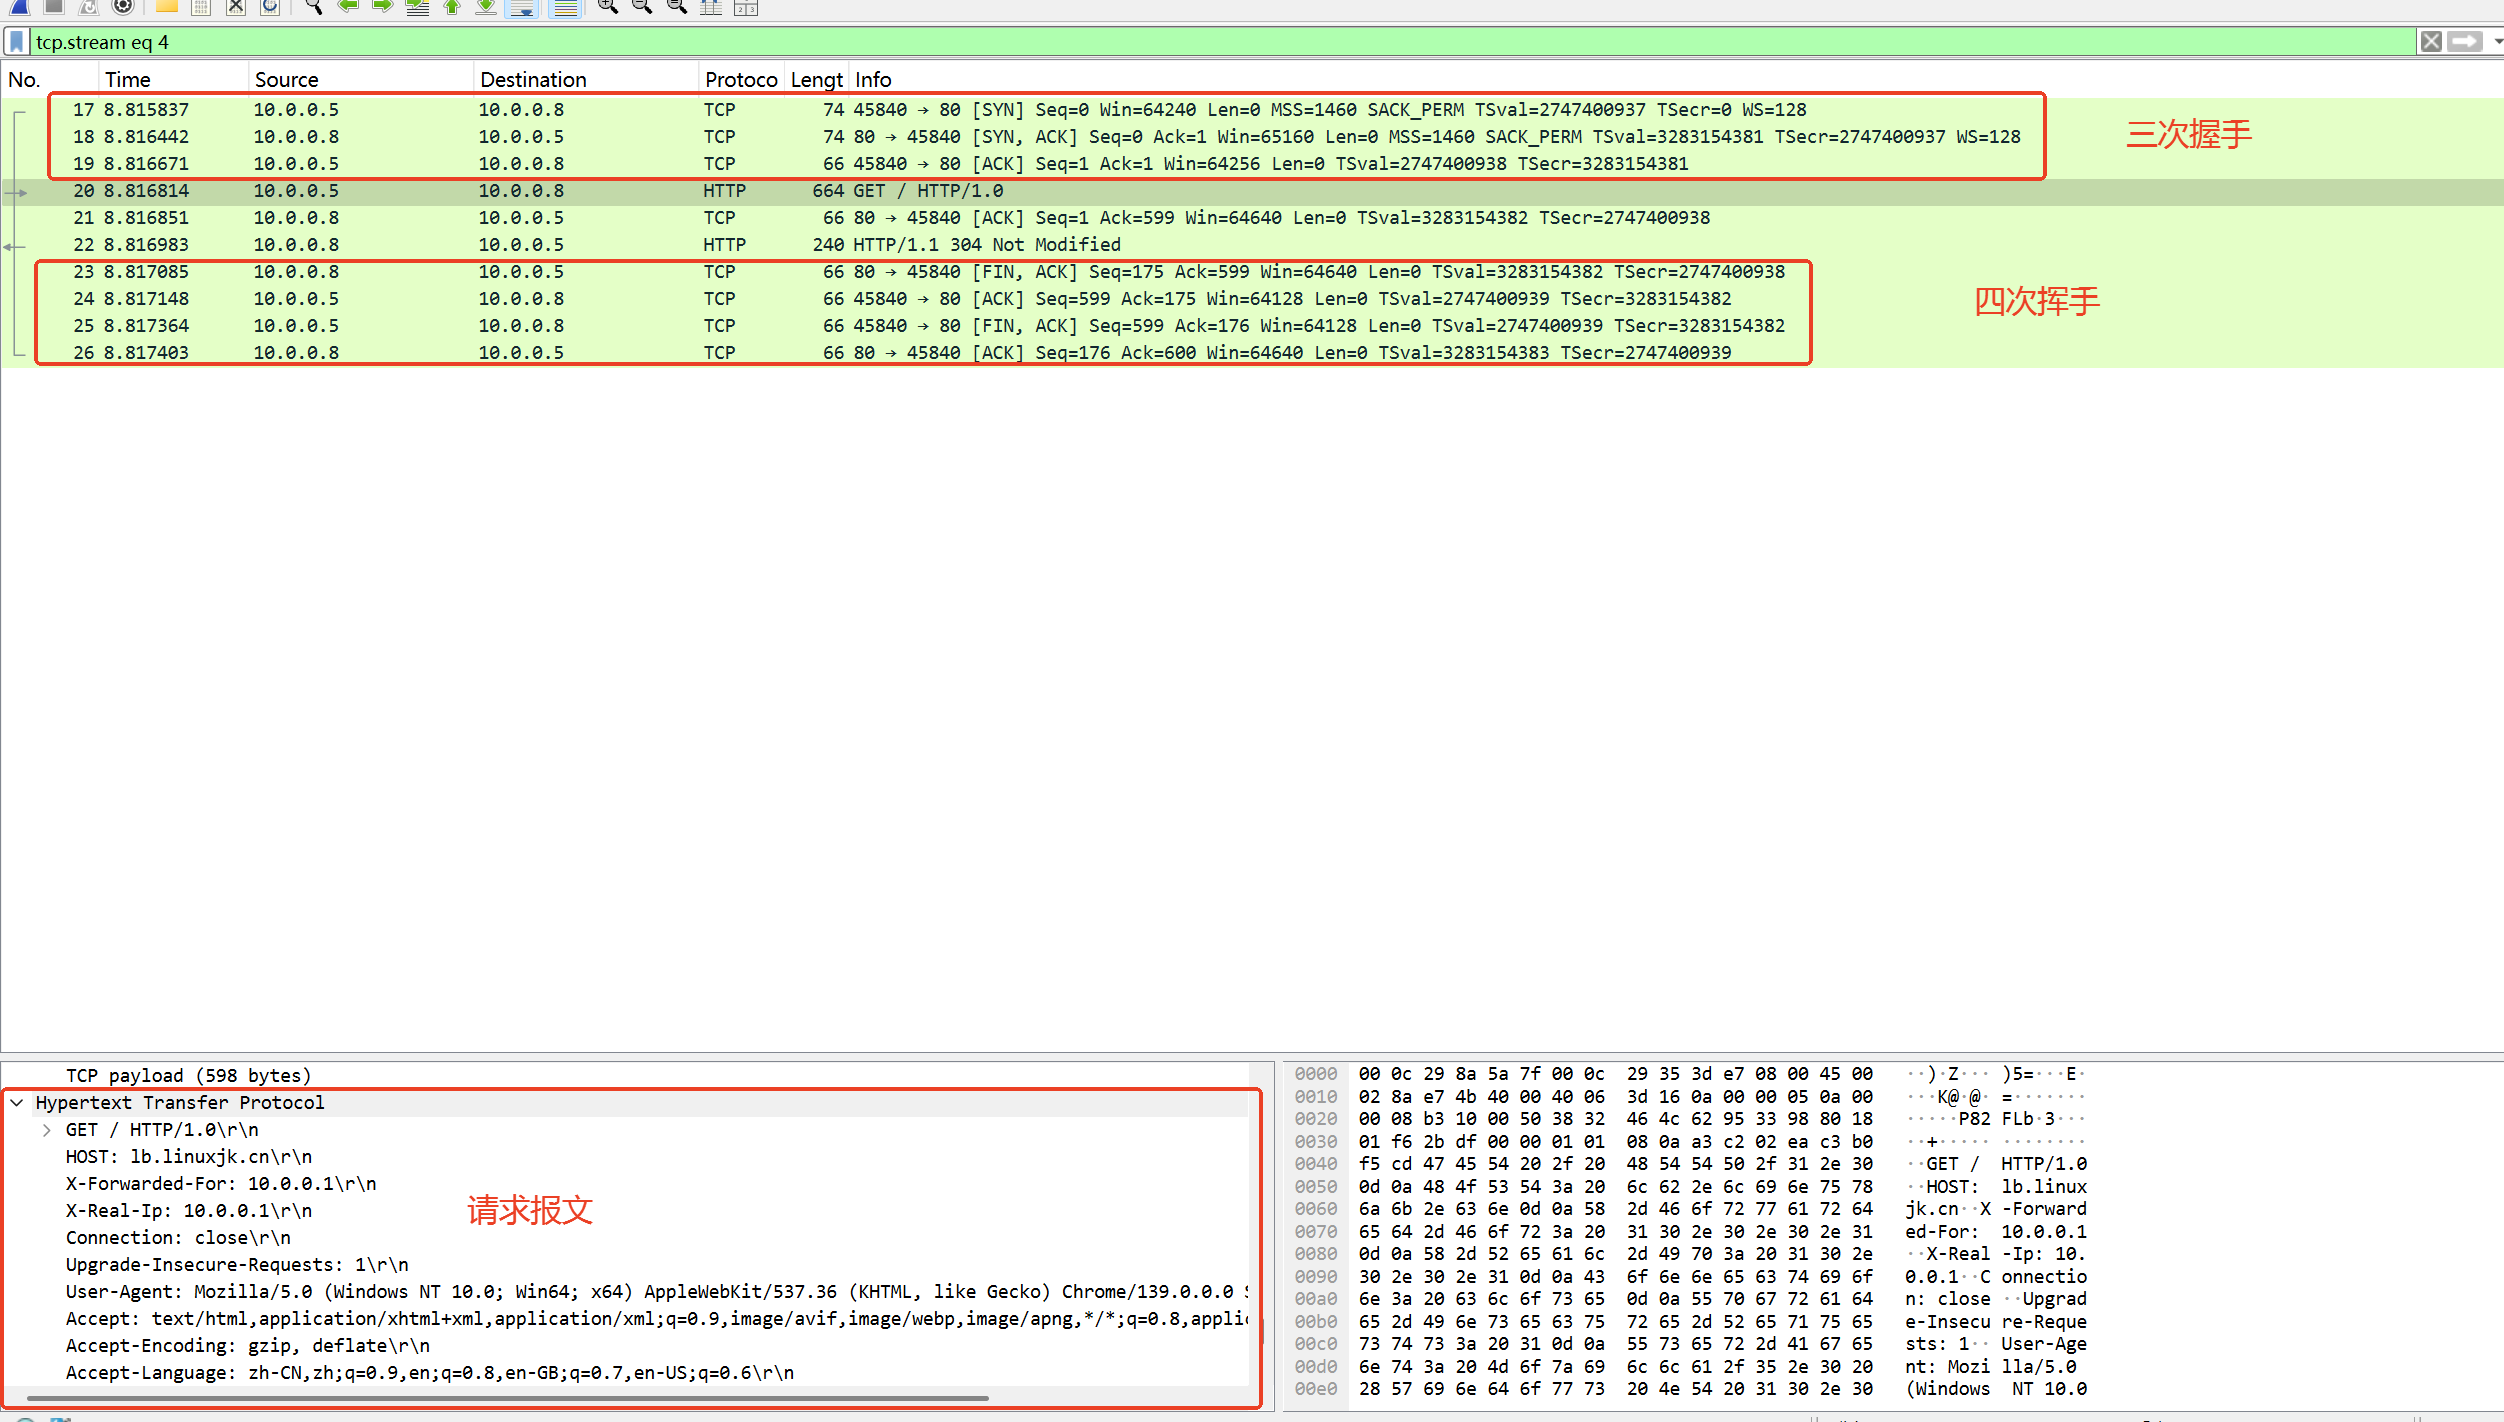
上面在中间未标注的两行分别代表的内容:
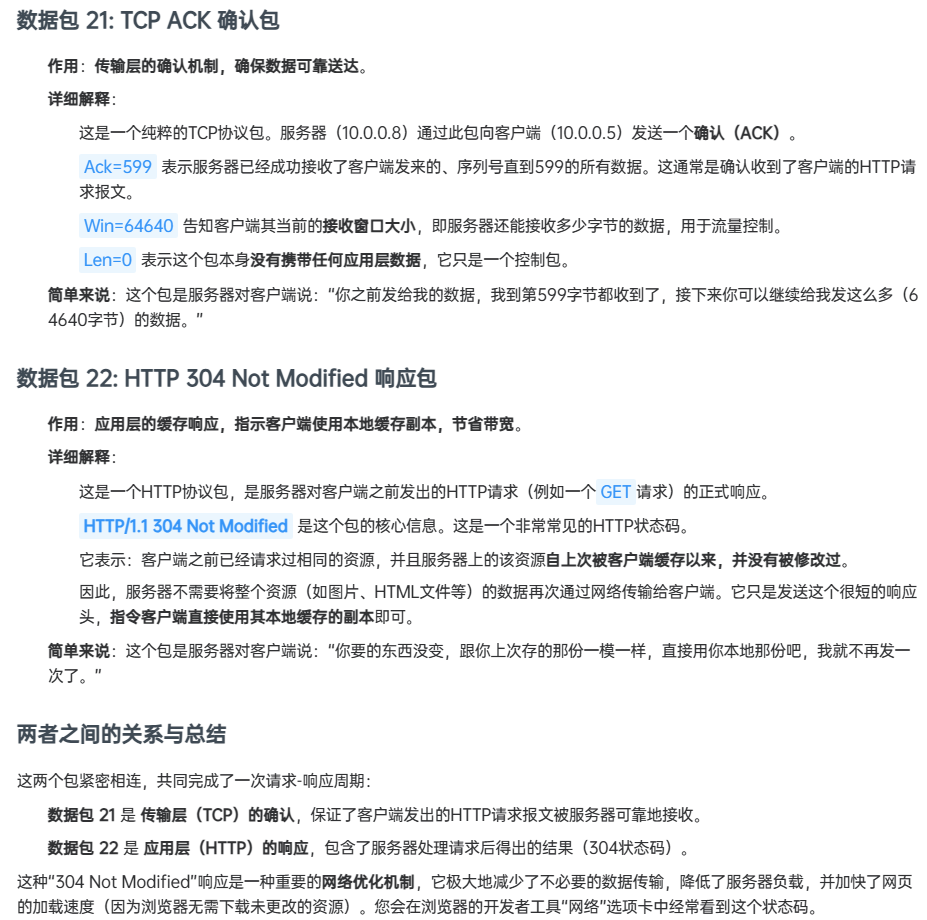
抓包中的304,浏览器缓存,实际服务器没有处理
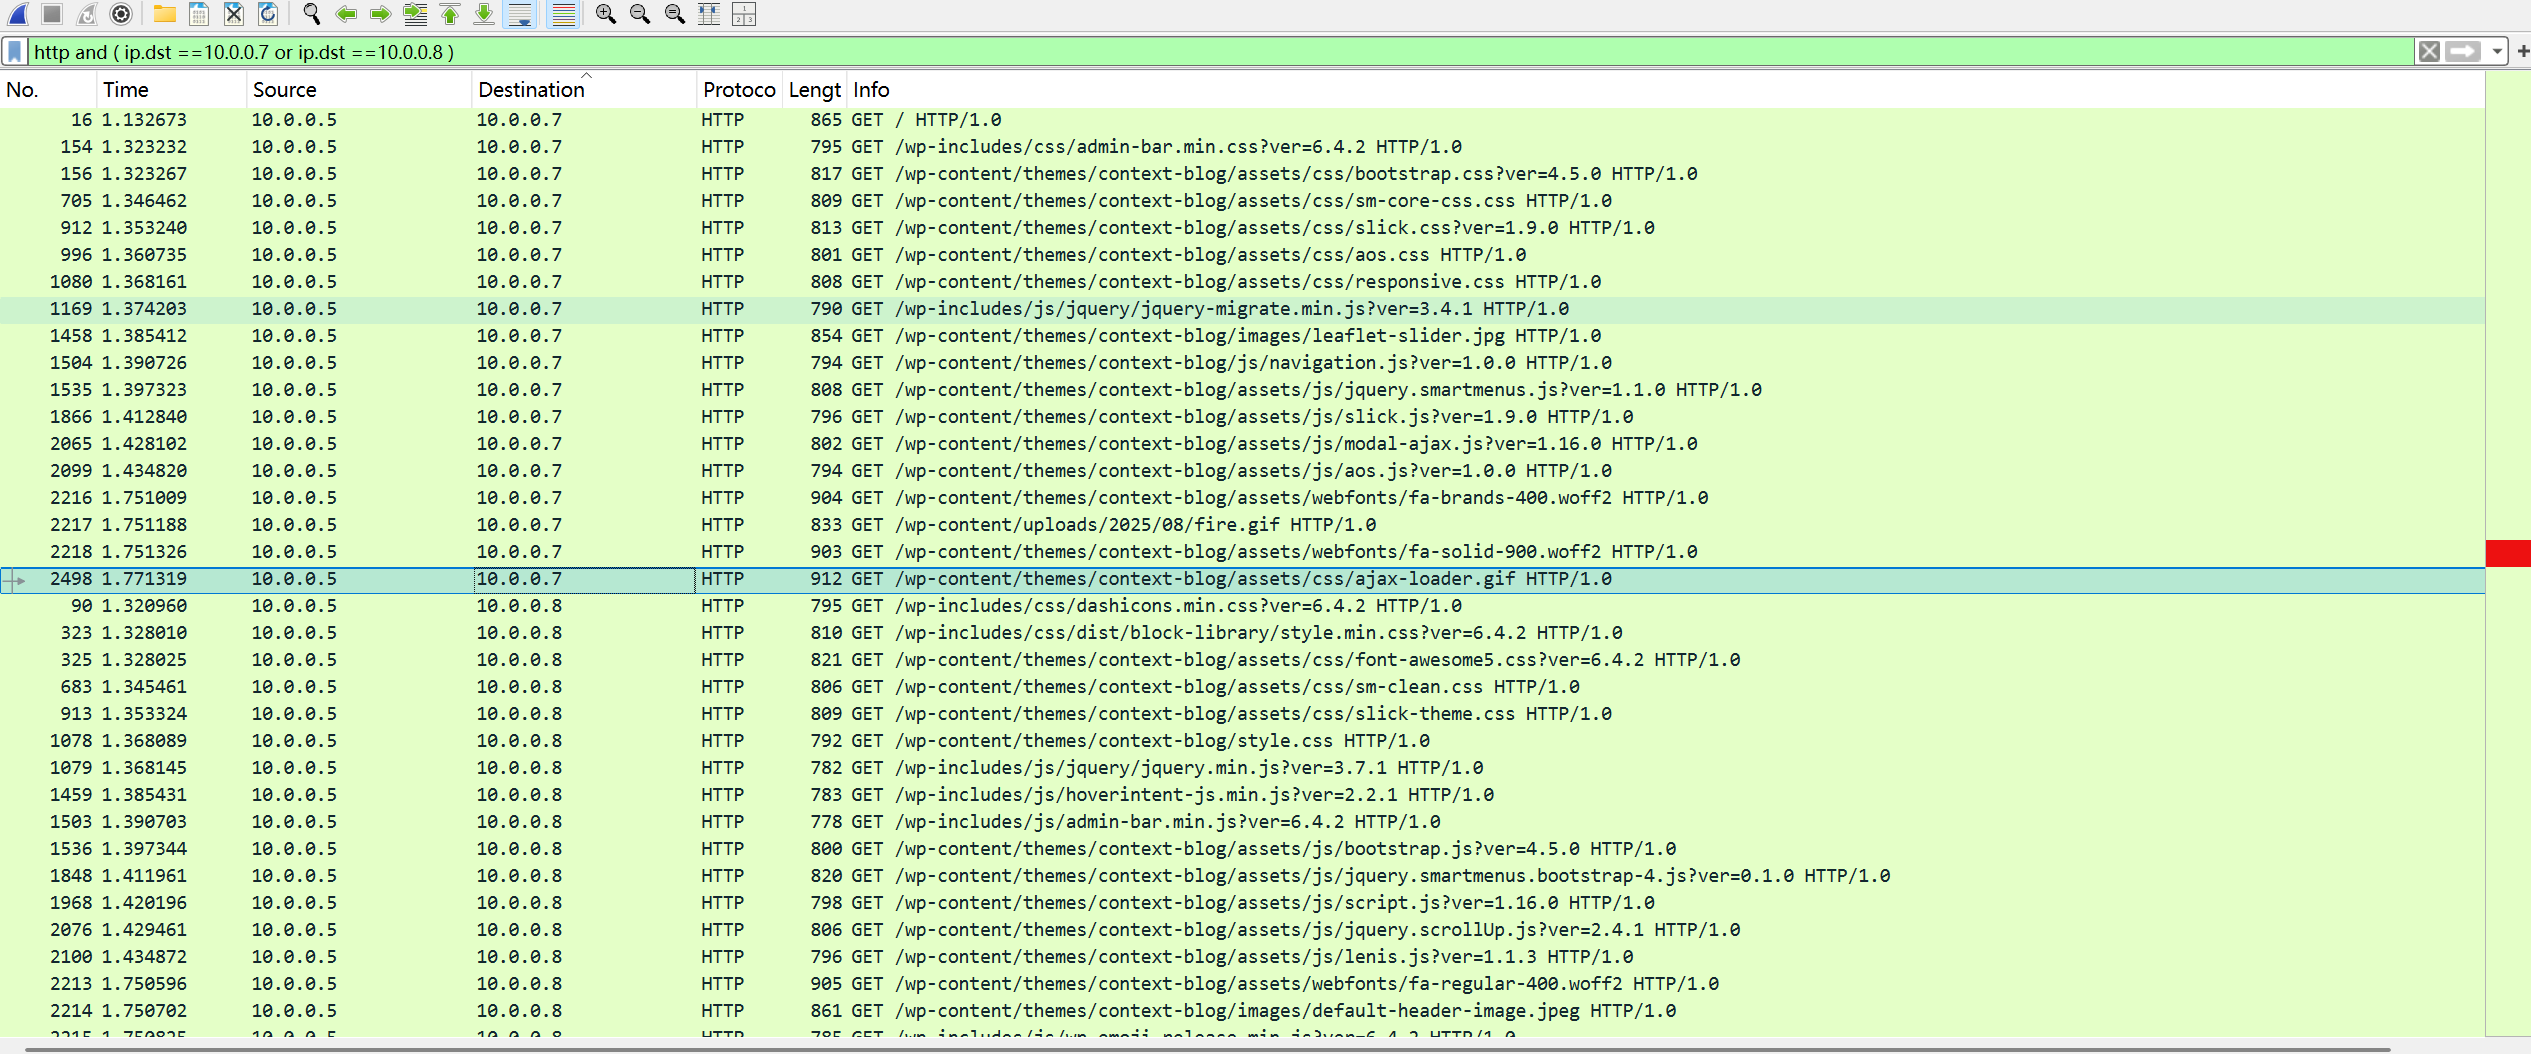
下面的为负载均衡配置wordpress后的抓包过程:
http and ( ip.dst ==10.0.0.7 or ip.dst ==10.0.0.8 )
6) 小结
使用流程:
先准备好web节点.
域名解析到lb上,web服务器的配置文件中server_name保持域名不变即可。
书写lb的配置文件. upstream指令创建分组(负载均衡池),分组名字要唯一. server中的location 中的proxy_pass.
- 部署公网流程及注意事项:
 DNS解析指向负载均衡器公网IP
- Web服务器
server_name设置为域名而非IP - 防火墙只允许负载均衡器访问Web服务器
- 配置了适当的监控和日志记录
- 实施了HTTPS加密
- 测试了故障转移机制
故障排查:
hosts解析
把域名解析到某一台web上.定位:是负载的问题,还是其他问题.
如果仍然有问题,基本是web的问题.lnmp环境排查.
如果没有问题.可能就是负载有问题.
7) 负载均衡指令与模块
2个模块:upstrream与proxy
upstrream指令
proxy_pass指令
proxy_set_header指令.
proxy_pass指令把请求往后抛.:
proxy_pass http: //10.0.0.7:80;
proxy_pass http: //分组名字(upstream)
upstream写在http区域中,不能写在server中
8) 负载均衡多虚拟主机的故障案例.
现象: web节点上有多个虚拟主机,负载均衡在转发数据的时候会有访问异常.访问多个虚拟主机的默认的或第1个.
原因:负载均衡向后端节点发出请求的时候,请求头Host变成了upstream名字,相当于使用ip访问.
解决:通过proxy_set_header指令修改负载到web节点的请求头.
proxy_set_header Host $http_host
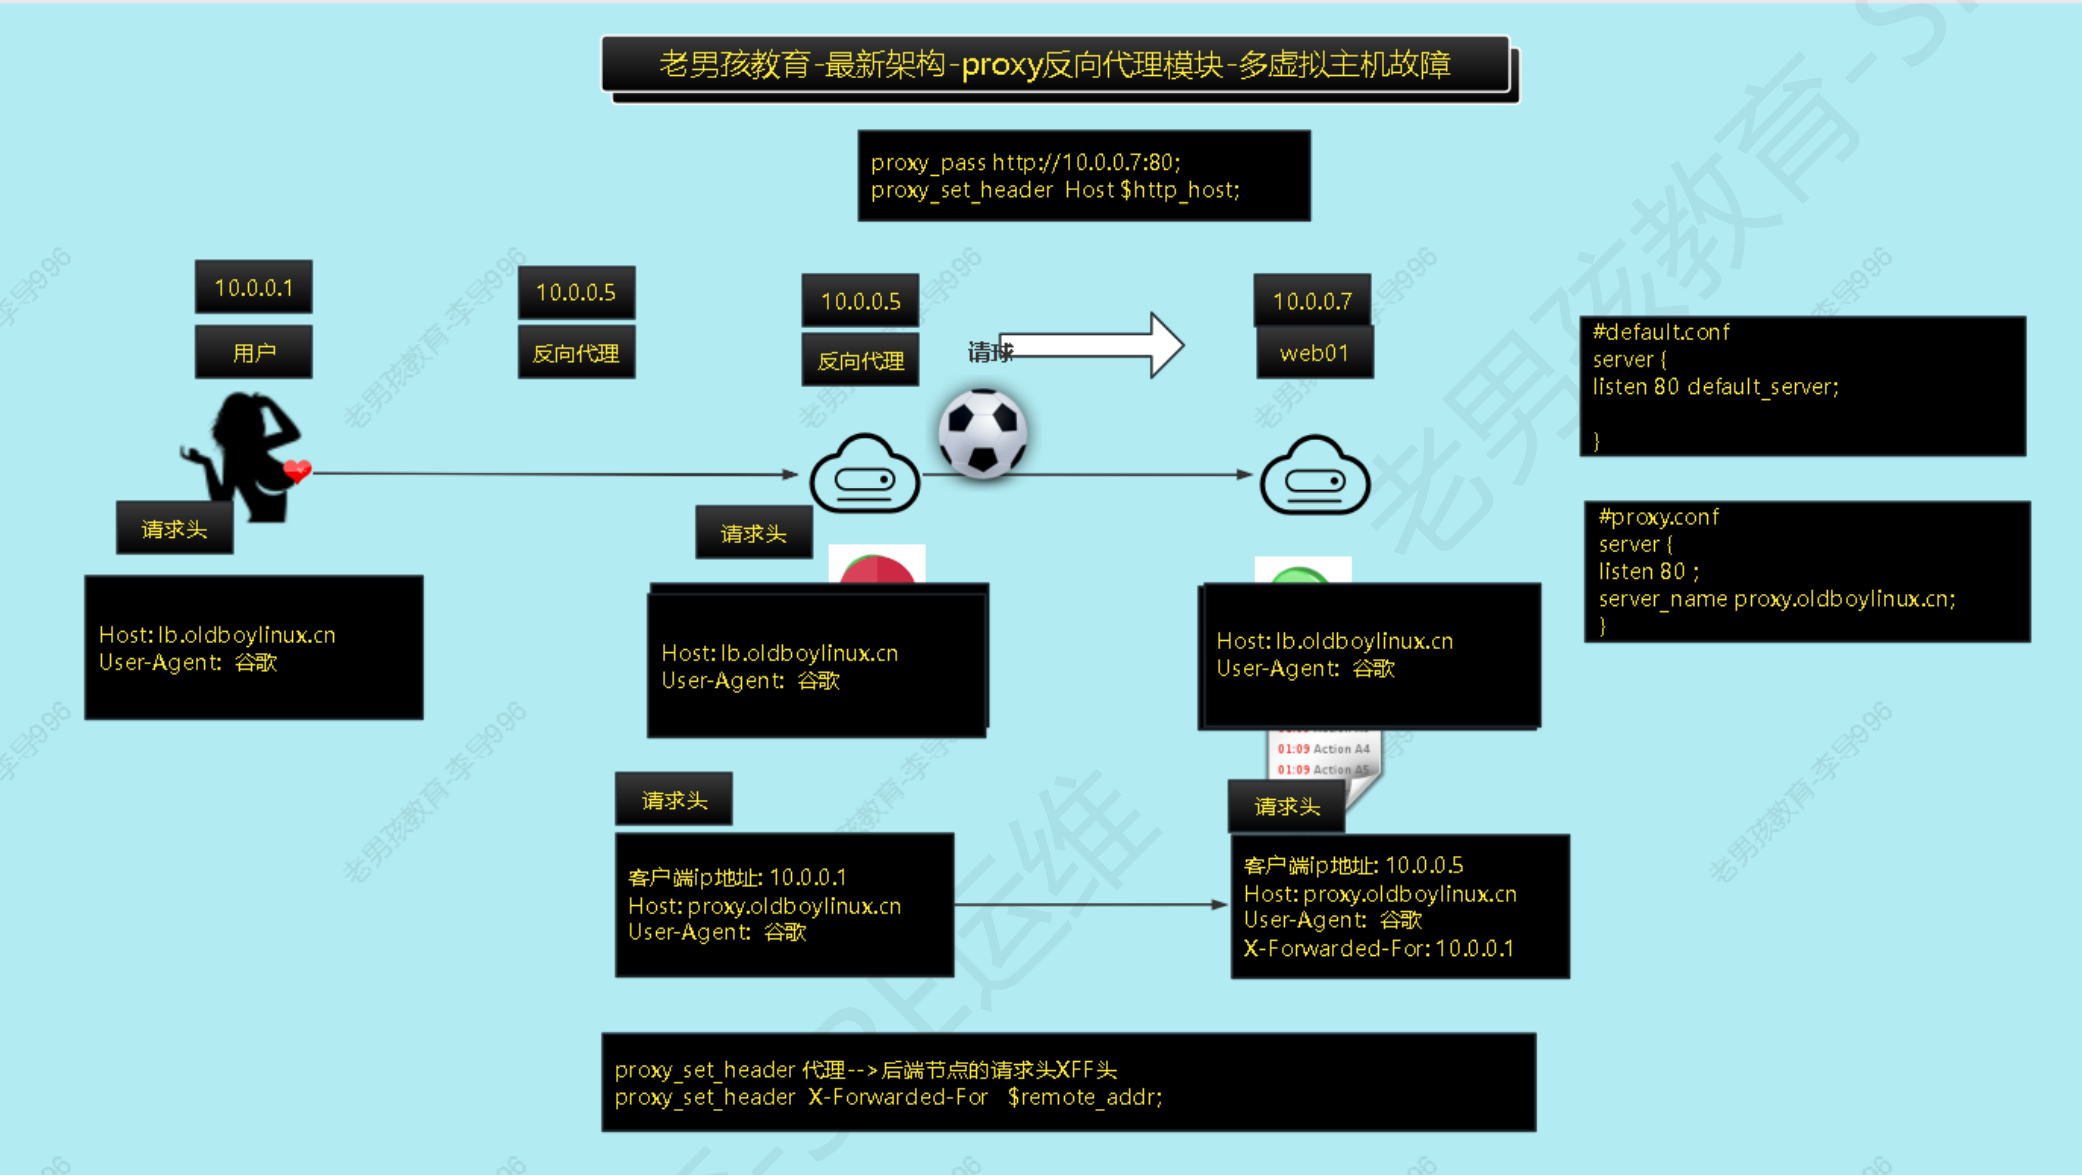
9) 经过负载均衡后web节点如何记录客户端真实ip地址
现象:查看web服务器访问日志只能看到请求来自10.0.0.5,不知道客户真实ip来源
解决: 增加XFF请求头,X-Forwarded-For,记录用户真实的ip地址.
在负载均衡上设置
proxy_set_header X-Forwarded-For $proxy_add_x_forwarded_for;
proxy_set_header X-Real-Ip $remote_addr;
在web服务器角度的客户端是负载机,想要记录用户的ip而不是反向代理的ip。
在代理节点向服务器发送请求时,加一个请求头(XFF头),因为请求头里的内容都可以以变量形式在配置文件中定义并写到访问日志中
客户端真实ip地址存放在XFF头中
X-Forwarded-For :10.0.0.1
web服务器中log_format里面有变量,$http_x_forward_for这个变量的含义就是有负载均衡时客户的真实ip
实现这个功能需要在负载配置文件写
proxy_set_header X-Forwarded-For $proxy_add_x_forwarded_for
proxy_add未来当设置了负载均衡cdn时将负载均衡前每一步的ip记录下来,结果可能是一堆
proxy_set_header X-Real-Ip $remote_addr
记录真实ip,与上面的区别就是这个变量中只能记录一个ip
在nginx中自定义请求头的方法:
自建变量:请求头里的内容变成小写,前面加个$http就可以写在web服务器的location中,如 $http_x_real_ip
1. 使用现有变量
proxy_set_header testhead $http_test_head;
这会将客户端请求中的 testhead 头的值传递给后端服务器。如果客户端请求中没有这个头,那么传递的值会是空。
2. 使用固定值
proxy_set_header testhead “固定值”;
这会向后端传递一个固定的字符串值。
3. 使用其他 Nginx 变量
proxy_set_header testhead $remote_addr;
这会使用客户端的 IP 地址作为值。
4. 组合多个值
proxy_set_header testhead “前缀-$http_user_agent-$remote_addr”;
这可以将多个变量组合成一个值。
关于 $http_ 前缀
在 Nginx 中,$http_ 前缀的变量用于获取客户端请求中的头部值。例如:
$http_user_agent获取 User-Agent 头$http_host获取 Host 头$http_test_head获取 Test-Head 头(如果客户端发送了这个头)
如果不使用 $http_ 前缀,那么需要使用其他 Nginx 变量或自定义变量。
注意事项
头部名称规范:建议使用
X-前缀表示自定义头部,例如X-Test-Head,这是一种常见做法但不是强制要求。变量可用性:确保使用的变量在当前的配置上下文中是可用的。某些变量可能只在特定阶段或特定位置块中可用。
性能考虑:大量使用自定义头部和复杂变量处理可能会对性能产生轻微影响,但在大多数情况下这种影响可以忽略不计。
后端处理:确保后端应用程序能够正确处理这些自定义头部。某些框架或应用程序可能需要额外配置才能接收非标准头部。
调试:如果自定义头部没有按预期工作,可以检查 Nginx 的访问日志和错误日志,或者使用
curl -v命令查看完整的请求和响应头部。
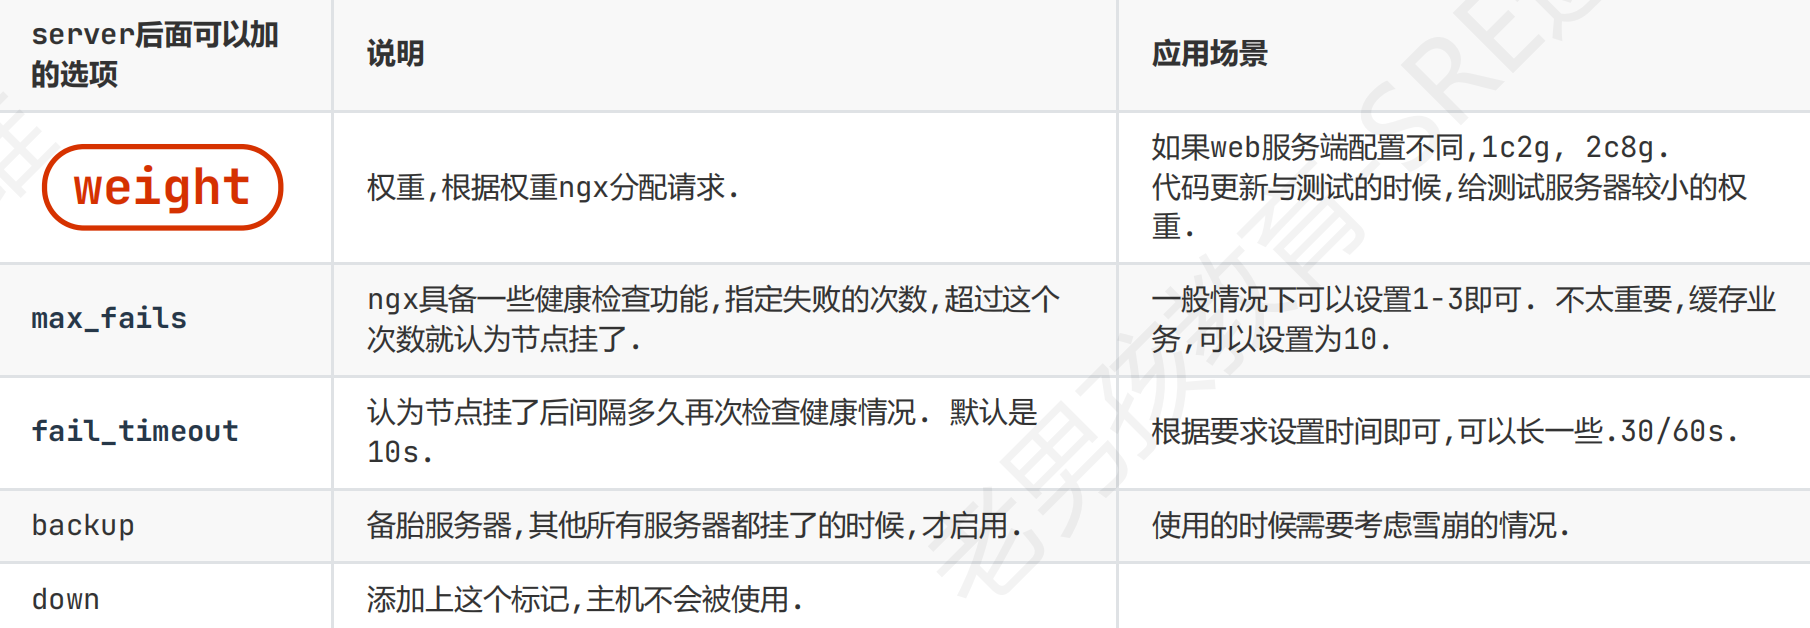
3 负载均衡模块的选项
upstream模块 sever 指令支持的选项
upstream后的名字要唯一.
proxy模块转发(代理)
proxy_pass
proxy_set_header
upstrem pools {
server 10.0.0.7:80  weight=2000 max_fails=3
fail_timeout=10s;
server 10.0.0.8:80  weight=1 max_fails=3
fail_timeout=10s;
server 10.0.0.9:80  weight=1 max_fails=3
fail_timeout=10s;
server 10.0.0.10:80 down weight=1 max_fails=3
fail_timeout=10s;
server 10.0.0.11:80 backup weight=1 max_fails=3
fail_timeout=10s;
}
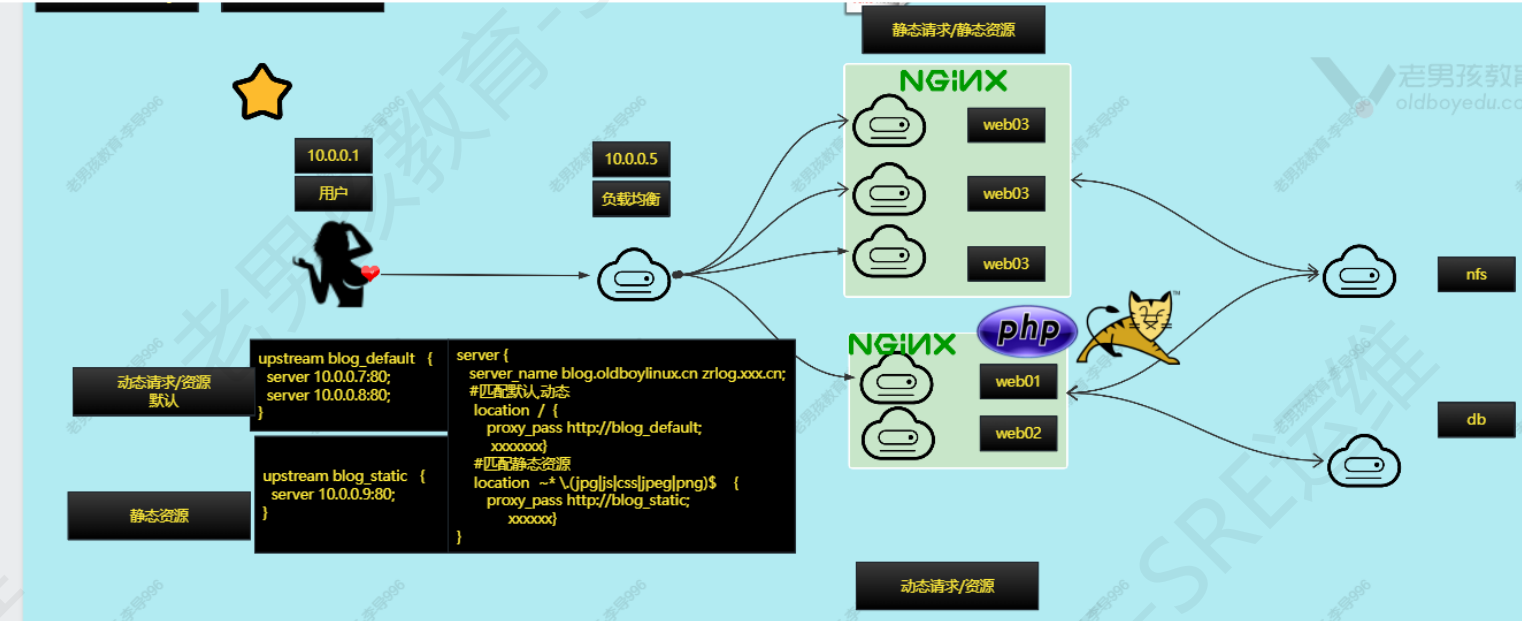
4 网站架构优化方案:动静分离
1) 背景
随着网站访问量增加,我们发现网站的动态资源vs静态资源 (读vs写),哪个访问的多? 读多写少.
我们可以采取动静分离方案:web服务器分为动态服务器(ngx+php),静态服务器(ngx)
2) 架构图
3) 项目准备(机器清单)
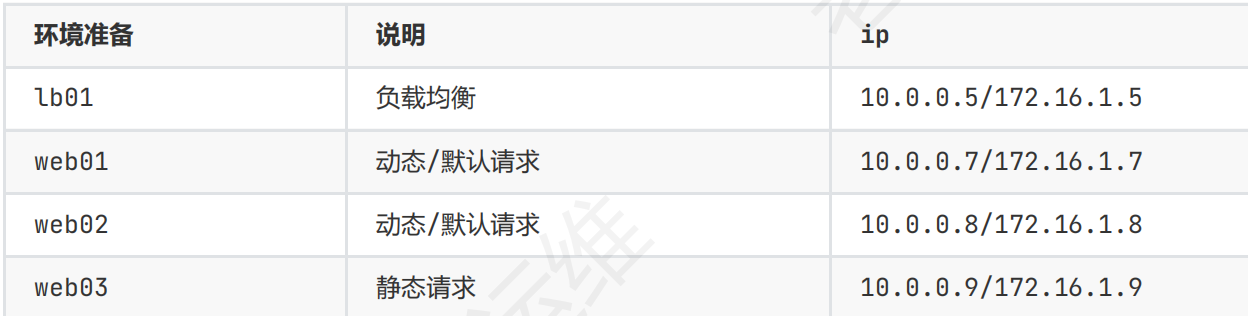
4) 静态组(web03)
部署ngx(配置文件)
www(1999)
nfs挂载
部署代码
[root@web03 ~]# cat /etc/nginx/conf.d/blog.conf
server {
listen 80;
server_name blog.linuxjk.cn;
root /app/code/blog;
error_log /var/log/nginx/blog-error.log notice;
access_log /var/log/nginx/blog-access.log main;
location / {
    index index.html;
}
}5)默认组(动态)
保留现有的环境
ngx+php
nfs挂载
6)接入负载均衡(配置lb01)
[root@lb01 ~]# cat /etc/nginx/conf.d/blog.linuxjk.cn.conf
upstream blog_pools {
server 10.0.0.7:80;
server 10.0.0.8:80;
}
upstream blog_static {
server 10.0.0.9:80;
}
server {
listen 80;
server_name blog.linuxjk.cn;
error_log /var/log/nginx/blog.linuxjk.cn_error.log notice;
access_log /var/log/nginx/blog.linuxjk.cn_access.log main;
location  / {
proxy_pass http://blog_pools;
proxy_set_header Host  $http_host;
proxy_set_header X-Forwarded-For $proxy_add_x_forwarded_for;
proxy_set_header X-Real-Ip $remote_addr;
}
location ~* \.(gif|jpg|jpeg|bmp|png|js|css|html)$ {
proxy_pass http://blog_static;
proxy_set_header Host  $http_host;
proxy_set_header X-Forwarded-For $proxy_add_x_forwarded_for;
proxy_set_header X-Real-Ip  $remote_addr;
}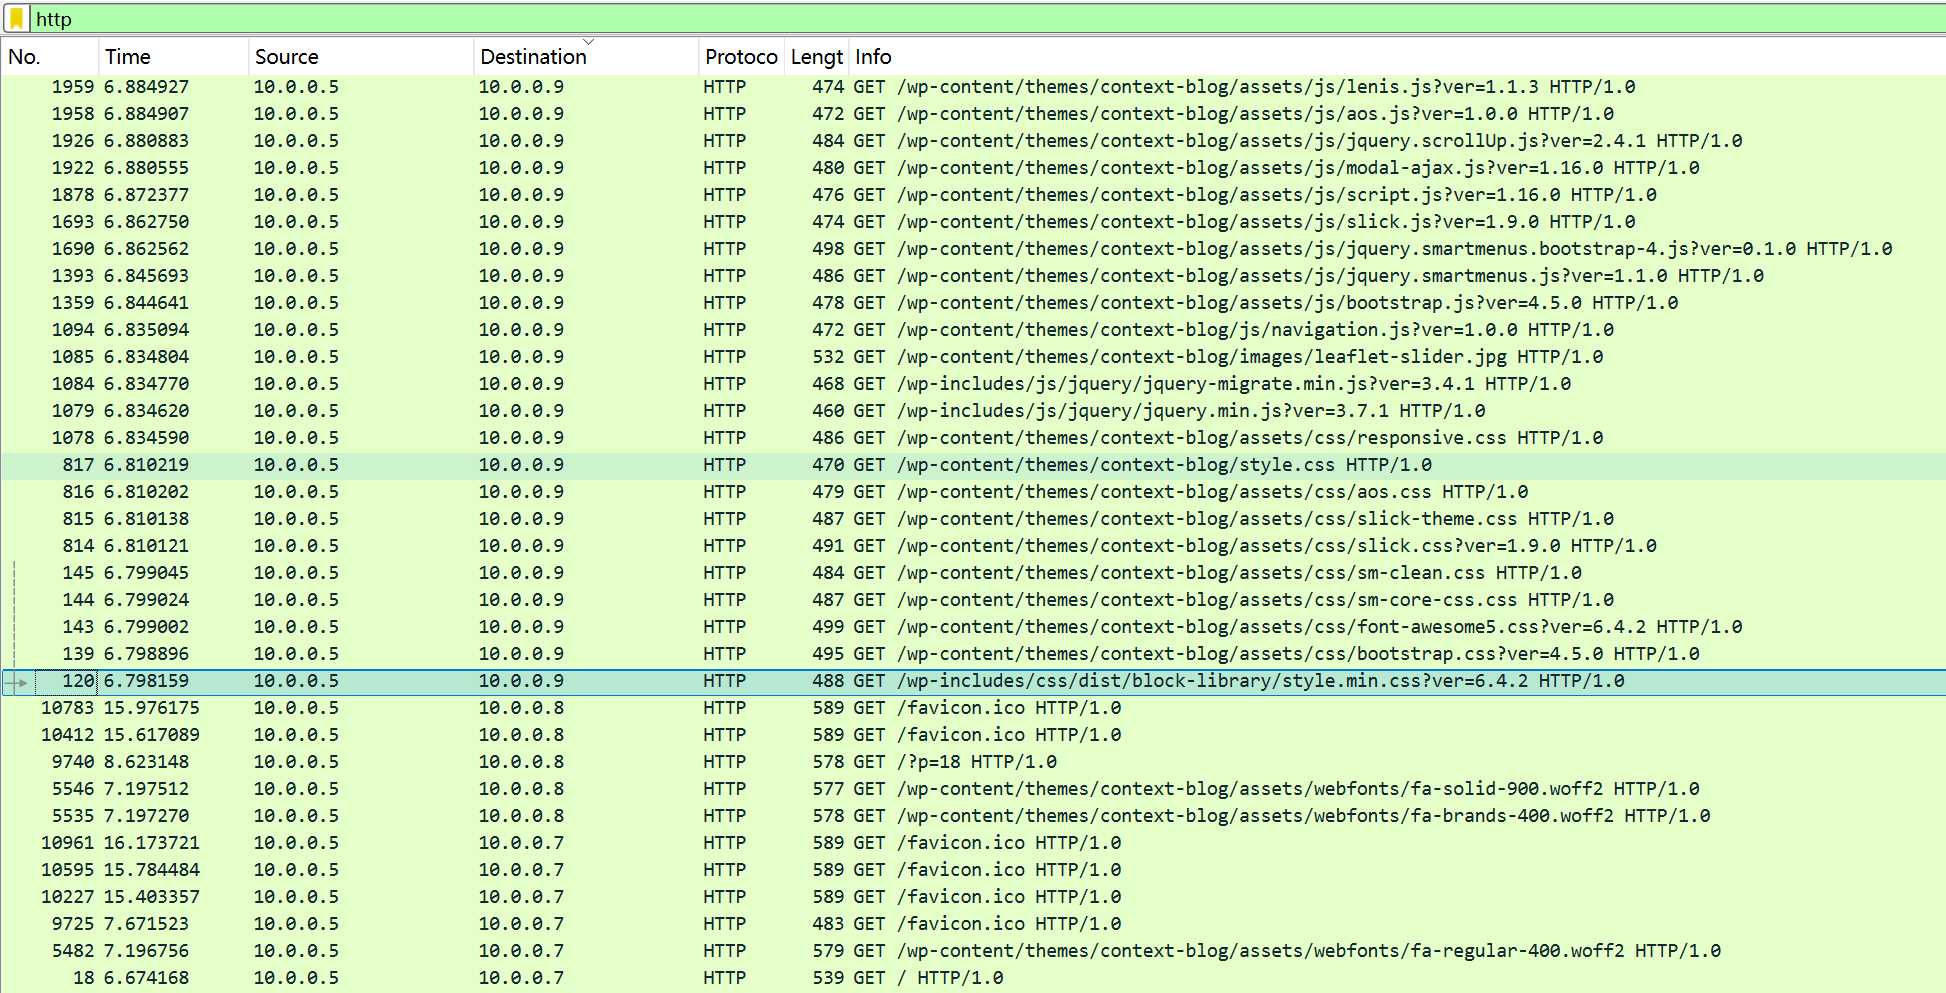
}7)测试与检查(抓包)
10.0.0.5 blog.oldboylinux.cn
http and ip.dst >= 10.0.0.7
5 网站架构优化/整改: 会话保持
1) 概述
用户的请求,登录的请求,经过负载均衡后落到后面的web服务器上,登录的状态/信息也会记录在web服务器上,就会导致不通的web服务器上,登录状态不统一,造成用户频繁需要登录.
会话:用户的登录状态,购物车状态
目标: 如何实现会话保持/会话共享.
2) 预备姿势: cookie vs session
开发中核心概念,知晓cookie和sesion含义,大致区别即可.

浏览器F12查看cookie信息
3) 会话保持方案(本次使用cookie+session的phpmyadmin)
登录状态写入cookie中.(wordpress)
cookie+session方式 + 统一存放session服务器(会话保持服务器redis) 类似于使用nfs做共享存储.
通过认证服务实现Oauth 2.0(使用token(令牌)方式)
ip_hash方法(讲解负载均衡轮询算法)
通过redis实现phpmyadmin会话共享.
部署:phpMyAdmin,web页面版本的数据库管理工具. SQL语句. PHP代码.
只需要ngx+php,不需要创建库,添加用户(权限大).
搭建phpmyadmin实现会话共享流程
- db: phpmyadmin用户,权限大一些(所有库的所有表).
- web1: 部署代码,传输到web2上
- db: 准备redis环境(db01)
- web1/2:原有的9000端口给wordpress(cookie认证,不需要session保持)
- 修改php配置(9001)redis会话保持端口(session.conf)
- php添加redis模块
- lb:接入负载均衡.访问与测试
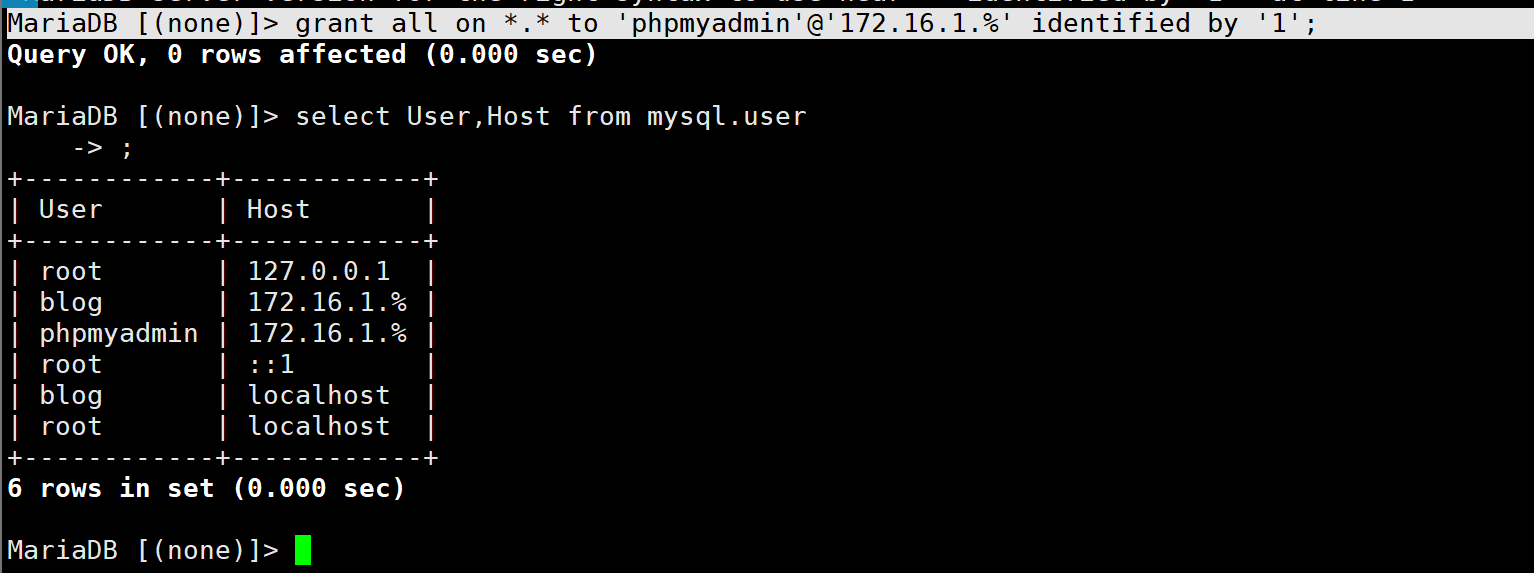
a) db准备phpmyadmin的用户
grant all on *.* to 'phpmyadmin'@'172.16.1.%' identified by '1';
b) web服务器书写phpmyadmin站点的nginx配置文件并部署代码
ngx+php环境
#ngx配置文件
[root@web01 ~]# cat /etc/nginx/conf.d/phpmyadmin.linuxjk.cn.conf
server {
listen 80;
server_name phpmyadmin.linuxjk.cn;
root /app/code/phpmyadmin;
error_log /var/log/nginx/phpmyadmin_error.log notice;
access_log /var/log/nginx/phpmyadmin_access.log main;
location / {
index index.php;
}
location ~ \.php$ {
fastcgi_pass 127.0.0.1:9001;
fastcgi_index index.php;
fastcgi_param SCRIPT_FILENAME $document_root$fastcgi_script_name;
include fastcgi_params;
}
}
部署代码(将phpmydamin代码放到/app/code/phpmyadmin)
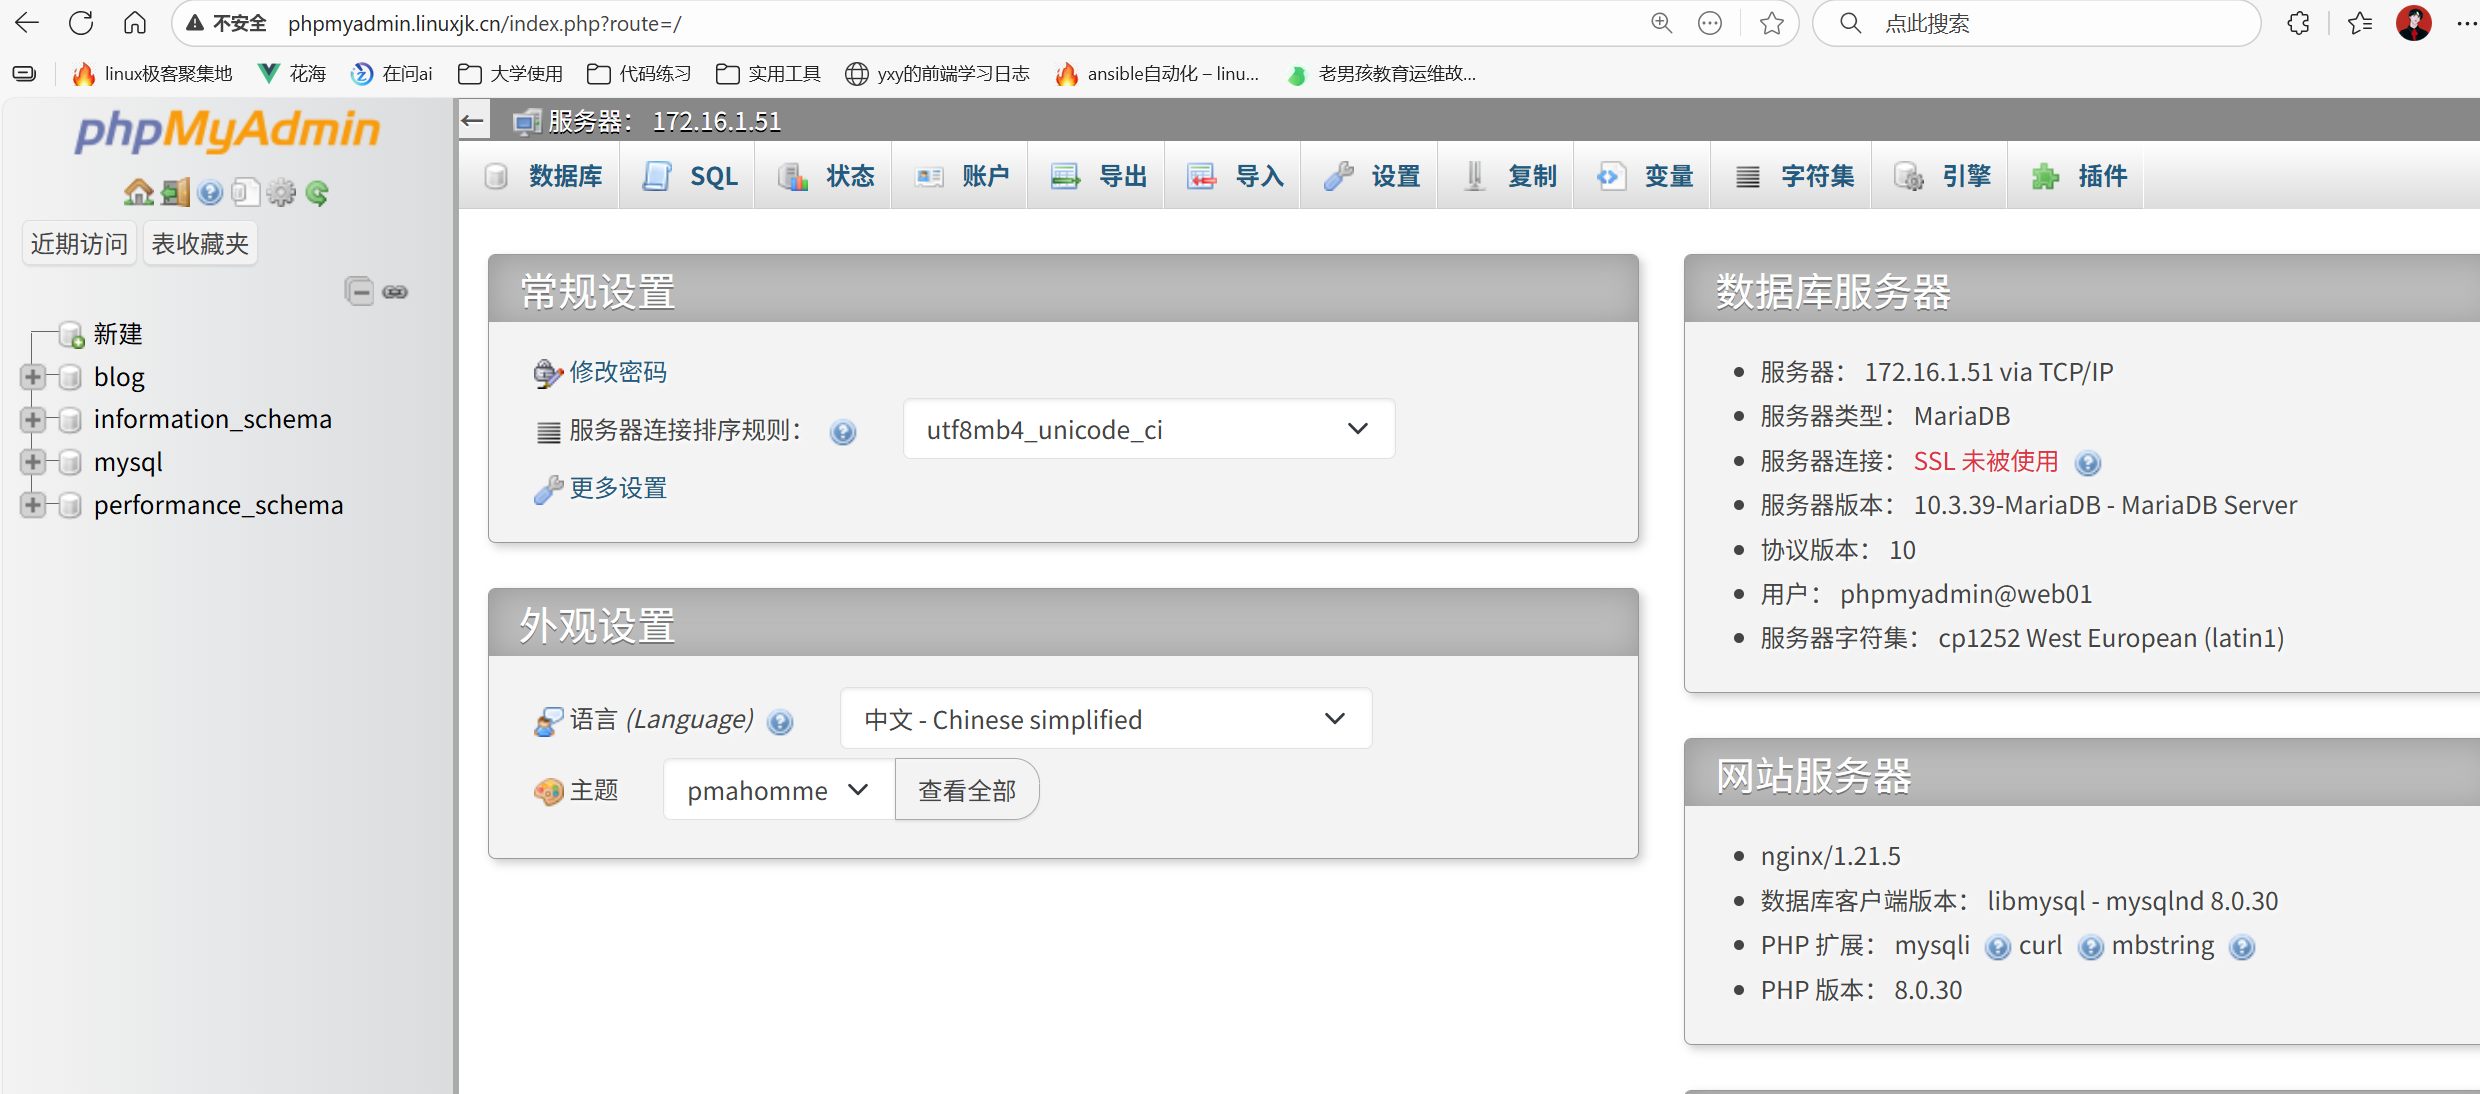
解析与访问
手动创建连接数据库的配置文件
#1.创建phpmyadmin连接数据的文件
cp config.sample.inc.php config.inc.php
#2.修改phpmyadmin连接指定的数据库主机(这里不用写数据库密码,未来登陆手动输入)
grep -wn host config.inc.php
30:$cfg['Servers'][$i]['host'] = '172.16.1.51';
c) 部署web02代码
1 参考上面步骤
d) 接入负载
[root@lb01 ~]# cat /etc/nginx/phpmyadmin.linuxjk.cn.conf
upstream phpmyadin_pools{
server 10.0.0.7;
server 10.0.0.8;
}
server{
listen 80;
server_name phpmyadmin.linuxjk.cn;
error_log /var/log/phpmyadmin_error.log notice;
access_log /var/log/phpmyadmin_access.log main;
location / {
index index.php;
}
location ~ \.php$ {
proxy_pass http://phpmyadin_pools;
proxy_set_header Host $http_host;
proxy_set_header X-Forwarded-For $proxy_add_x_forwarded_for;
proxy_set_header X-Real-Ip $$remote_addr;
}
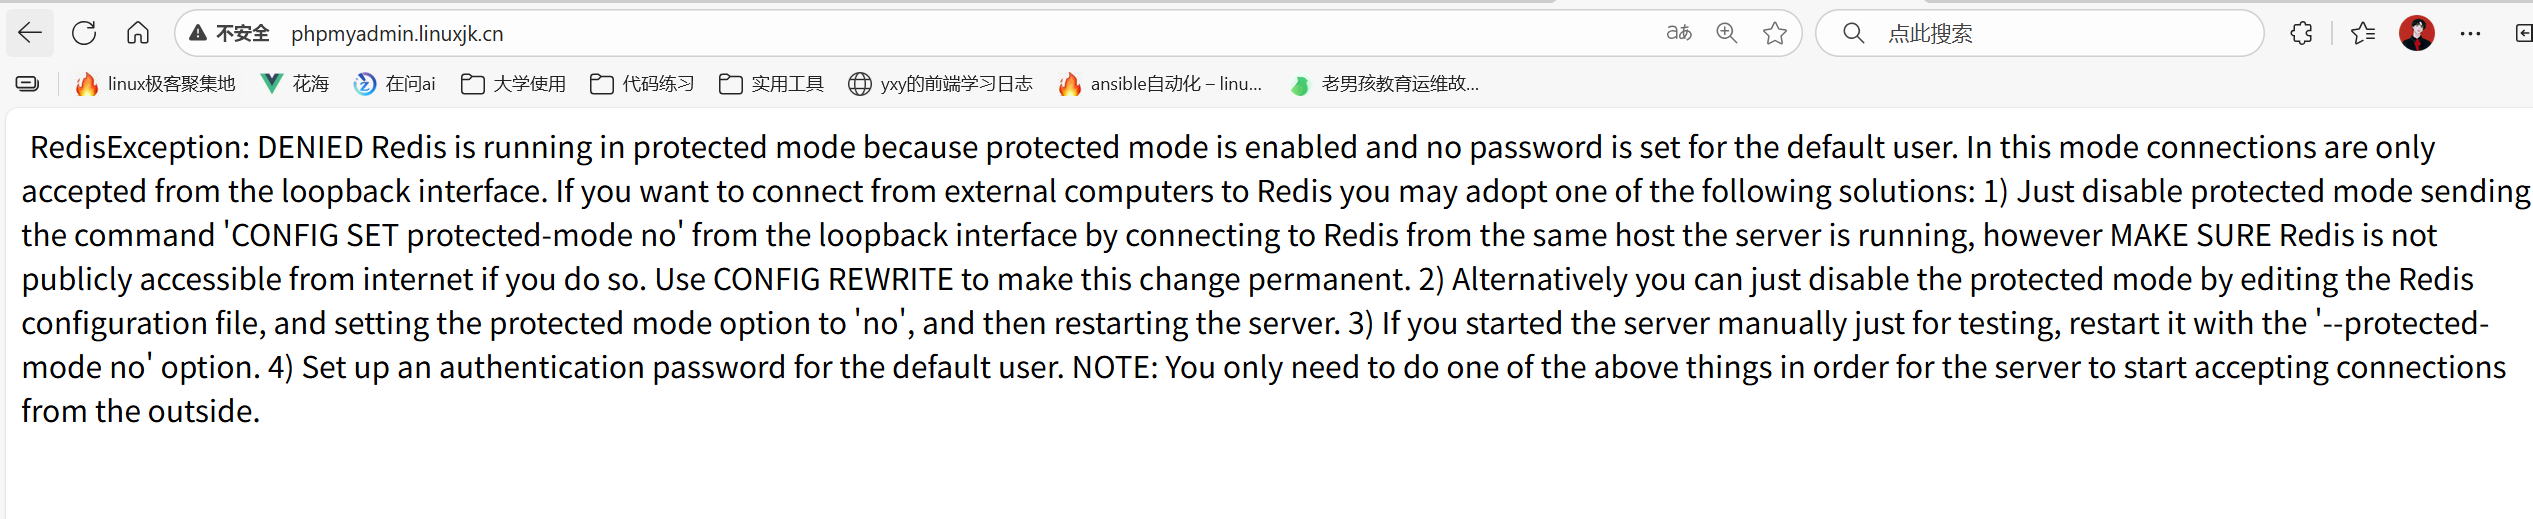
}注意此刻访问:负载均衡,phpmyadmin站点无法正常登录的
显示phpmyadmin.linuxjk.cn 拒绝连接,因为没有php-redis模块处理php-fpm.d/session.conf
e) 部署redis服务(db01)
yum install -y redis
修改/etc/redis.conf
bind 127.0.0.1 172.16.1.51 #172.16.1.51 本地网卡的ip
systemctl enable --now redis
ss -lntup |grep redis
d) web服务器安装php-redis插件
麒麟系统sp2-sp3
#下载php软件用于安装 php插件包管理器
wget http://pear.php.net/go-pear.phar -O go-pear.php
php go-pear.php #提示的时候直接按回车即可
#通过pecl安装php插件
pecl install redis #有提示按回车
#创建1个php的子配置文件,写入新添加的模块
cat > /etc/php.d/31-redis.ini <<EOF
[redis]
extension=redis.so
EOF
#进行检查
php -m |grep redis
e)书写php的session配置文件指定会话存放位置(web1/2)
创建新的子配置文件
通知php指定会话保持位置:redis tcp: //172.16.1.51:6379
从/etc/php-fpm.d/www.conf的基础上进行修改,修改以下几行
php_value[session.save_handler] = redis   #原有的方式是file
php_value[session.save_path]    =tcp://172.16.1.51:6379
#php的session配置文件
vim /etc/php-fpm.d/session.conf
[session]
user = www
group = www
listen = 127.0.0.1:9001
listen.acl_users = apache,nginx
listen.allowed_clients = 127.0.0.1
pm = dynamic
pm.max_children = 50
pm.start_servers = 5
pm.min_spare_servers = 5
pm.max_spare_servers = 35
slowlog = /var/log/php-fpm/www-slow.log
php_admin_value[error_log] = /var/log/php-fpm/www-error.log
php_admin_flag[log_errors] = on
php_value[session.save_handler] = redis
php_value[session.save_path] = tcp://172.16.1.51.6379
php_value[soap.wsdl_cache_dir] = /var/lib/php/wsdlcache
#修改php session目录权限
chown -R www.www /var/lib/php/session
最终测试
通过负载10.0.0.5进行登录,成功.
redis中可以命令行查看会话信息
redis-cli 进入redis中
keys * 查看所有键值信息(危险,生产环境不要用.)
del 加上双引号内容可以删除对应的session信息,查看页面刷新后变为未登录状态
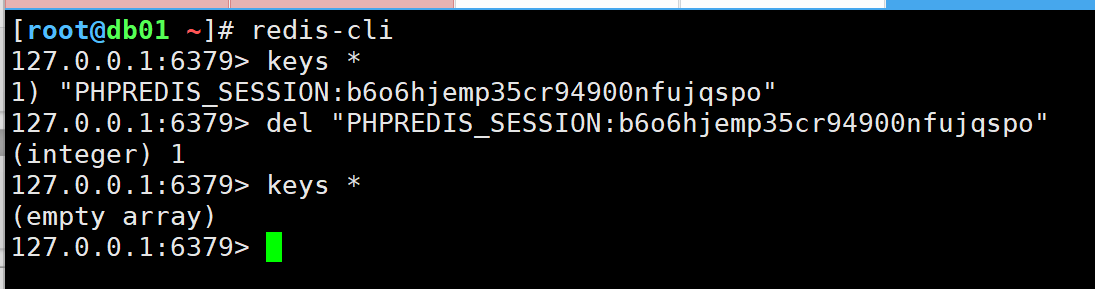
redis远程连接故障:没有配置禁用保护模式
[root@db01 ~]#egrep 'bind|protected-mode no' /etc/redis.conf | grep -v '^#' bind 127.0.0.1 172.16.1.51
protected-mode no
4) 小结
需要理解,说出来session,cookie区别.说出来会话共享的方案.(redis)
redis负载均衡轮询算法:ip_hash.
案例通过部署phpmyadmin实现会话共享.
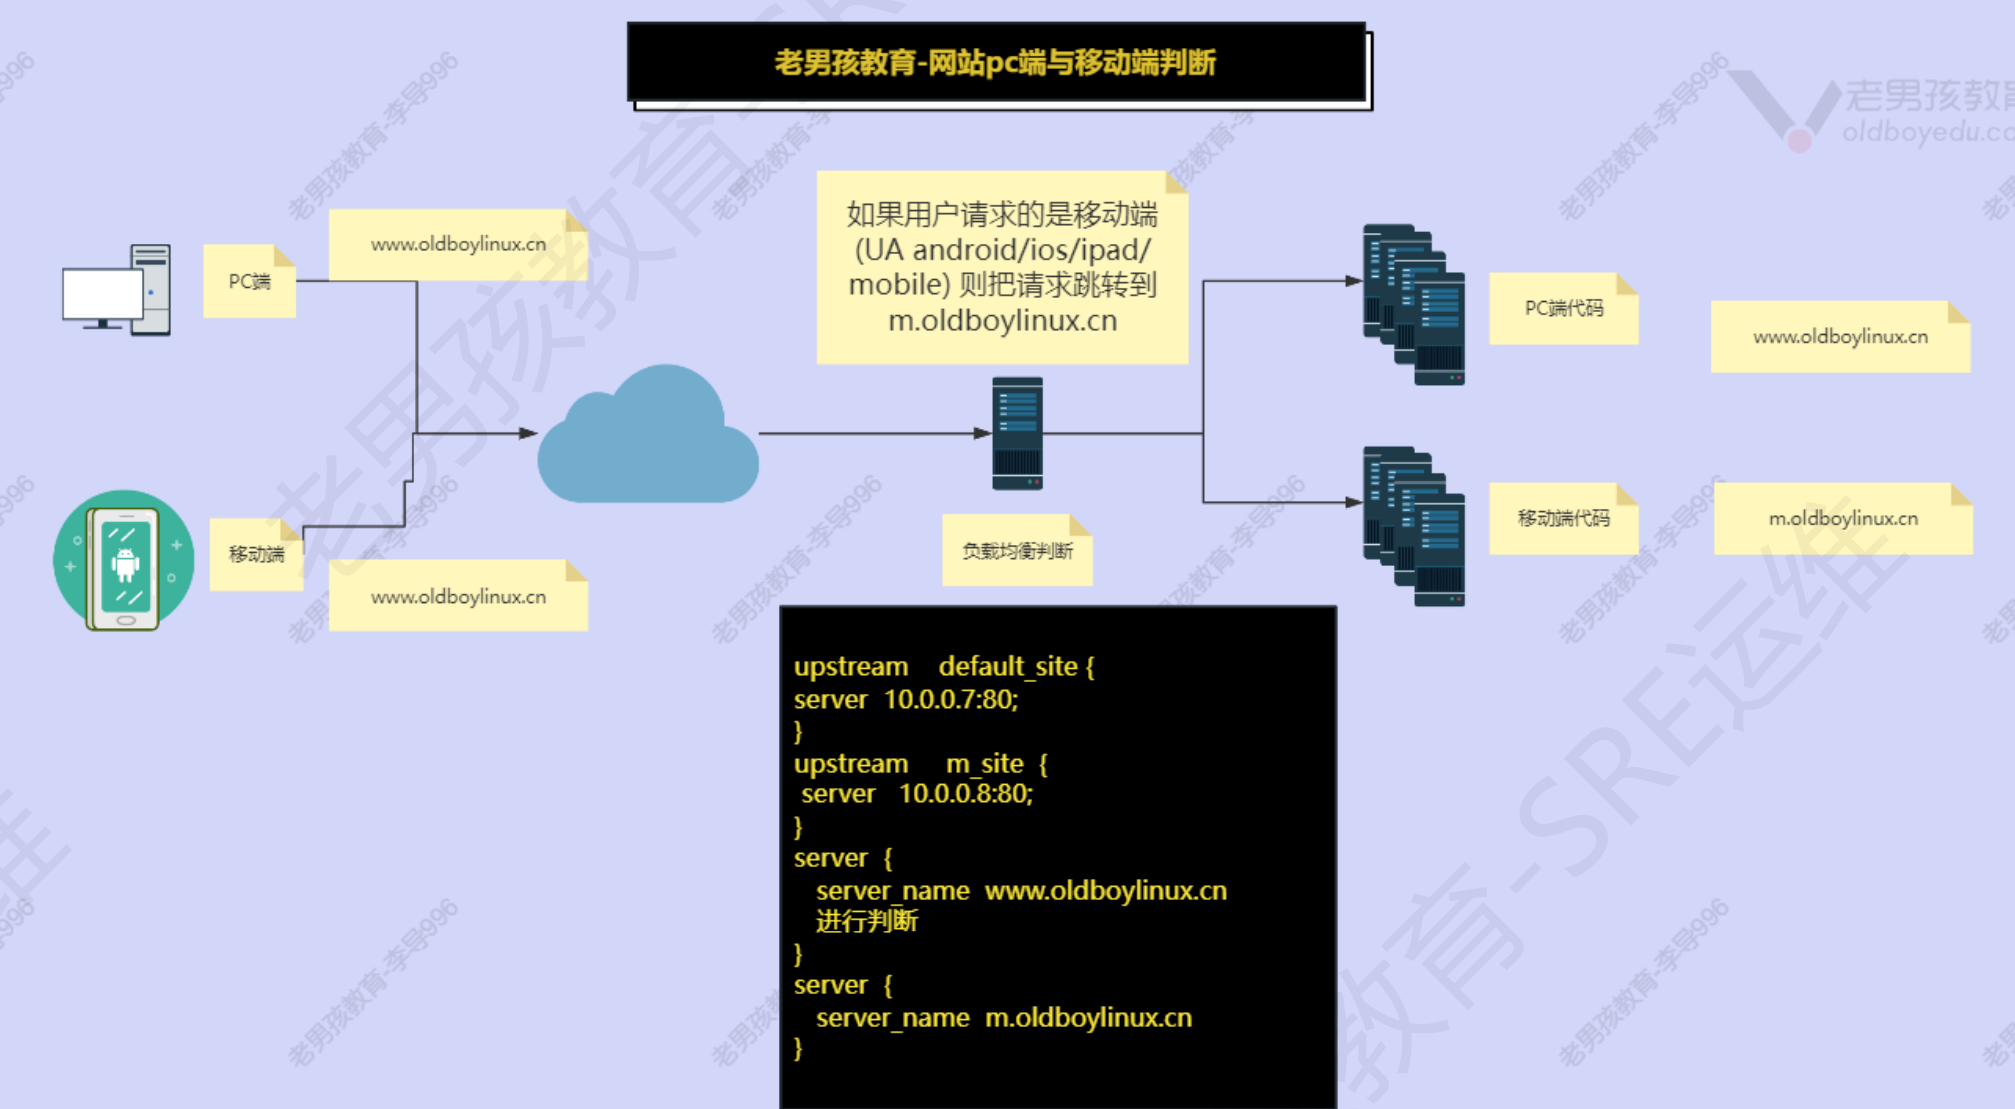
6.网站架构优化/设计: 根据客户端类型 进行转发
1) 背景: 同一个域名访问网站,如果是移动端则跳转到移动端站点(不同的域名).如果不是默认访问pc页面.
网站一份代码不变的情况下怎么同时支持pc端和移动端
开发能改代码最好
运维处理:两个站点,准备两份代码,一个负责pc端,一个负责移动端
在负载均衡中做判断,默认pc,ua中有符合移动端就访问移动端站点
可以在静态服务器的location中加入expire 1d实现浏览器缓存功能
2) 架构设计:
3) 实施(部署)
web服务器:web1作为pc端默认访问的站点testlinuxjk.cn,web2作为移动端访问时跳转的网址m.testlinuxjk.cn
[root@web01 ~]# cat /etc/nginx/conf.d/testlinuxjk.cn.conf
server {
listen 80;
#web1:
server_name www.tetlinuxjk.cn testlinuxjk.cn; root /app/code/pc; #web2 server_name m.testlinuxjk.cn; root /app/code/mobile; #error_log #access_log location / { index index.html;} }lb01服务器做代理,if判断UA头是否符合移动端,是移动端即跳转到web2
[root@lb01 ~]# cat /etc/nginx/conf.d/testlinuxjk.cn.conf
upstream pc_pools {
  server 10.0.0.7;
}
upstream mobile_pools {
  server 10.0.0.8;
}
server {
listen 80;
server_name www.testlinuxjk.cn testlinuxjk.cn;
#error_log
#access_log
location / {
#这个判断可以写在默认站点(pc端)的 location中或server中
if ( $http_user_agent ~* "mobile|Android" ) {
return 302 http://m.testlinuxjk.cn$request_uri;
}
proxy_pass http://pc_pools;
proxy_set_header Host $http_host;
proxy_set_header X-Forwarded-For $proxy_add_x_forwarded_for;
proxy_set_header X-Real-Ip $remote_addr;
}
}
server {
listen 80;
server_name m.testlinuxjk.cn;
#error_log
#access_log
location / {
proxy_pass http://mobile_pools;
proxy_set_header Host $http_host;
proxy_set_header X-Forwarded-For $proxy_add_x_forwarded_for;
proxy_set_header X-Real-Ip $remote_addr;
}
}
做好hosts解析
-A修改请求头的UA 类似于 -H User-Agent:mobile
-L 跟随跳转,访问发生302/301自动继续访问而不是提示302/301

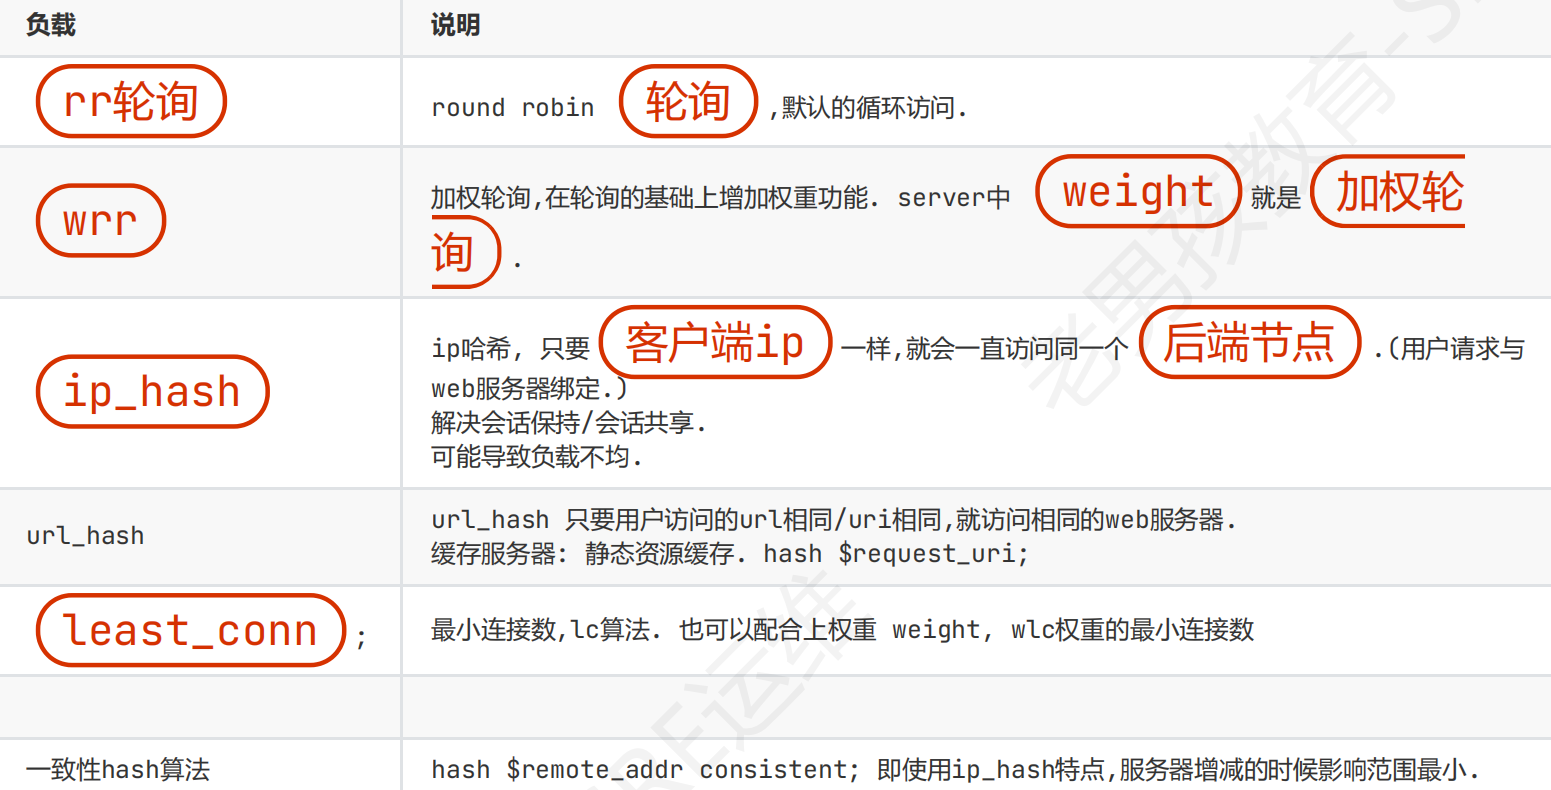
7.负载均衡轮询算法
面试题: 说出负载均衡常见的轮询算法.
1) 概述
决定负载均衡如何把请求分发给后端节点,这种分发的方式就是轮询算法
2) 轮询算法
面试题: 说说常见ngx轮询算法.
rr,wrr,ip_hash,lc算法(最小连接数),wlc(加权最小连接数)
- ip_hash
upstream lb_pools {
ip_hash;
server 10.0.0.7:80 weight=1 max_fails=3
fail_timeout=30s;
server 10.0.0.8:80 weight=1 max_fails=3
fail_timeout=30s;
}
server {
listen 80;
server_name lb.oldboylinux.cn;
error_log /var/log/nginx/lb-error.log notice;
access_log /var/log/nginx/lb-access.log main;
location / {
  proxy_pass http://lb_pools;
  proxy_set_header Host $http_host;
  proxy_set_header X-Forwarded-For $proxy_add_x_forwarded_for;
}
}- url_hash
hash $request_uri;
- 一致性哈希
hash $remote_addr consistent # 使用客户端地址作为哈希键
一致性哈希负载均衡算法有以下优点:
- 均衡性: 服务器和请求的均衡分布,减少了服务器之间的负载差异。
- 可扩展性: 当服务器数量发生变化时,只有部分请求需要重新路由,不会影响整个集群的负载均衡。
- 缓存友好性: 对于缓存系统,一致性哈希负载均衡算法可以保证相同的关键字总是路由到同一个服务器,提高缓存命中率。
4) 小结
面试题:说出常见的负载均衡算法即可.
8.负载均衡—4层 vs 7层(osi)
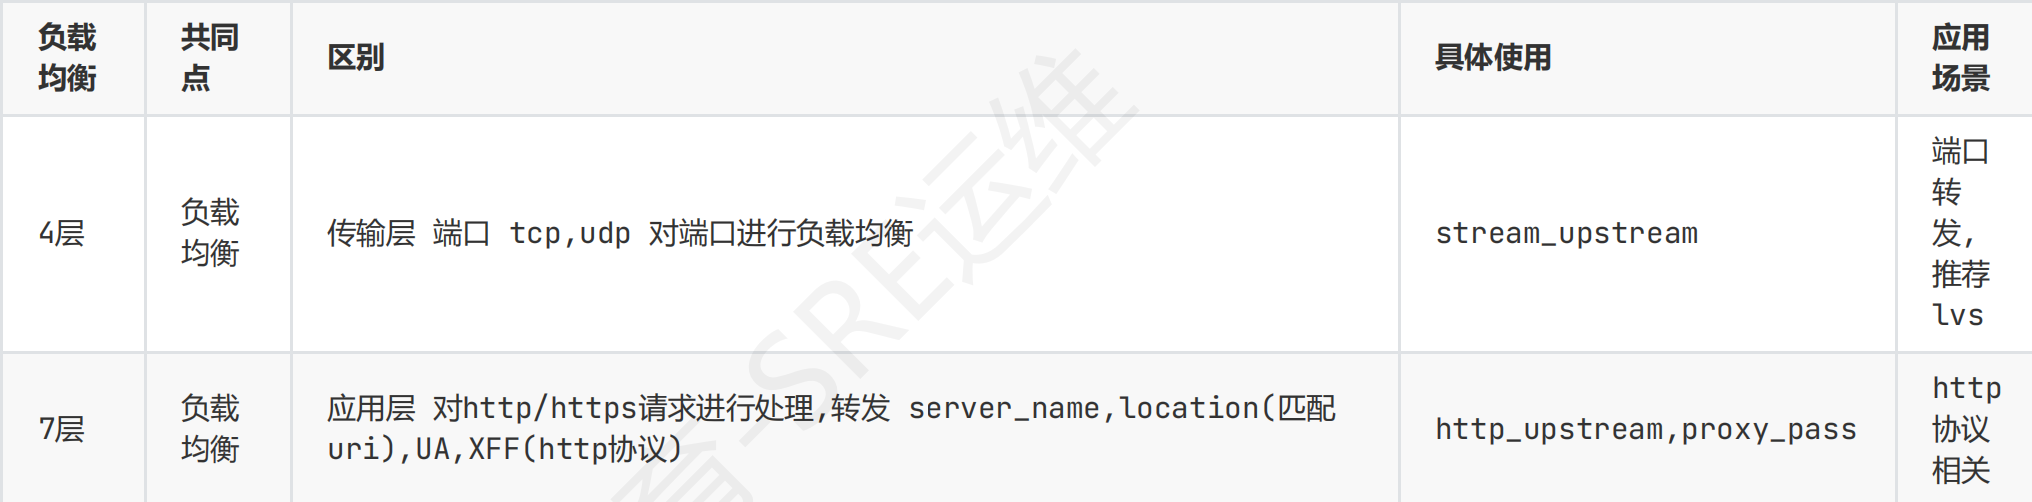
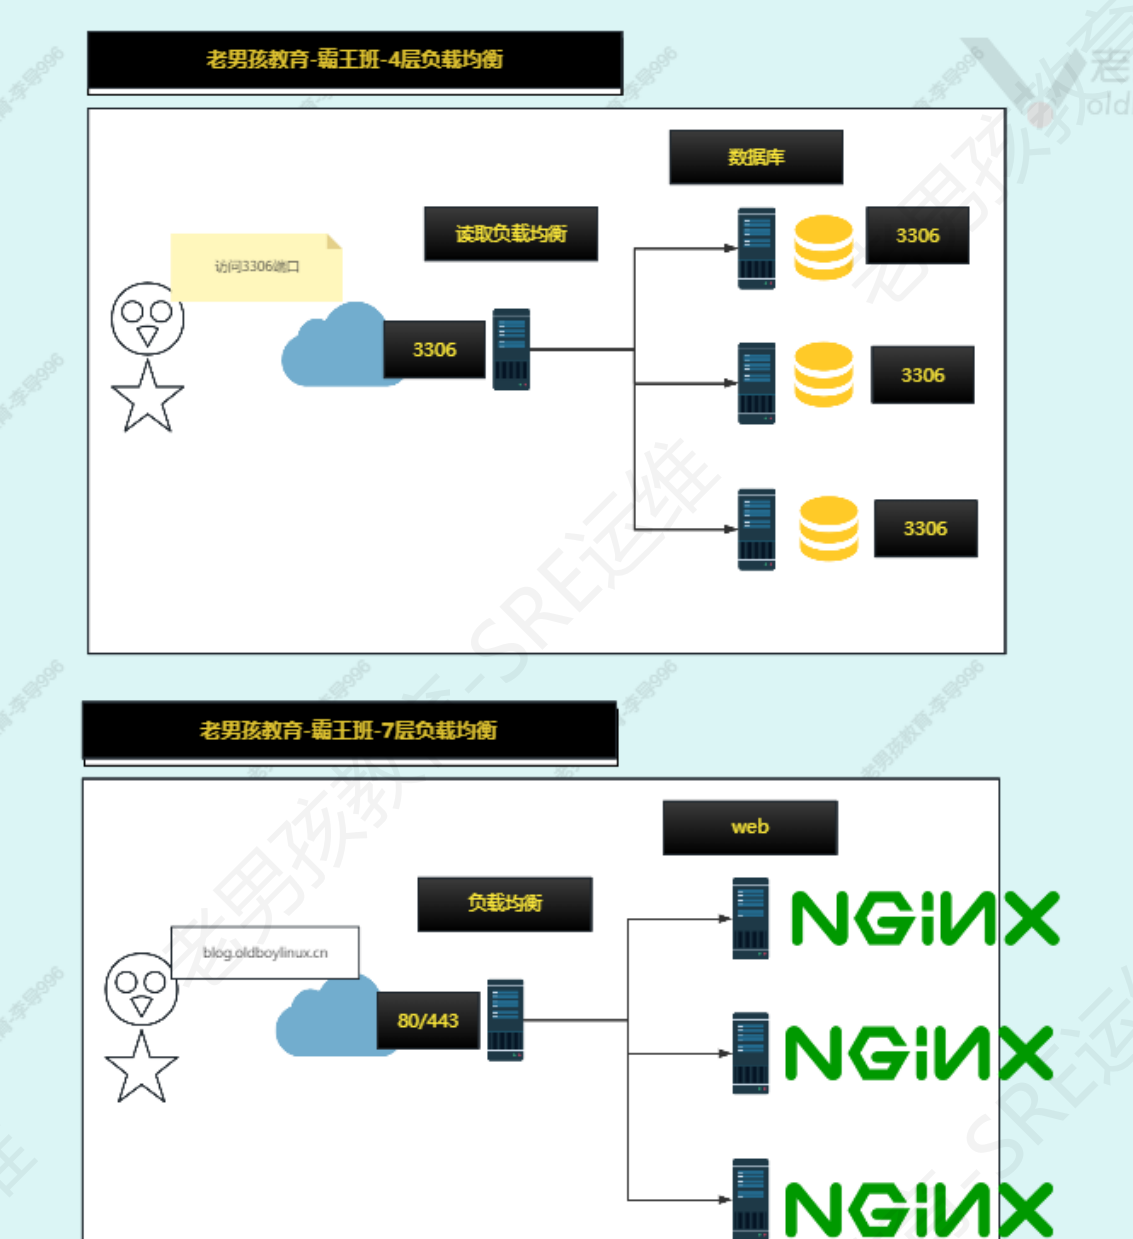
4层负载均衡
使用流程:
- 检查ngx是否有4层负载均衡的模块.
- 准备环境nc命令创建端口即可.
- 负载均衡配置文件与调试
1 检查安装的nginx中有无4层负载均衡模块:with_stream
nginx -V |& grep stream --color
–with-stream=dynamic不是我们想要的
四层负载均衡基于端口转发,不能在conf.d里面写,因为conf.d被包含在http块中
stream模块和http是同级关系,可以将stream块写在nginx.conf的http块上方,stream{},注意4层和7层的端口不能冲突
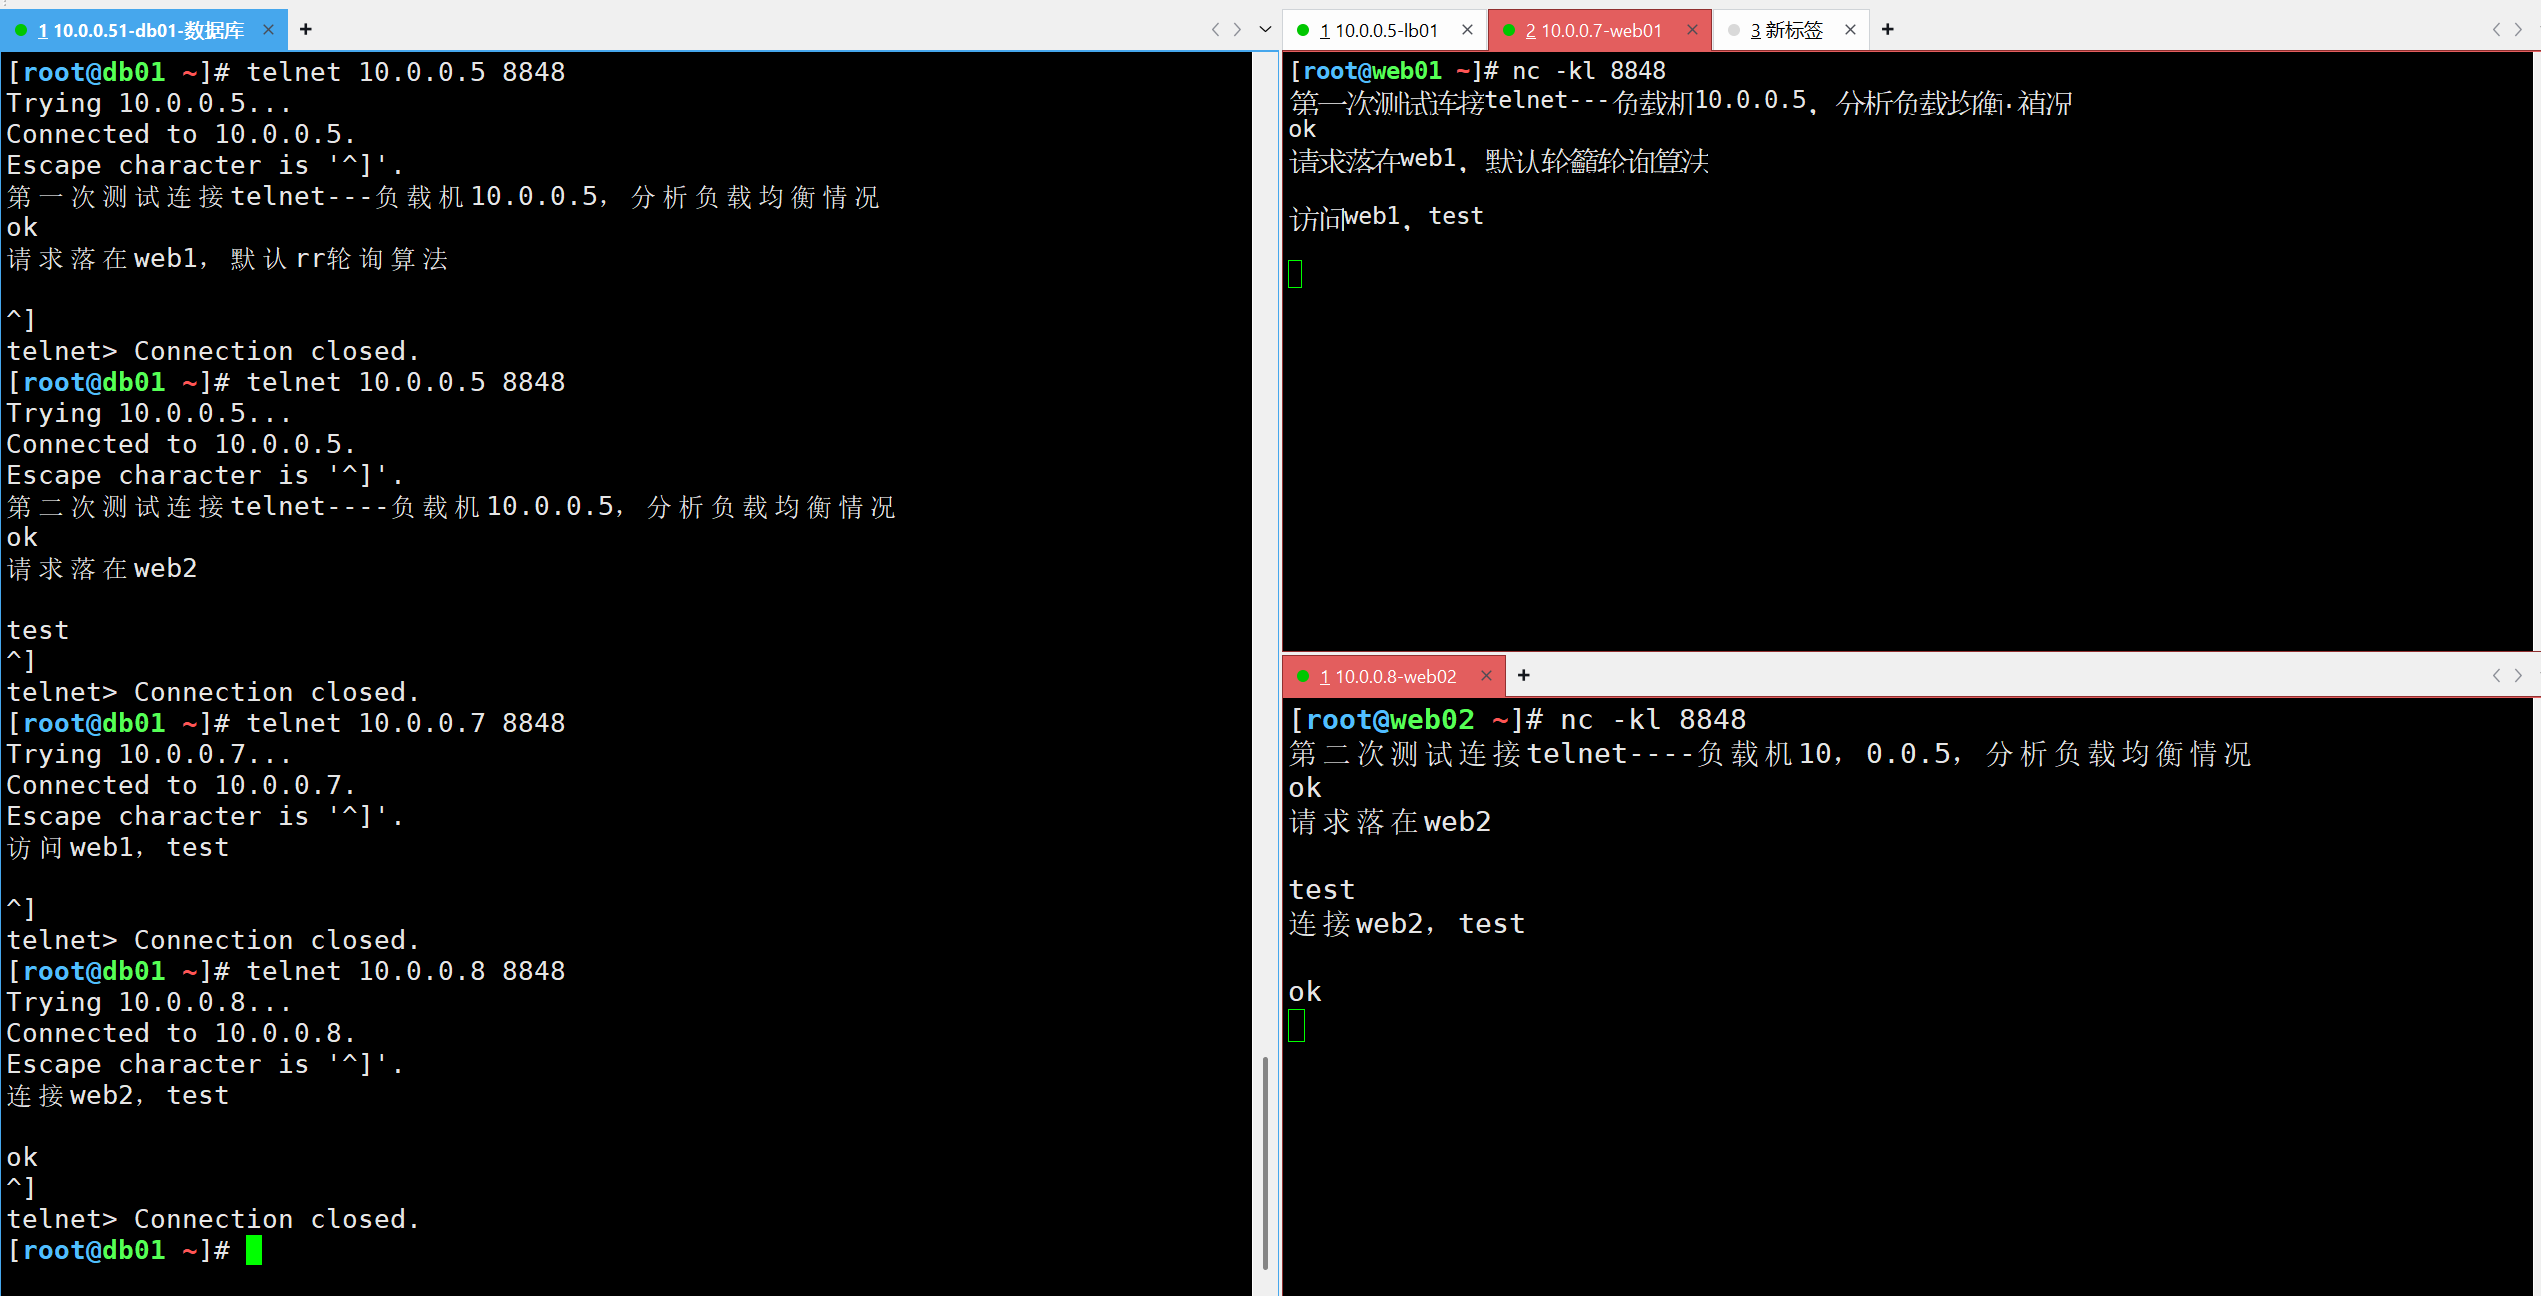
2 web服务器创建8848端口(web1/2)
nc -lk 8848创建指定端口,l表示持续
3 书写负载均衡配置文件(lb01)
stream {
upstream l4_pools {
server 10.0.0.7:8848;
server 10.0.0.8:8848;
}
#log_format
server {
listen 8848;
#error_log
#access_log
proxy_pass l4_pools;
}
}
小结
区分和说出4层负载和7层负载区别.
stream四层负载均衡模块.
stream http并列
WEB集群-Ngx-rewrite功能
1. ngx重定向概述
重定向:重写,也叫url重定向,也叫url改写.
通过模块指令实现对url,uri改变.
未来需求: 网站是http(80) 👉 https(443) URL重定向
用户http: //www.baidu.com👉https: //www.baidu.com/
根据客户端访问类型进行跳转👉如果用户的客户端是ios,iphone,android,访问m.linuxjk.cn否则默认访问linuxjk.cn
⭐ 新老域名跳转: www.360buy.com👉 jd.com
其他需求(进阶):需要我们调整url格式变为伪静态
(搜索引擎收入) 运营要求. 动态url地址变化为静态的地址
2 模块与指令:rewrite模块
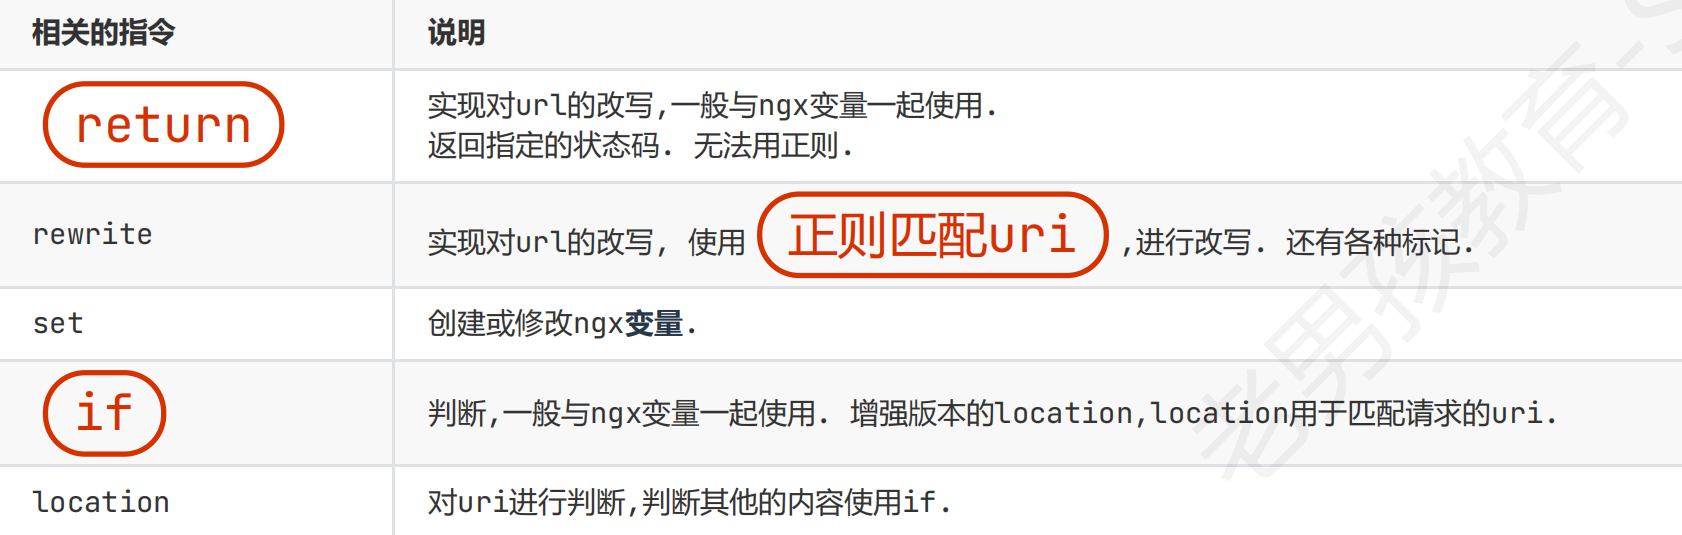
1) return 指令
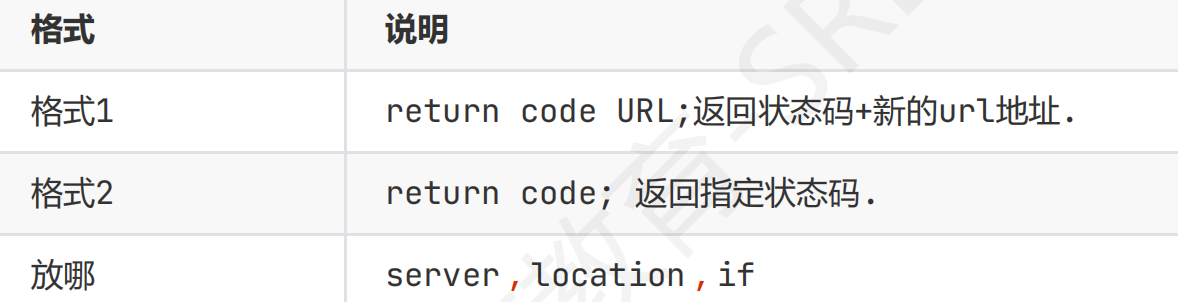
案例01: 如果用户访问/admin/页面返回403
用户访问指定的uri的时候返回指定的状态码.(在server块中的location匹配目录,{}中直接加return 403即可
location /admin {
return 403;
}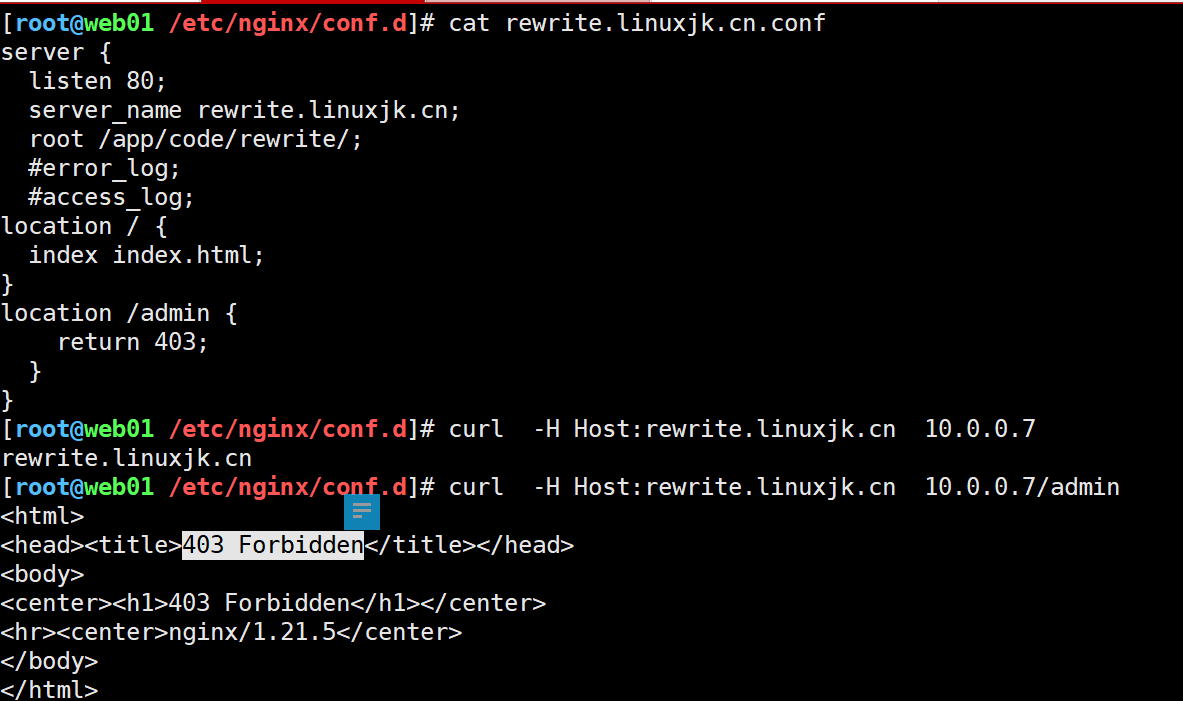
这里书写return 403;所有人禁止访问/admin/页面.
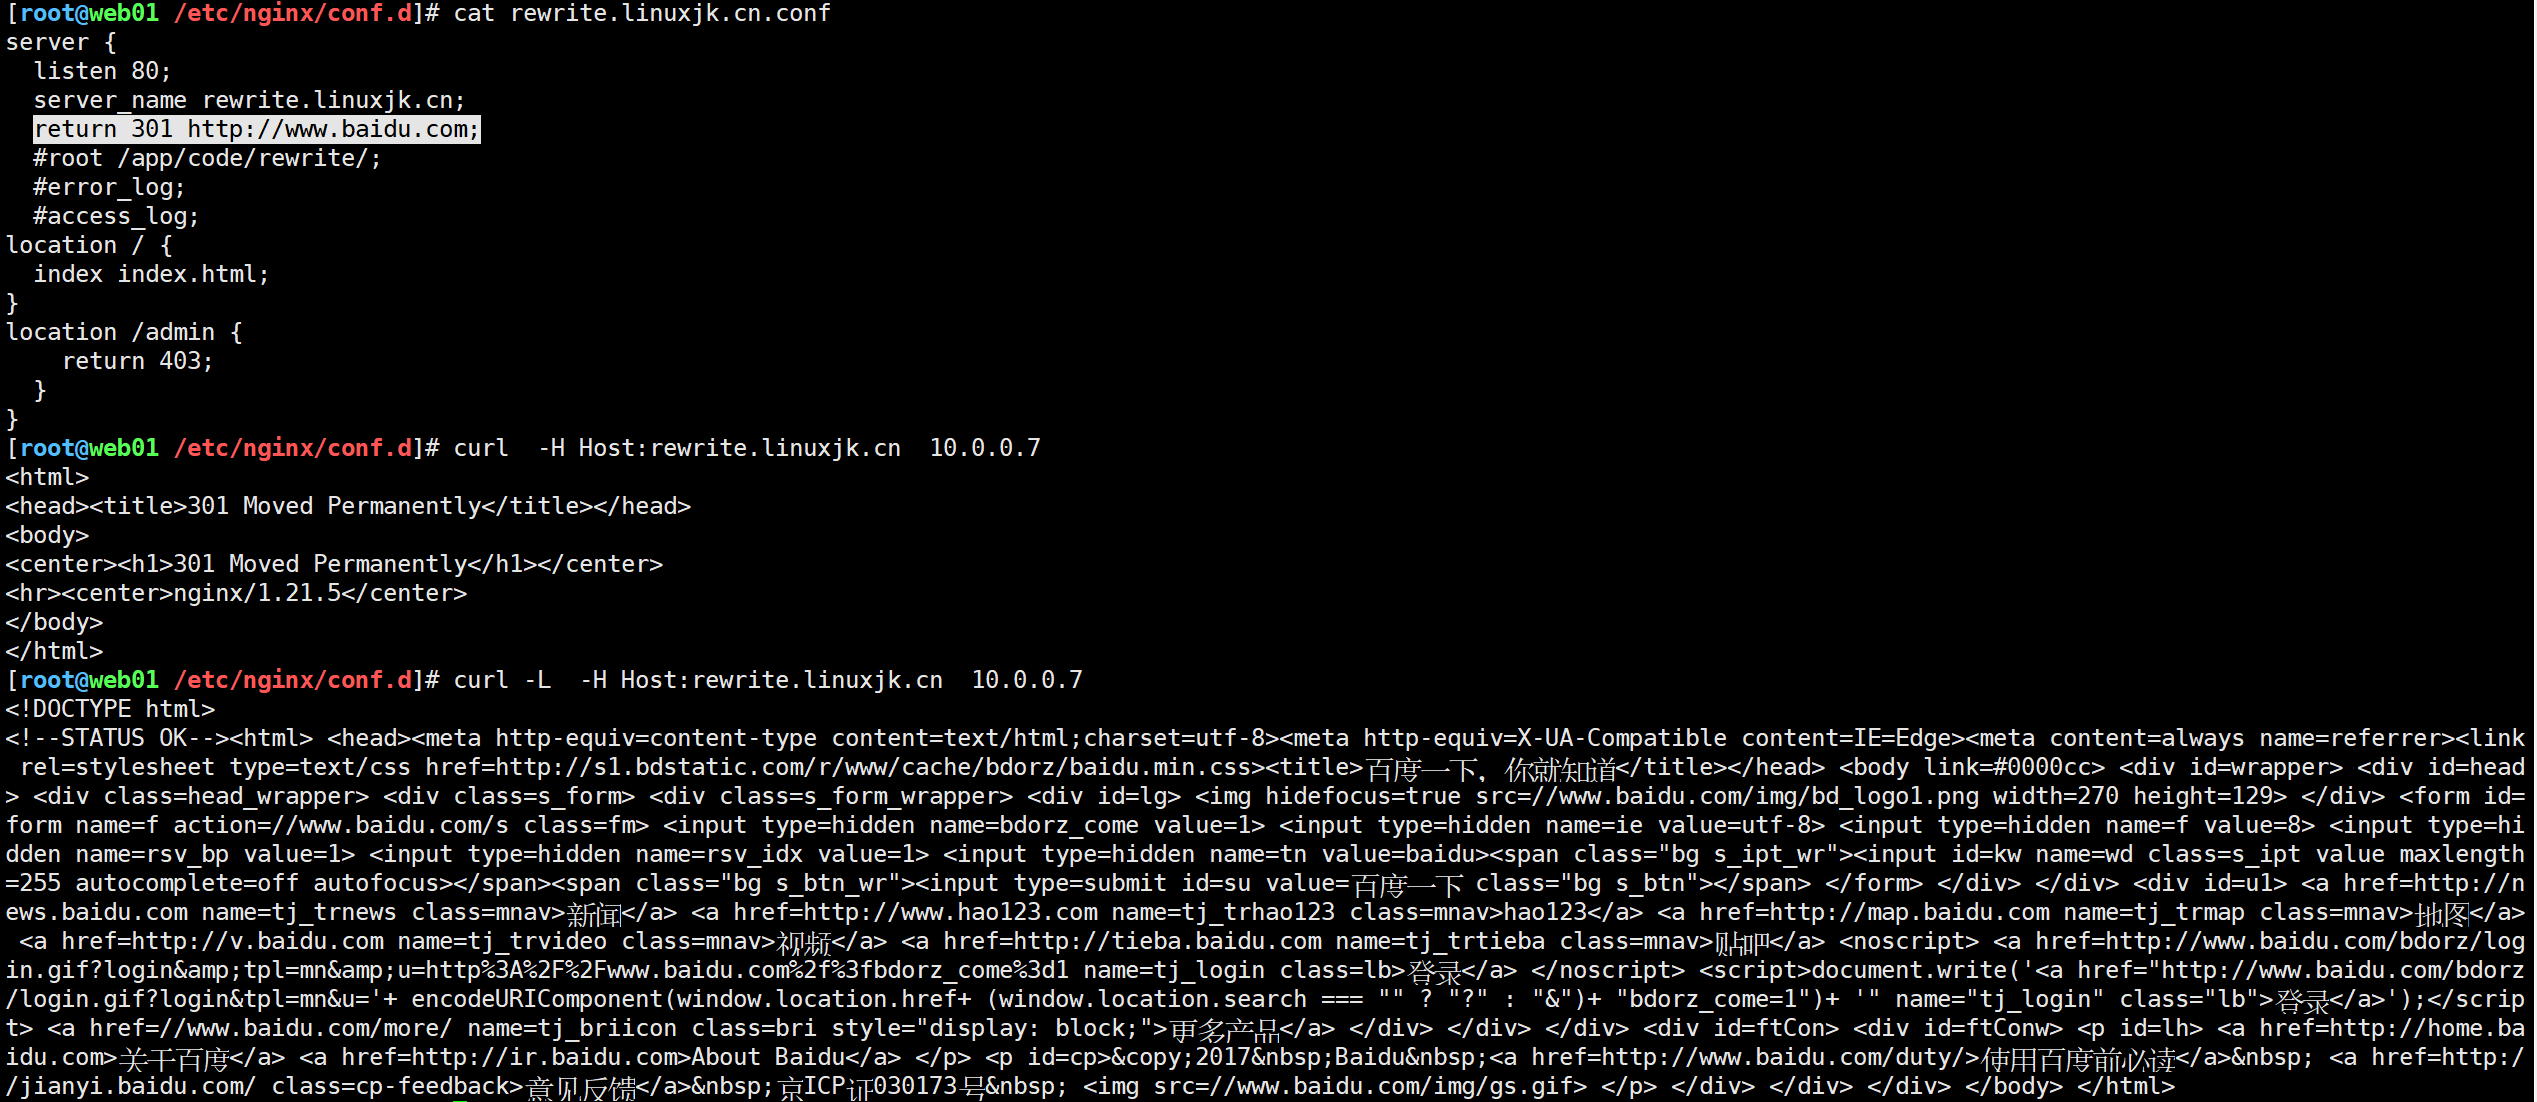
案例02-域名间跳转(跳到其他域名)不用location,直接在server里写
用户访问rewrite.linuxjk.cn 👉 www.baidu.com
不管输入什么uri,只要匹配了左边的域名就会跳转到baidu
server {
listen 80;
server_name rewrite.linuxjk.cn;
return 301 http://www.baidu.com;
}
案例03--http跳转https ⭐(保留用户请求的uri)
$request_uri变量用于记录用户请求的uri.
用户请求网站一般都是http请求, http 👉 https
server {
listen 80;
server_name rewrite.linuxjk.cn;
return 302 https://rewrite.linuxjk.cn$request_uri;
}
server {
listen 443 ssl;
server_name rewrite.linuxjk.cn;
root /app/code/rewrite/;
私钥
公钥(证书)
location / {
index index.html;
}
}return小结
return + 状态码 与 location 或 if判断.
return 实现跳转,返回指定的状态码
域名跳转(新旧域名) 或者 http 👉 https跳转
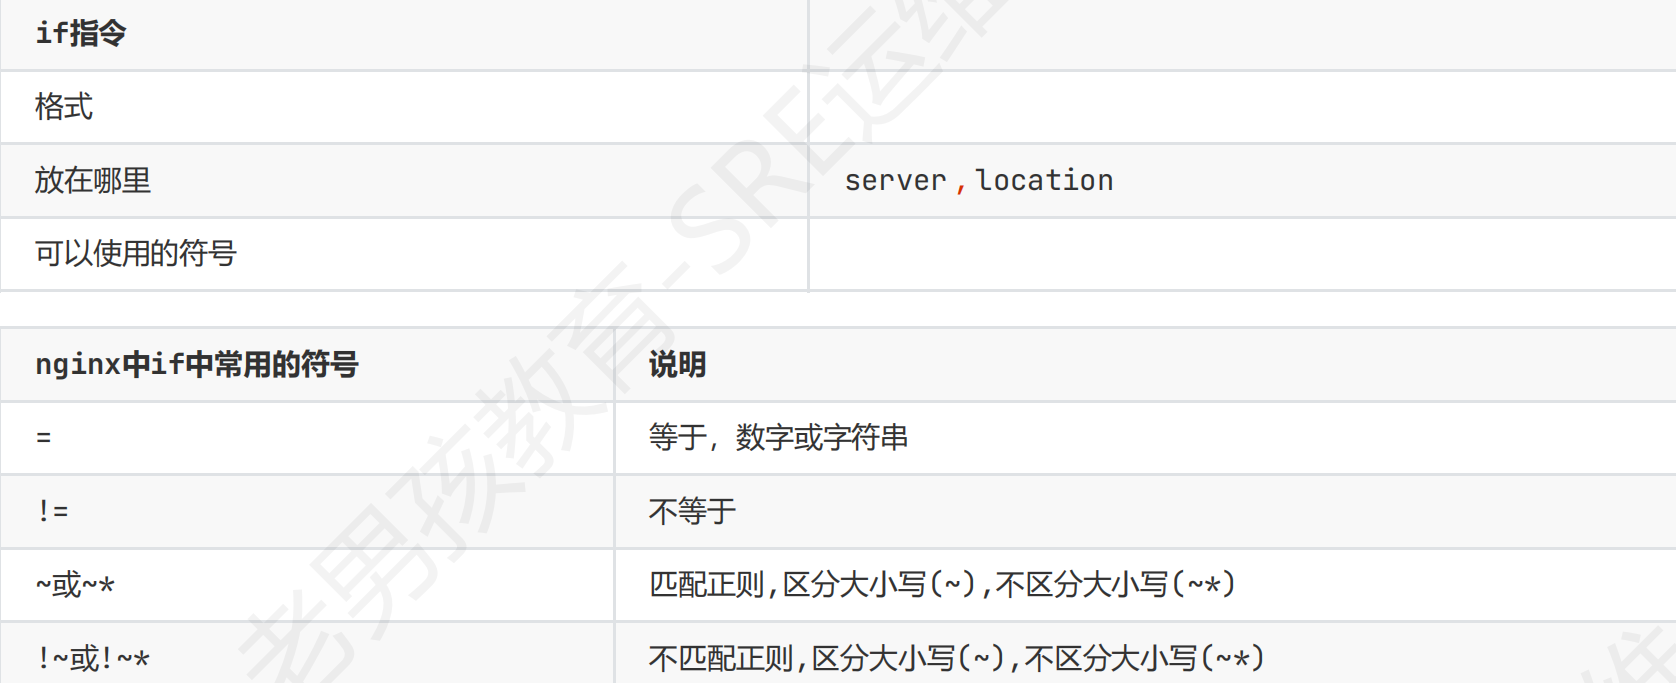
2) if 判断
if擅长与ngx变量搭配进行判断.
格式:没有fi,没有else,不能嵌套
if指令在ngx中的格式
if (条件) {
满足条件执行的内容.
}
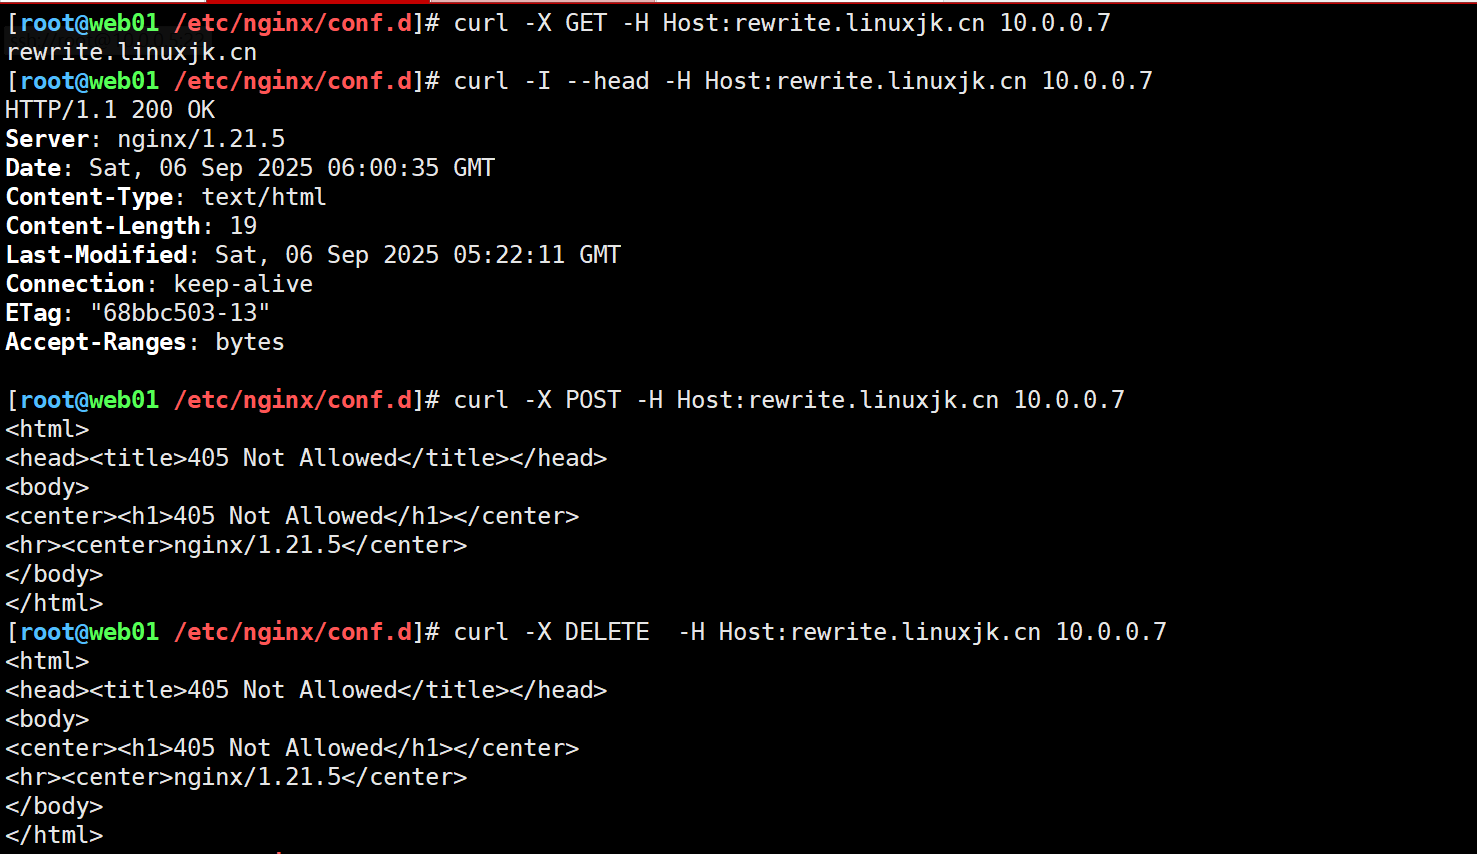
案例04-rewrite.linuxjk.cn 网站只允许GET,POST,HEAD3种请求方法,其他访问禁止访问.
需求:为了安全.
if用于通过ngx中的变量进行判断,
可以比大小.
也可以进行等于,不等于.
也可以进行匹配(过滤),不匹配
请求方法有误,return 405姿势不对,未来一些安全软件也可能出现这个状态码
[root@web01 /etc/nginx/conf.d]# cat rewrite.linuxjk.cn.conf
server {
  listen 80;
  server_name rewrite.linuxjk.cn;
  root /app/code/rewrite/;
  #error_log;
  #access_log;
if ($request_method !~ "GET|POST|HEAD"){
return 405;
#这里可以使用405状态码,405表示使用的请求方法不被网站准许或支持.
}
  location / {
  index index.html;
}
}
测试结果,GET/HEAD正常,只有POST和其他方法返回405。
注意:使用curl -X指定请求方法不支持head,测试HEAD需要使用 -I
Nginx默认对静态文件的POST请求就是返回405。因为静态文件服务器不支持POST方法。所以,即使我们在配置中允许了POST方法,但是Nginx在处理静态文件时,仍然会拒绝POST请求。
# 测试 GET 方法
curl -X GET -H "Host: rewrite.linuxjk.cn" http://10.0.0.7
# 测试 POST 方法
curl -X POST -H "Host: rewrite.linuxjk.cn" http://10.0.0.7
# 测试 HEAD 方法(正确方式)
curl -I -H "Host: rewrite.linuxjk.cn" http://10.0.0.7
# 测试不允许的方法(如 DELETE)
curl -X DELETE -H "Host: rewrite.linuxjk.cn" http://10.0.0.7
if小结
一般与ngx内置变量或自定义变量一起使用.与location使用的符号类似.
常用:~ ~*
!~ !~*
= ≠
ngx取反,排除,只能用if
补充nginx变量:
客户端ip地址  $remote_addr
请求方法:     $request_method
请求uri:     $request_uri
UA客户端类型  $http_user_agent
3) set
用于自己创建或修改ngx变量.
#shell写法:oldboy=666 echo $oldboy
#ngx中写法
set $变量名字 值;
set $test 888;
ngx变量,进行赋值与进行使用都需要加上$符号.
cat rewrite.conf---将域名+uri进行拼接,组成一个变量url
server {
listen 80;
server_name rewrite.oldboylinux.cn;
 set $url $http_host$request_uri;
return 200 "$url\n";
}
4) rewrite
a) rewrite指令

rewrite正则用于匹配用户请求的uri.
需要使用正则的时候再使用rewrite(实现伪静态)
命令的格式与sed ‘s ### g’的反向引用类似,实现替换功能,rewrite替换url内容.(改写)
在使用的时候一样是()括起来,后面使用$1引用
rewrite格式:
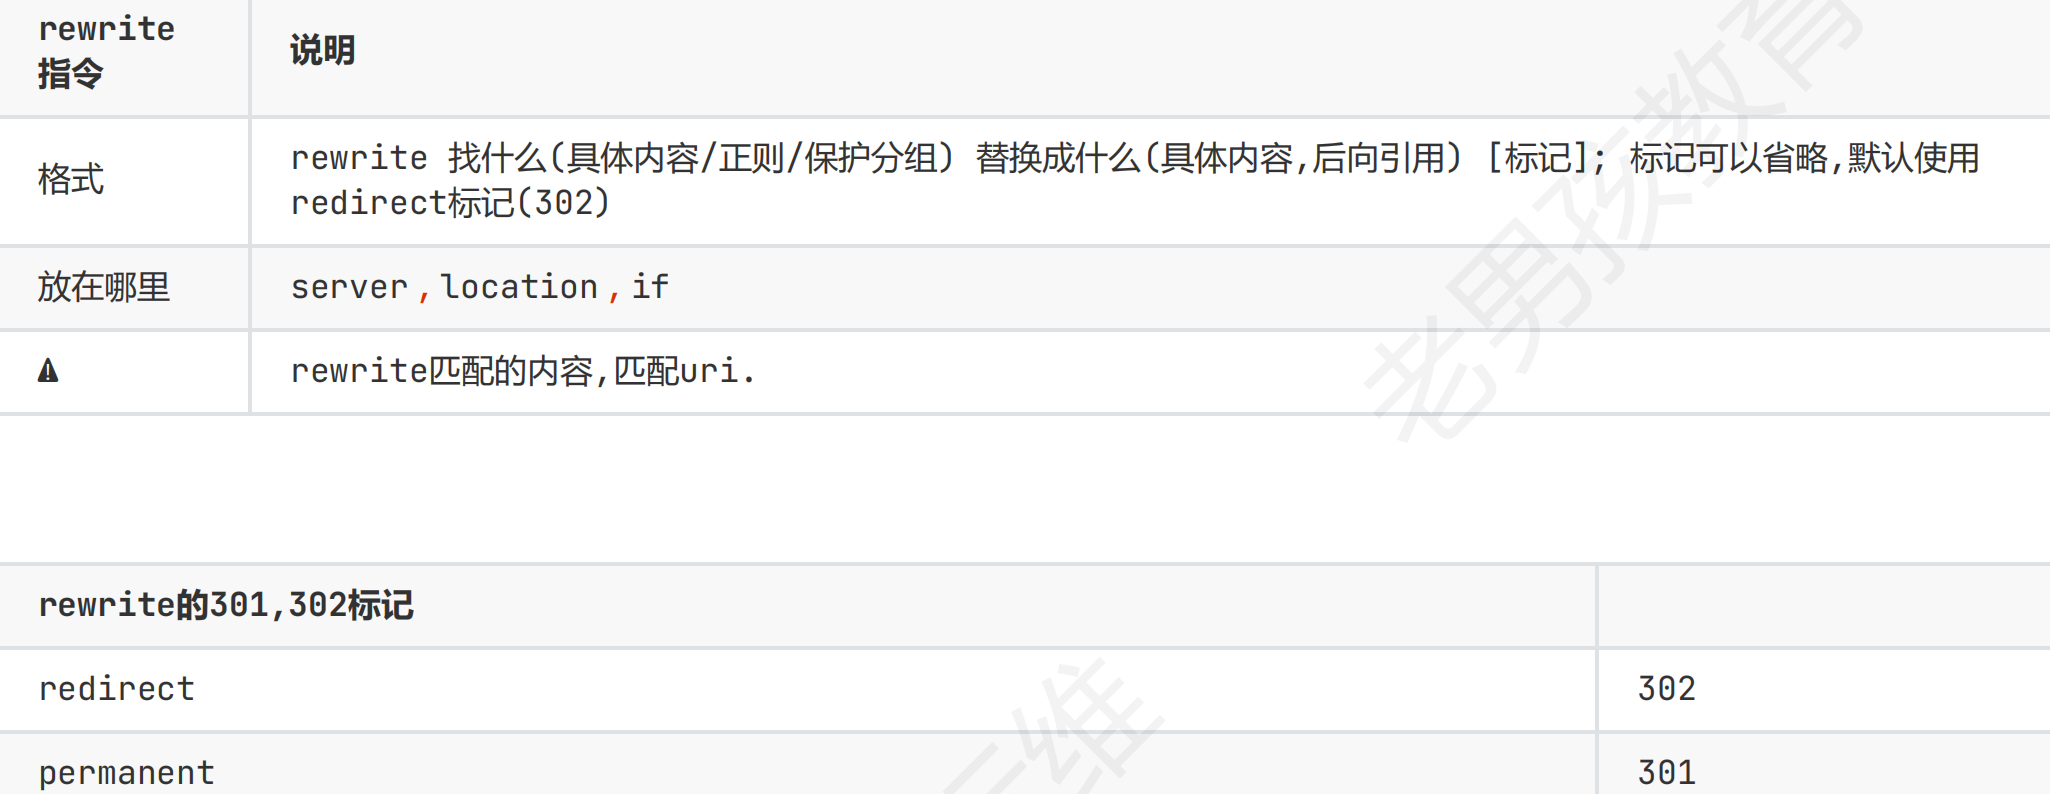
b) 案例06 域名跳转
server {
listen 80;
server_name rewrite.linuxjk.cn;
#return 301 http://www.baidu.com$request_uri;
#http://rewrite.linuxjk.cn/images/rewrite.txt
#http://rewrite.linuxjk.cn
rewrite ^(.*)$ http://www.baidu.com$1 redirect;
}
跳转到百度,保留uri,加redirect表示302,不加默认302
加permanent会表示301
c) 案例07使用rewrite实现http 👉 https
server {
listen 80;
server_name rewrite.linuxjk.cn;
#return 302
https://rewrite.linuxjk.cn$request_uri;
rewrite ^(.*)$ https://rewrite.linuxjk.cn$1 ;
#302
}
server {
listen 443 ssl;
server_name rewrite.linuxjk.cn;
root /app/code/rewrite/;
#私钥
#公钥(证书)
location / {
index index.html;
}
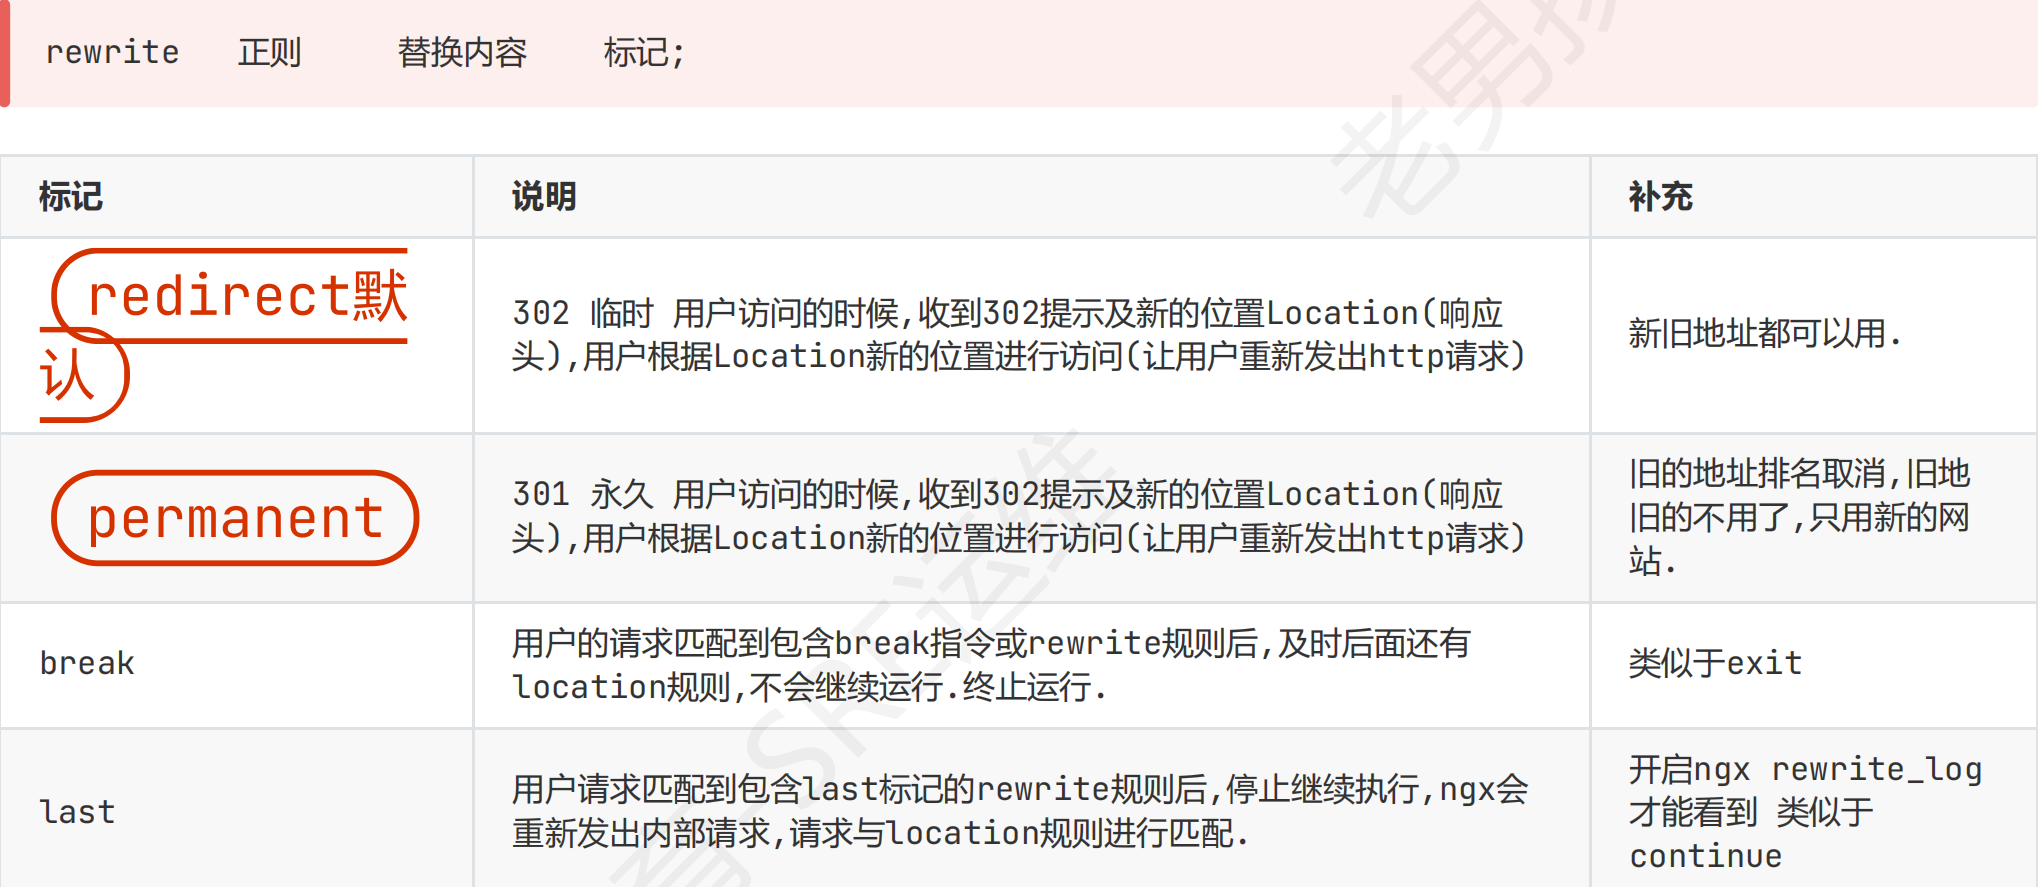
}e) Rewrite各种标记
server {
listen 80;
server_name flag.linuxjk.cn;
root /app/code/flag;
error_log /var/log/nginx/flag-error.log notice;
rewrite_log on; #需要错误日志debug ...notice
#跳转日志,记录nginx的break,last内部跳转
location / {
rewrite /1.html /2.html ;
# 正常的location匹配规则就是访问1.html,开始跳转→2.html→3.html→a.html,最终显示3.html内容
# rewrite /1.html /2.html break;
# 这里使用break 不会重新匹配下面的location,因此不会进入location /2.html,最终显示2.html内容
# rewrite /1.html /2.html last;
# 这里使用last,请求重定向为2.html后,不继续下面这一行的rewrite匹配,
#而是到2.html后进入location,执行下面/2.html中的跳转,最终显示b.html
rewrite /2.html /3.html ;
}
location /2.html {
rewrite /2.html /b.html ;
}
location /3.html {
rewrite /3.html /a.html ;
}
}
rewrite请求处理流程(不加break和last的默认处理: 重定向到a.html)
初始请求:
GET /1.html- 匹配
location /区块 - 执行第一个 rewrite:
/1.html→/2.html
- 匹配
第一次重写后:
/2.html- 继续在
location /区块中处理 - 执行第二个 rewrite:
/2.html→/3.html
- 继续在
第二次重写后:
/3.html- 由于URL变为
/3.html,Nginx需要重新选择location - 匹配到
location /3.html区块 - 执行 rewrite:
/3.html→/a.html
- 由于URL变为
第三次重写后:
/a.html- URL变为
/a.html,Nginx需要再次重新选择location - 没有专门匹配
/a.html的location,所以匹配默认的location / - 在
location /中,尝试匹配rewrite规则:/1.html不匹配/a.html→ 日志显示 “does not match”/2.html不匹配/a.html→ 日志显示 “does not match”
- 没有匹配的rewrite规则,最终返回
/a.html的内容
- URL变为
f) rewrite小结
使用正则进行跳转,伪静态的时候.
必会功能实现302,301跳转.
80 👉 443(http 👉https) / 域名跳转.
必会伪静态含义.
了解break,last标记.
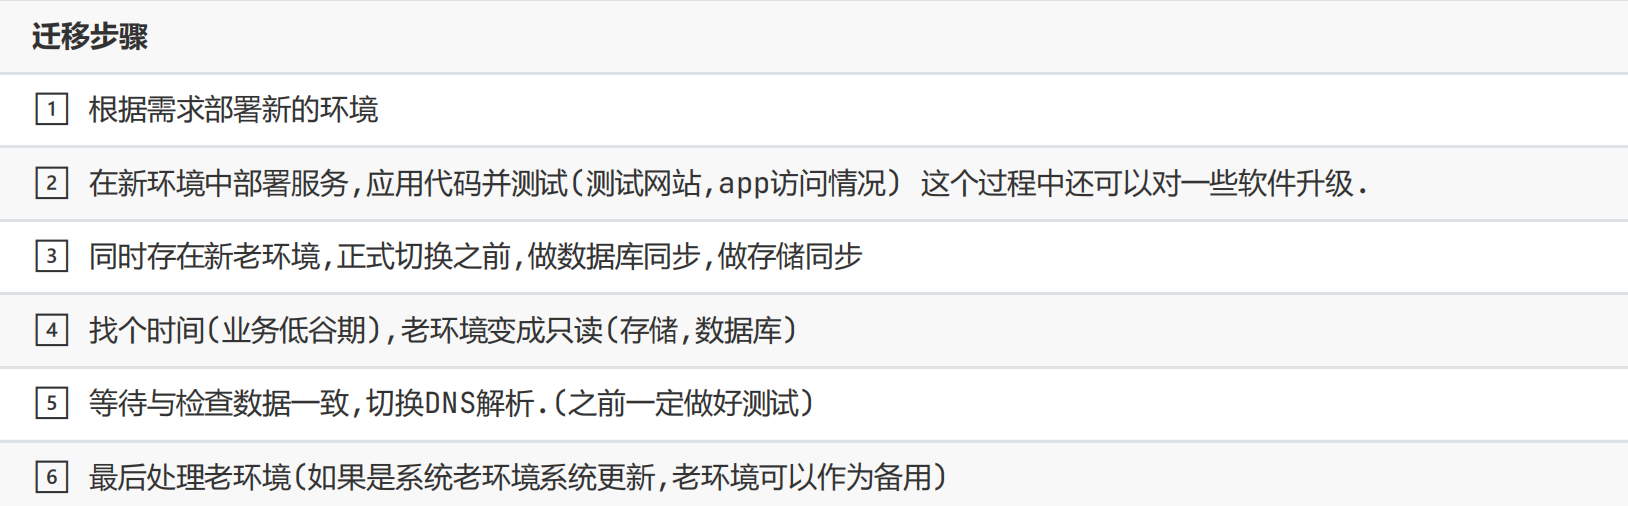
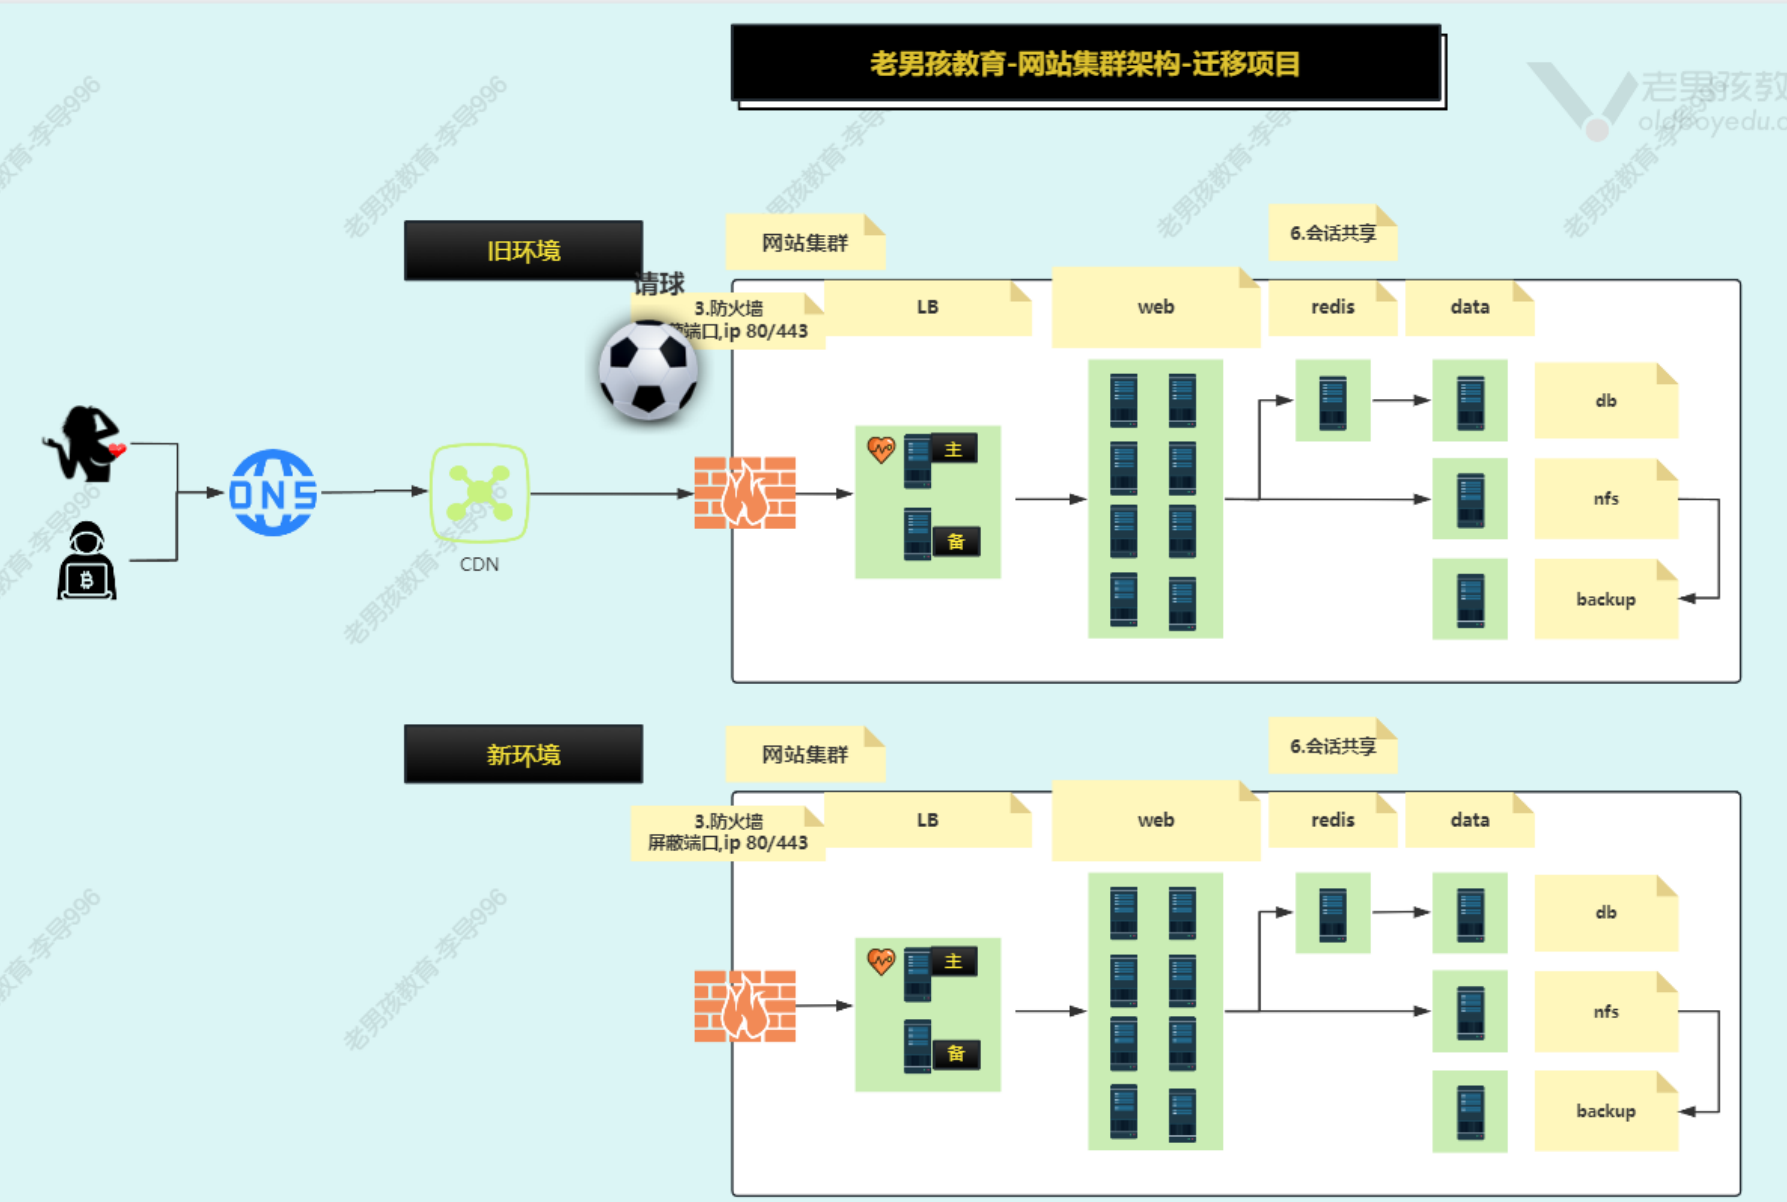
网站迁移/升级案例
1 背景
场景01:网站麒麟sp2 升级到sp3
场景02:网站centos7.9 升级到sp3
场景03:网站杭州地区 迁移北京
场景04:物理服务器 上云
目标: 迁移的整个过程中,对网站用户影响最小. 最好做好无感知.
2 规划
3 新环境编译安装ngx
安装/app/tools/nginx-1.20.2
下载 1.20.2 源码包
wget https://tengine.taobao.org/download/tengine-3.1.0.tar.gz
解压进入压缩目录
安装依赖
#麒麟 红帽
yum install -y openssl-devel pcre-devel zlib-devel
#ubt debian
apt install -y libssl-dev libpcre3 libpcre3-dev zlib1g-dev
./configure 用于生成Makefile文件(make时候读取) 用于指定安装目录,指定选项参数
--prefix=PATH   #绝大部分编译安装过程,都有这个参数. 指定安装目录,不指定默认安装到/usr/local/
--user=USER #ngx默认用户
--group=GROUP #ngx默认组
--with-http_ssl_module #https
--with-http_v2_module #http2.0功能
--with-http_realip_module realip模块
--with-http_geoip_module #对客户端ip地址进行判断,地区判断.
--with-http_mp4_module
--with-http_gzip_static_module
--with-http_stub_status_module #ngx状态模块 stub_status
--with-http_perl_module
--with-stream
--with-stream_ssl_module
--with-pcre
--add-module=/root/ngx_http_upstream_check_module/
--add-module=/root/ngx_http_upstream_check_module/
##添加第3方模块
/root/ngx_http_upstream_check_module/
.configure 配置
./configure --prefix=/app/tools/tengine-3.1.0/ \
--user=nginx \
--group=nginx \
--with-http_v2_module \
--with-http_realip_module \
--with-http_mp4_module \
--with-http_gzip_static_module \
--with-http_stub_status_module \
--with-http_perl_module \
--with-stream \
--with-stream_ssl_module \
--with-pcre \
--add-module=modules/ngx_http_upstream_check_module/ \
--add-module=modules/ngx_http_upstream_session_sticky_module/
上一步操作完后会生成一个makefile文件,tengine自动存放在objs/Makefile中
#修改Makefile 给编译的时候增加的选项 (麒麟系统中需要处理,其他系统不用)
在CFLAGS那一行加入-fPIE的参数
sed -i '/^CFLAGS/s#$# -fPIE#g' objs/Makefile
make -j `nproc` && make install
编译
make -j `nproc`
安装 创建目录,复制文件
make install
编译后的收尾工作(便于下次升级)
#1.添加用户useradd -s /sbin/nologin -M nginx
#2.创建软连接
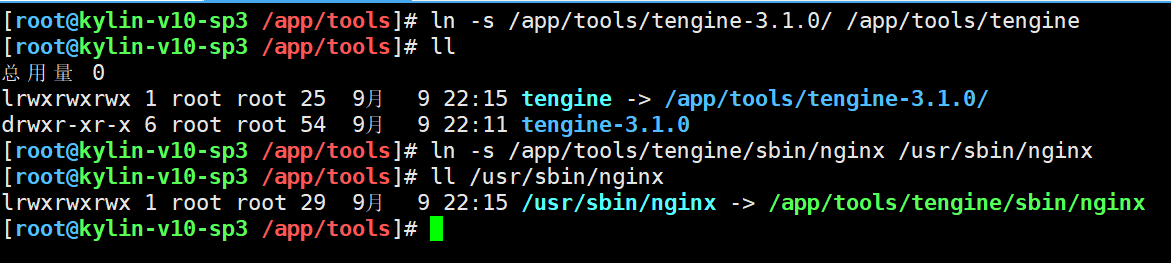
安装目录软连接:(装到/app/tools/tengine中,下载目录在tengine-3.1.0)
ln -s /app/tools/tengine-3.1.0/ /app/tools/tengine
命令软连接 ln -s /app/tools/tengine/sbin/nginx /usr/sbin/
#3书写systemctl配置文件
systemctl cat tengine
# /usr/lib/systemd/system/tengine.service
[Unit]
Description=The tengine HTTP and reverse proxy server
After=network.target remote-fs.target nss-lookup.target

[Service]
Type=forking
PIDFile=/app/tools/tengine/logs/nginx.pid
# Nginx will fail to start if /run/nginx.pid already exists but has the wrong
# SELinux context. This might happen when running`nginx -t` from the cmdline.
ExecStartPre=/usr/bin/rm -f /app/tools/tengine/logs/nginx.pid
ExecStartPre=/usr/sbin/nginx -t
ExecStart=/usr/sbin/nginx
ExecReload=/bin/kill -s HUP $MAINPID
KillSignal=SIGQUIT
TimeoutStopSec=5
KillMode=mixed
PrivateTmp=true

[Install]
WantedBy=multi-user.target

书写完配置文件以后重载systemctl,设置tengine开机自启动
systemctl daemon-reload
systemctl enable --now tengine
systemctl status tengine
#如果没有systemctl 则可以使用绝对路径的命令
/app/tools/tengine/sbin/nginx -V #显示参数
/app/tools/tengine/sbin/nginx -t #检查语法
/app/tools/tengine/sbin/nginx -T #检查nginx读取的配置文件
/app/tools/tengine/sbin/nginx -s #reload 重启(已运
行)
/app/tools/tengine/sbin/nginx 启动
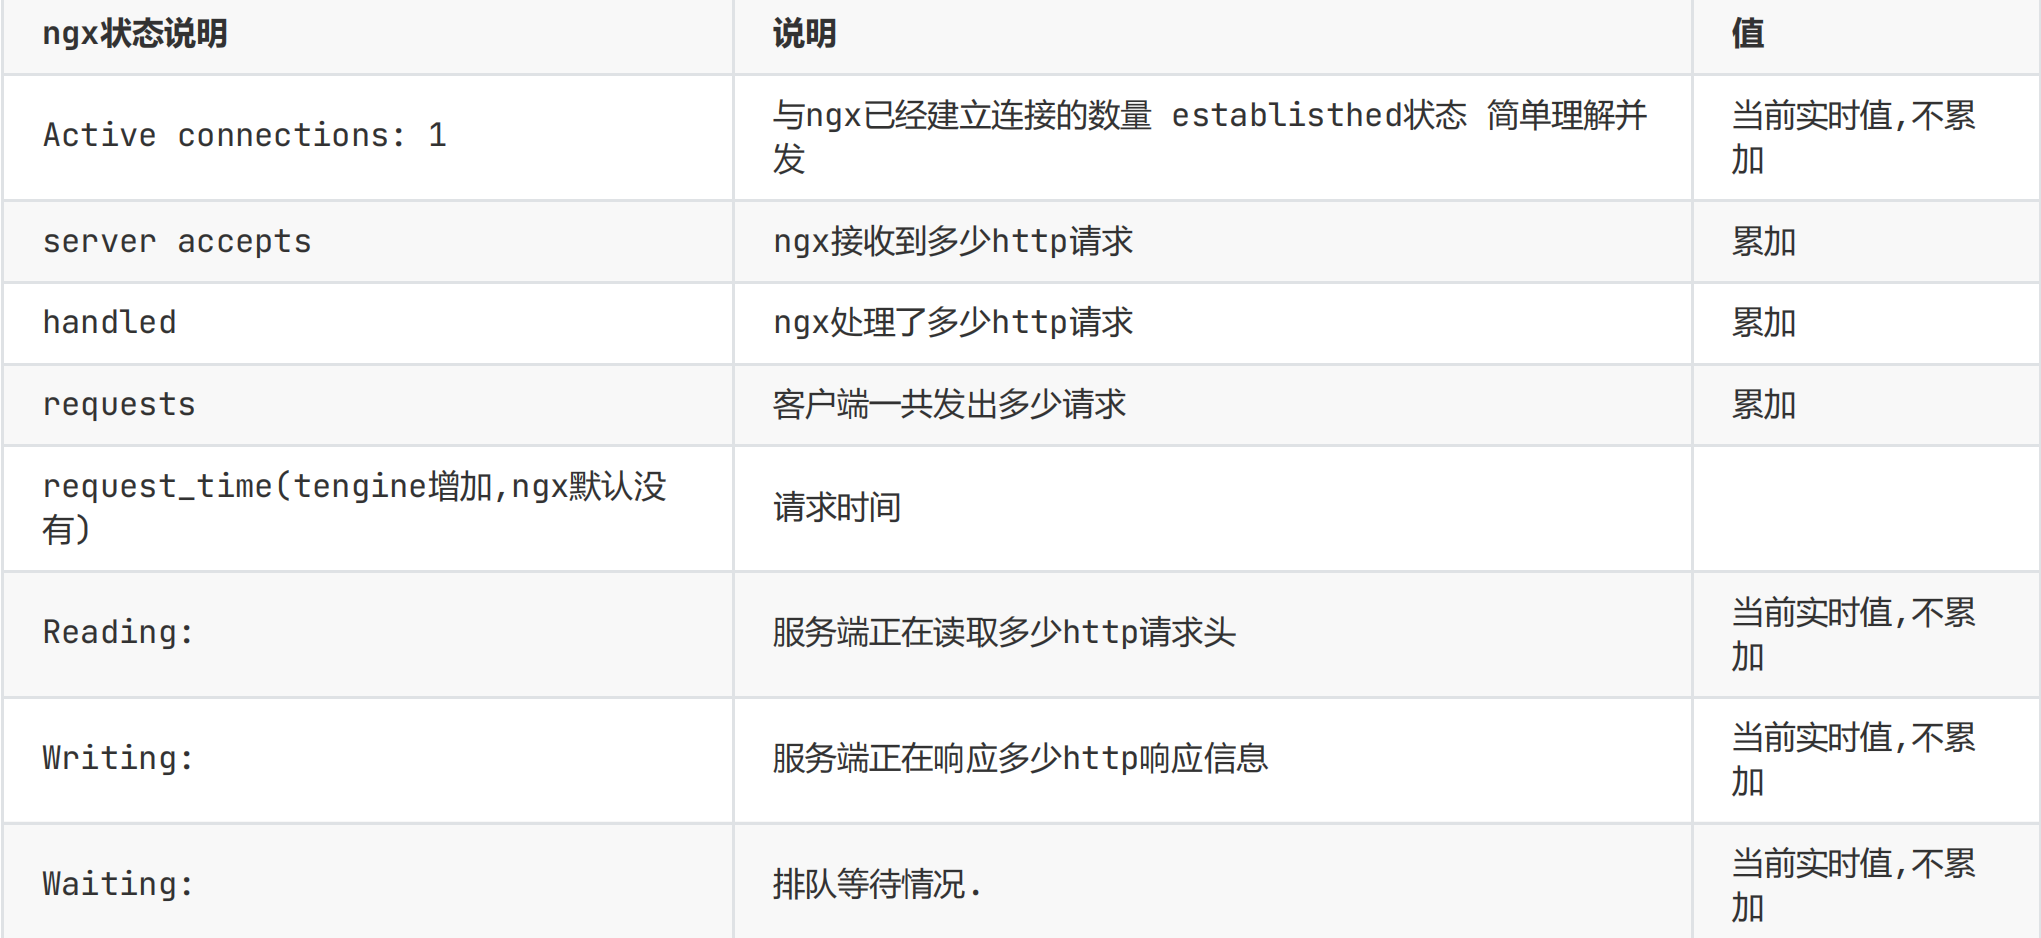
4 监控ngx状态:ngx stub_status模块
编译安装的nginx可能没有conf.d文件,需要手动在listen80的server块上面设置子配置文件的引用
include conf.d/*.conf;
cat conf.d/status.conf
server {
listen 8848;
server_name status.oldboylinux.cn;
location / {
allow 10.0.0.1;
allow 172.16.1.0/24;
#允许电脑浏览器,内网网段访问,拒绝其他机器访问此页面
deny all;
stub_status;
}
}
状态说明:这个页面统计了ngx服务下面所有站点的状态
小结:
web/lb都可以使用
监控ngx状态(所有站点)
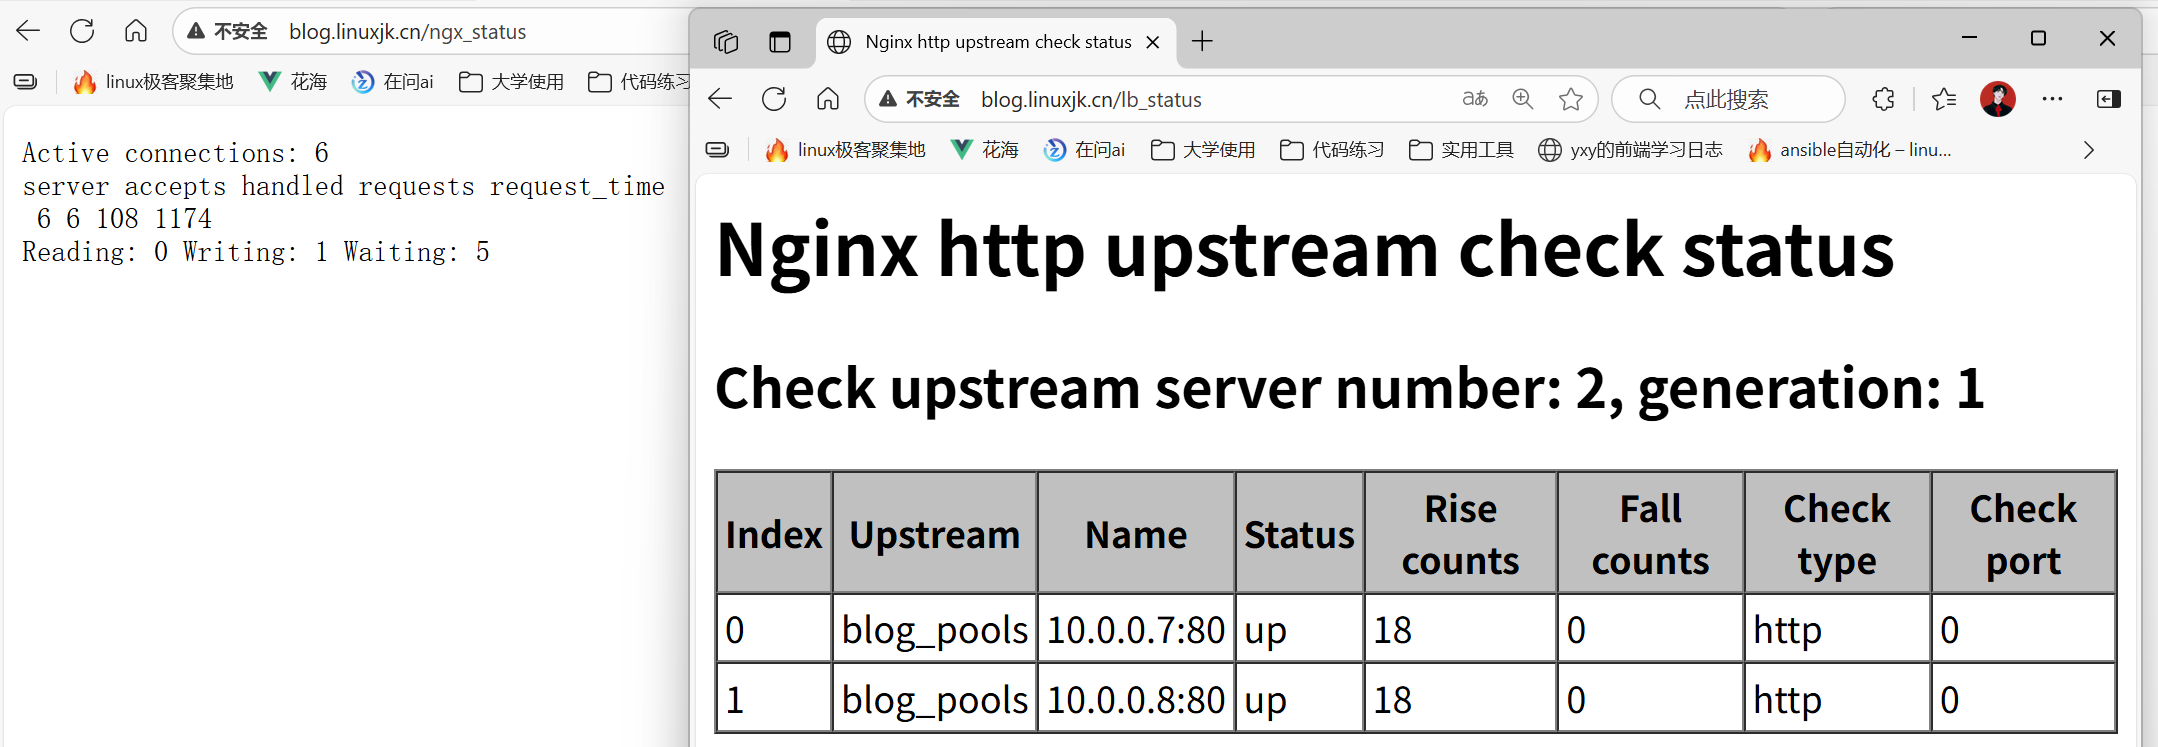
5 监控 ngx负载均衡状态 :upstream_check模块
应用场景: ngx负载均衡使用;官方文档
启动(编译安装ngx,./configure –add-module=xxx)
模块名字: ngx_http_upstream_check_module(负载均衡健康检查:)
格式:
第1部分写upstream中用于指定监控的方式,uri,域名等信息.
第2个部分server中,开启监控.
nginx.conf(负载均衡服务器)
 log_format main   '$remote_addr - $remote_user [$time_local] "$request" '
'$status $body_bytes_sent "$http_referer" '
'"$http_user_agent" "$http_x_forwarded_for"';
conf.d/lb_blog.conf(负载均衡服务器)
upstream blog_pools {
server  10.0.0.7:80;
server   10.0.0.8:80;
check interval=3000 rise=2 fall=5 timeout=1000 type=http;
#每3s检查一次,rise检查几次都成功就认为恢复,fail失败次数:5次认为挂了
#和时间相关的单位都是ms 使用type=http方式检查,最接近用户访问
#/index.php 未来让开发书写检查页面 进行修改
check_http_send "HEAD /index.php HTTP/1.0\r\nHost:blog.linuxjk.cn\r\nUser-Agent:LB_check\r\n\r\n";
#checkhttpsend发的请求(指定请求方法,URI,Host,UA)
#每一部分写完后需要加上\n\r,结尾加上两个回车\n\r\n\r(制造空行) check_http_expect_alive http_2xx http_3xx; # 检查上面请求的状态码,如果2xx,3xx代表web存活
}
server {
listen 80;
server_name blog.linuxjk.cn;
error_log logs/blog.linuxjk.cn-error.log notice;
access_log logs/blog.linuxjk.cn-access.log main;
location / {
proxy_pass http://blog_pools;
proxy_set_header Host $http_host;
proxy_set_header X-Forwarded-For $proxy_add_x_forwarded_for;
proxy_set_header X-Real-Ip $remote_addr;
}
#ngx状态检查(stub_status;)
location = /ngx_status
{
allow 10.0.0.1;
allow 172.16.1.0/24;
deny all;
stub_status;
#access_log off;
}
#负载均衡状态检查(check_status;)
location = /lb_status {
allow 10.0.0.1;
allow 172.16.1.0/24;
deny all;
check_status;
#access_log off;
}
}
conf.d/blog.linuxjk.cn.conf(web服务器):忽略检查的访问日志(防止access_log中每3秒加一条UA为LB_check的日志信息)
[root@web01 ~]# cat /etc/nginx/conf.d/blog.linuxjk.cn.conf
server {
listen 80;
server_name blog.linuxjk.cn;
root /app/code/blog;
error_log /var/log/nginx/blog-error.log notice;
access_log /var/log/nginx/blog-access.log main;
location / {
if ( $http_user_agent   = "LB_check") {
access_log off;
}
#首页文件index.php
index index.php;
}
location ~ \.php$ {
if ( $http_user_agent   = "LB_check") {
access_log off;
}
fastcgi_pass   127.0.0.1:9000;
fastcgi_index index.php;
fastcgi_param SCRIPT_FILENAME $document_root$fastcgi_script_name;
include    fastcgi_params;
}
}
在web服务器配置忽略检查的访问日志(放在两个location中)
if ( $http_user_agent = "LB_check") { access_log off; }
文件中对于ua头的判断,只能写在location中
小结:
给ngx负载均衡加上监控.
显示ngx组内节点是否可用.
软件各种安装方式(nginx升级准备)
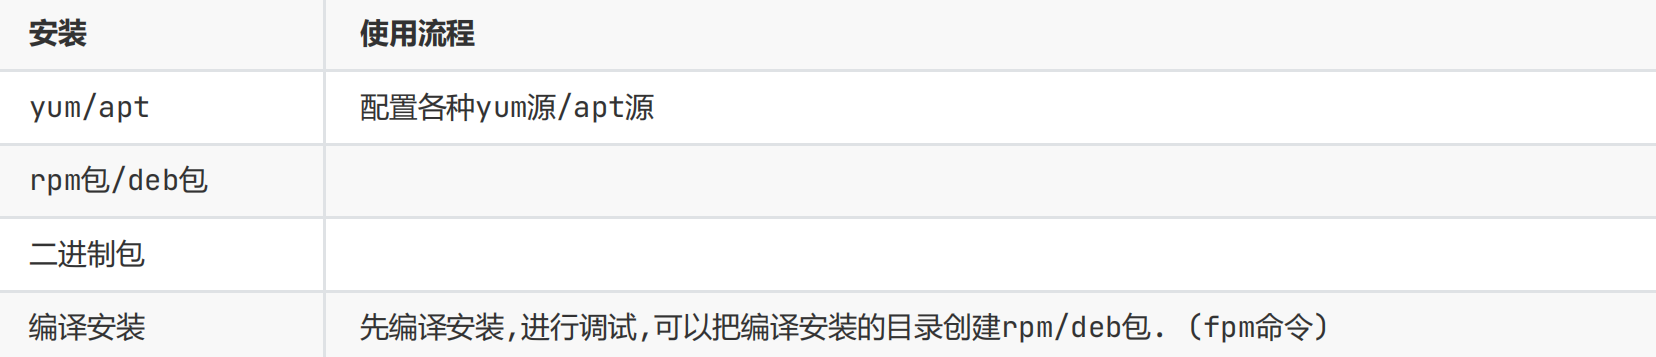
配置官网nginx—yum源 (麒麟sp3,rhel7.9)
vim /etc/yum.repos.d/ngx.repo
[nginx-stable]
name=nginx stable repo
baseurl=http://nginx.org/packages/centos/7/x86_64/
gpgcheck=1
enabled=1
gpgkey=https://nginx.org/keys/nginx_signing.key
module_hotfixes=true
先yum安装软件nginx,不满足要求再通过编译安装给nginx添加模块(再另一台机器上进行编译安装)
编译安装的时候与yum安装的配置一样(用户,命令路径,配置文件目录,错误日志的目录,访问日志的目录)
#安装nginx需要的依赖
yum install -y libxml2-devel libxslt-devel openssl-devel pcre-devel zlib-devel gd-devel
nginx -V 获取./config参数(获取原yum安装的参数)
./config执行后
sed -i '/^CFLAGS/s#$# -fPIE#g' objs/Makefile
make -j `nproc`
#编译后得到nginx 的命令,替换原有yum安装的/usr/sbin/nginx
ngx总结
配置ngx静态站点,ngx动态(lnmp),ngx lb7 ,ngx lb4
ngx处理用户请求的流程(lb+web+db+nfs) https: ˌ
部署wordpress
未来:ngx优化,ngx平滑升级