本地部署
获取程序源码
#在本地生成一个id_rsa,将公钥文件内容id_rsa.pub粘贴到github后台ssh配置页面
ssh-keygen -t rsa -b 4096 -C "zhangpeng@linuxjk.cn"
cat /root/.ssh/id_rsa.pub
# 使用 SSH 协议克隆
git clone git@github.com:0xJacky/nginx-ui.git安装Go环境
# 安装Go(如果尚未安装)
wget https://golang.org/dl/go1.21.linux-amd64.tar.gz
sudo tar -C /usr/local -xzf go1.21.linux-amd64.tar.gz
echo 'export PATH=$PATH:/usr/local/go/bin' >> ~/.bashrc
source ~/.bashrc
#使用阿里云镜像
go env -w GOPROXY=https://mirrors.aliyun.com/goproxy/,direct
#验证版本
go version还需要安装nodejs,pnpm
#nodejs可以使用nvm安装
curl -o- https://raw.githubusercontent.com/nvm-sh/nvm/v0.39.0/install.sh | bash
source ~/.bashrc
nvm install 21
nvm use 21
#以上为使用nvm安装node21
# 验证版本
node --version
#安装好nodejs后安装pnpm(nodejs中带npm)
# 安装 pnpm
npm install -g pnpm
# 验证安装
pnpm --versionroot@anolis810:~# curl -o- https://raw.githubusercontent.com/nvm-sh/nvm/v0.39.0/install.sh | bash
% Total % Received % Xferd Average Speed Time Time Time Current
Dload Upload Total Spent Left Speed
100 14984 100 14984 0 0 6108 0 0:00:02 0:00:02 --:--:-- 6108
=> nvm is already installed in /root/.nvm, trying to update the script
=> nvm source string already in /root/.bashrc
=> bash_completion source string already in /root/.bashrc
=> Close and reopen your terminal to start using nvm or run the following to use it now:
export NVM_DIR="$HOME/.nvm"
[ -s "$NVM_DIR/nvm.sh" ] && \. "$NVM_DIR/nvm.sh" # This loads nvm
[ -s "$NVM_DIR/bash_completion" ] && \. "$NVM_DIR/bash_completion" # This loads nvm bash_completion
root@anolis810:~# source ~/.bashrc
root@anolis810:~# nvm install 21
Downloading and installing node v21.7.3...
Downloading https://nodejs.org/dist/v21.7.3/node-v21.7.3-linux-x64.tar.xz...
########################################################################################################################################################################################### 100.0%
Computing checksum with sha256sum
Checksums matched!
Now using node v21.7.3 (npm v10.5.0)
root@anolis810:~# nvm use 21
Now using node v21.7.3 (npm v10.5.0)
root@anolis810:~# node --version
v21.7.3
root@anolis810:~# npm install -g pnpm
added 1 package in 1s
1 package is looking for funding
run `npm fund` for details
root@anolis810:~# pnpm --version
10.20.0
root@anolis810:~# 使用官方脚本安装(代码中的install.sh)
bash install.sh
#安装目录(二进制文件):/usr/local/bin/nginx-ui
#配置文件:/usr/local/etc/nginx-ui/app.ini
#如果脚本运行过程中显示配置文件下载失败无法启动:手动使用以下配置文件
#rm -rf /etc/systemd/system/nginx-ui.service.d/
# /etc/systemd/system/nginx-ui.service
[Unit]
Description=Yet another WebUI for Nginx
Documentation=https://github.com/0xJacky/nginx-ui
After=network.target
[Service]
Type=simple
ExecStart=/usr/local/bin/nginx-ui --config /usr/local/etc/nginx-ui/app.ini
RuntimeDirectory=nginx-ui
WorkingDirectory=/var/run/nginx-ui
Restart=on-failure
TimeoutStopSec=5
KillMode=mixed
[Install]
WantedBy=multi-user.target
systemctl enable --now nginx-ui.service
#完成以上步骤即可使用使用源代码自行编译安装
#进入代码目录
cd /server/tools/nginx-ui-dev
# 安装前端依赖并构建
pnpm install
pnpm build
#打包前端资源为 dist.tar.xz
cd app
tar -cJf dist.tar.xz dist/
cd ..
# 下载需要的go依赖
go mod tidy
#下载失败提示以下内容:
#go: downloading github.com/sacloud/packages-go v0.0.11
#verifying github.com/sacloud/packages-go@v0.0.11: checksum mismatch
# downloaded: h1:QUjhifK9qBkZ78I6002uSD90b24FJHYYWjIxpde6Z5s=
# go.sum: h1:hrRWLmfPM9w7GBs6xb5/ue6pEMl8t1UuDKyR/KfteHo=
#SECURITY ERROR
#This download does NOT match an earlier download recorded in go.sum.
#The bits may have been replaced on the origin server, or an attacker may
#have intercepted the download attempt.
# 尝试使用不同的代理
GOPROXY=https://goproxy.cn,direct go mod tidy
# 设置 CGO 启用
export CGO_ENABLED=1
#安装gcc
yum install -y gcc
#编译
go build -o nginx-ui main.go配置和启动
# 复制示例配置文件
cp app.example.ini nginx-ui.ini
# 编辑配置文件
vim nginx-ui.ini
# 创建 Nginx-UI 管理的配置目录
mkdir -p /etc/nginx/nginx-ui
# 备份原有配置
cp /etc/nginx/nginx.conf /etc/nginx/nginx.conf.backup
# 前台运行(测试用)
./nginx-ui --config nginx-ui.ini
;nginx-ui.ini主要配置项
[server]
host = 0.0.0.0
port = 9000
run_mode = release
log_level = info
[database]
type = sqlite3
path = /server/tools/nginx-ui-dev/database.db
[nginx]
config_dir = /etc/nginx/nginx-ui
pid_path = /var/run/nginx.pid创建系统服务
#先将配置文件放在合适的目录中:
mkdir -p /etc/nginx-ui
cp -a /server/tools/nginx-ui-dev/nginx-ui /usr/local/bin/
cp -a /server/tools/nginx-ui-dev/nginx-ui.ini /etc/nginx-ui/
# 创建 systemd 服务文件
cat > /etc/systemd/system/nginx-ui.service << EOF
[Unit]
Description=Nginx UI
After=network.target
[Service]
Type=simple
User=root
WorkingDirectory=/etc/nginx-ui
ExecStart=/usr/local/bin/nginx-ui --config /etc/nginx-ui/nginx-ui.ini
Restart=on-failure
RestartSec=5s
[Install]
WantedBy=multi-user.target
EOF
# 重新加载 systemd
systemctl daemon-reload
# 启动服务
systemctl start nginx-ui
# 设置开机自启
systemctl enable nginx-ui
# 查看服务状态
systemctl status nginx-ui修改配置文件
编辑 /etc/nginx-ui/nginx-ui.ini:
[server]
host = 0.0.0.0
port = 9000
[database]
type = sqlite3
path = /etc/nginx-ui/database.db
[nginx]
config_dir = /etc/nginx
pid_path = /var/run/nginx.pid
docker 部署流程:
#配置镜像加速:(镜像源来自镜像资源监控站:https://status.anye.xyz/)
{
  "registry-mirrors": [
      "https://docker.1ms.run",
"https://docker.1panel.live",
"https://docker.m.ixdev.cn",
"https://hub.rat.dev",
"https://docker.xuanyuan.me",
"https://dockerproxy.net",
"https://docker-registry.nmqu.com",
"https://hub.amingg.com",
"https://docker.amingg.com",
"https://docker.hlmirror.com",
"https://hub1.nat.tf",
"https://hub2.nat.tf",
"https://hub3.nat.tf",
"https://docker.m.daocloud.io",
"https://docker.kejilion.pro",
"https://docker.367231.xyz",
"https://hub.1panel.dev",
"https://dockerproxy.cool",
"https://docker.apiba.cn",
"https://proxy.vvvv.ee"
  ]
}
#其他nginx容器创建:
#创建nginx挂载的目录和文件
mkdir -p /app/docker/nginx{1,2,3}/conf
cat >> /app/docker/nginx1/conf/nginx1.conf << EOF
server {
listen 80;
server_name nginx1.com;
root /app/code/a;
location \ {
index index.html;
}
}
EOF
cat >> /app/docker/nginx2/conf/nginx2.conf << EOF
server {
listen 80;
server_name nginx1.com;
root /app/code/a;
location \ {
index index.html;
}
}
EOF
mkdir -p /app/docker/nginx{1,2,3}/html
mkdir -p /app/docker/nginx2/html
mkdir -p /app/docker/nginx3/html
echo test 1 container > /app/docker/nginx1/html/index.html
echo test 2 container > /app/docker/nginx2/html/index.html
echo test 3 container > /app/docker/nginx3/html/index.html
cp -a /etc/nginx/nginx.conf /app/docker/nginx{1,2,3}/conf
cp -a /etc/nginx/* /app/docker/nginx3/conf
#启动
#以下两个容器挂载了配置文件和网站目录
cd /app/docker/nginx1
docker run -d --name ngx_1 --restart=always \
-p 8888:80 \
-v `pwd`/conf/nginx.conf:/etc/nginx/nginx.conf \
-v `pwd`/conf/nginx1.conf:/etc/nginx/conf.d/nginx1.conf \
-v `pwd`/html:/app/code/a \
nginx:alpine
cd /app/docker/nginx2
docker run -d --name ngx_2 --restart=always \
-p 7777:80 \
-v `pwd`/conf/nginx.conf:/etc/nginx/nginx.conf \
-v `pwd`/conf/nginx2.conf:/etc/nginx/conf.d/nginx2.conf \
-v `pwd`/html:/app/code/b \
nginx:alpine
#此容器挂载了整个/etc/nginx目录
cd /app/docker/nginx3
docker run -d --name ngx_3 --restart=always \
-p 5555:80 \
-v `pwd`/conf:/etc/nginx/ \
-v `pwd`/html:/app/code/b \
nginx:alpine
#创建以下目录结构
├── docker-compose.yml
└── nginx-ui
├── app.ini
├── backup
└── database.db
stub_status_nginx-ui.conf:为容器内nginx准备的配置文件
server {
listen 51820;
server_name localhost;
# Status monitoring interface
location /stub_status {
stub_status;
allow 127.0.0.1;
deny all;
}
}

app.ini:nginx-ui配置文件
backup:备份目录,存储自动备份的其他nginx容器的配置文件
database.db:第一次运行后自动生成的数据库,无需手动生成

#使用nginx-ui官方镜像
#创建docker-compose.yml
cat >> docker-compose.yml << EOF
version: '3.8'

services:
nginx-ui:
image: uozi/nginx-ui:latest
container_name: nginx-ui
restart: unless-stopped
ports:
- "9000:9000"
environment:
- TZ=Asia/Shanghai
volumes:
- ./nginx-ui:/etc/nginx-ui
- ./stub_status_nginx-ui.conf:/etc/nginx/conf.d/stub_status_nginx-ui.conf
- /var/run/docker.sock:/var/run/docker.sock
# 挂载第一个nginx容器的配置
- /app/docker/nginx_v1/conf:/etc/nodes/ngx_v1
# 挂载第二个nginx容器的配置
- /app/docker/nginx_v2/conf:/etc/nodes/ngx_v2
# 挂载第三个nginx容器的配置
- /app/docker/nginx_v3/nginx:/etc/nodes/ngx_v3
# 挂载nginx日志目录(如果需要查看日志)
- /var/log/nginx:/var/log/nginx
EOF
#3. 其他nginx容器的配置文件目录挂载好后可以启动
docker-compose up -d
访问Nginx UI
打开浏览器访问:
http://你的服务器IP:9000,程序默认9000端口,如有冲突可以修改 nginx-ui/app.ini 和docker-compose.yml
验证部署
# 检查服务状态
systemctl status nginx-ui
# 查看日志
journalctl -u nginx-ui -f
# 测试端口是否开放
netstat -tlnp | grep 8080
页面操作:
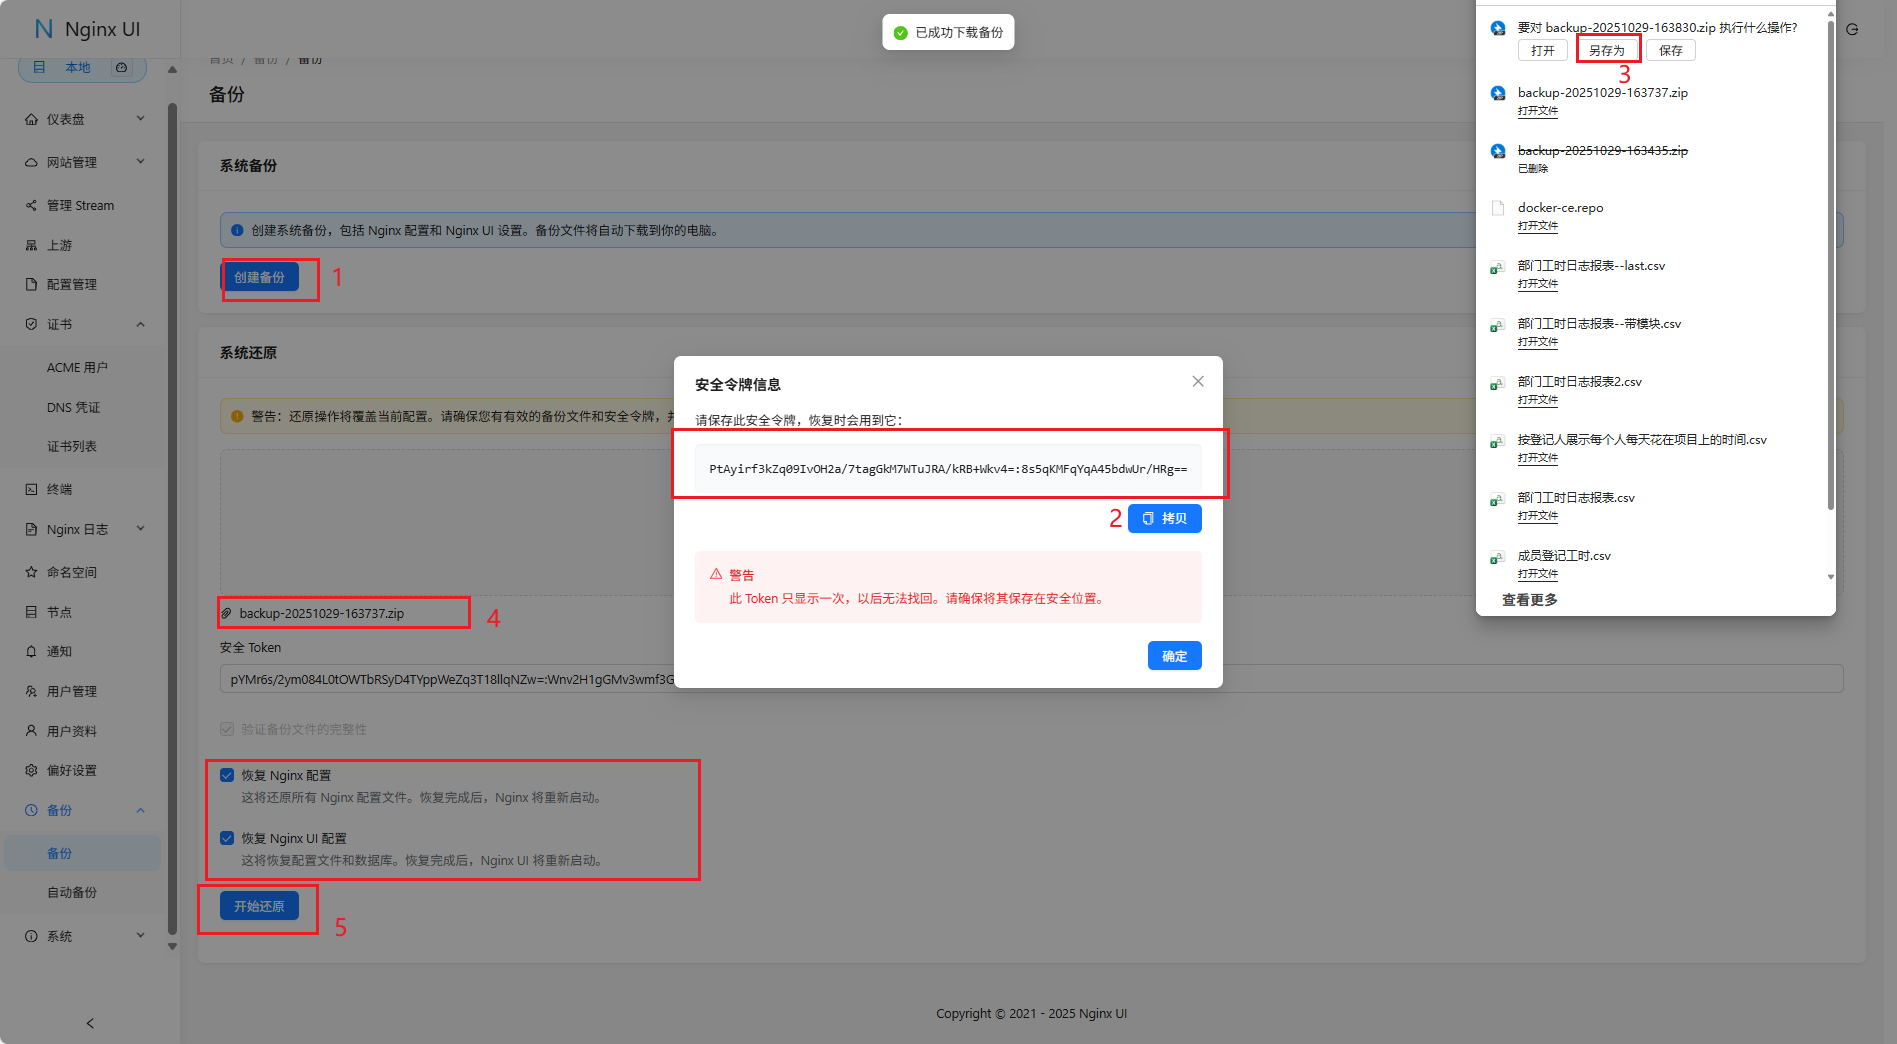
创建/恢复备份(nginx配置文件+nginxui数据库+配置文件)注:本地部署才能进行正常的备份/恢复
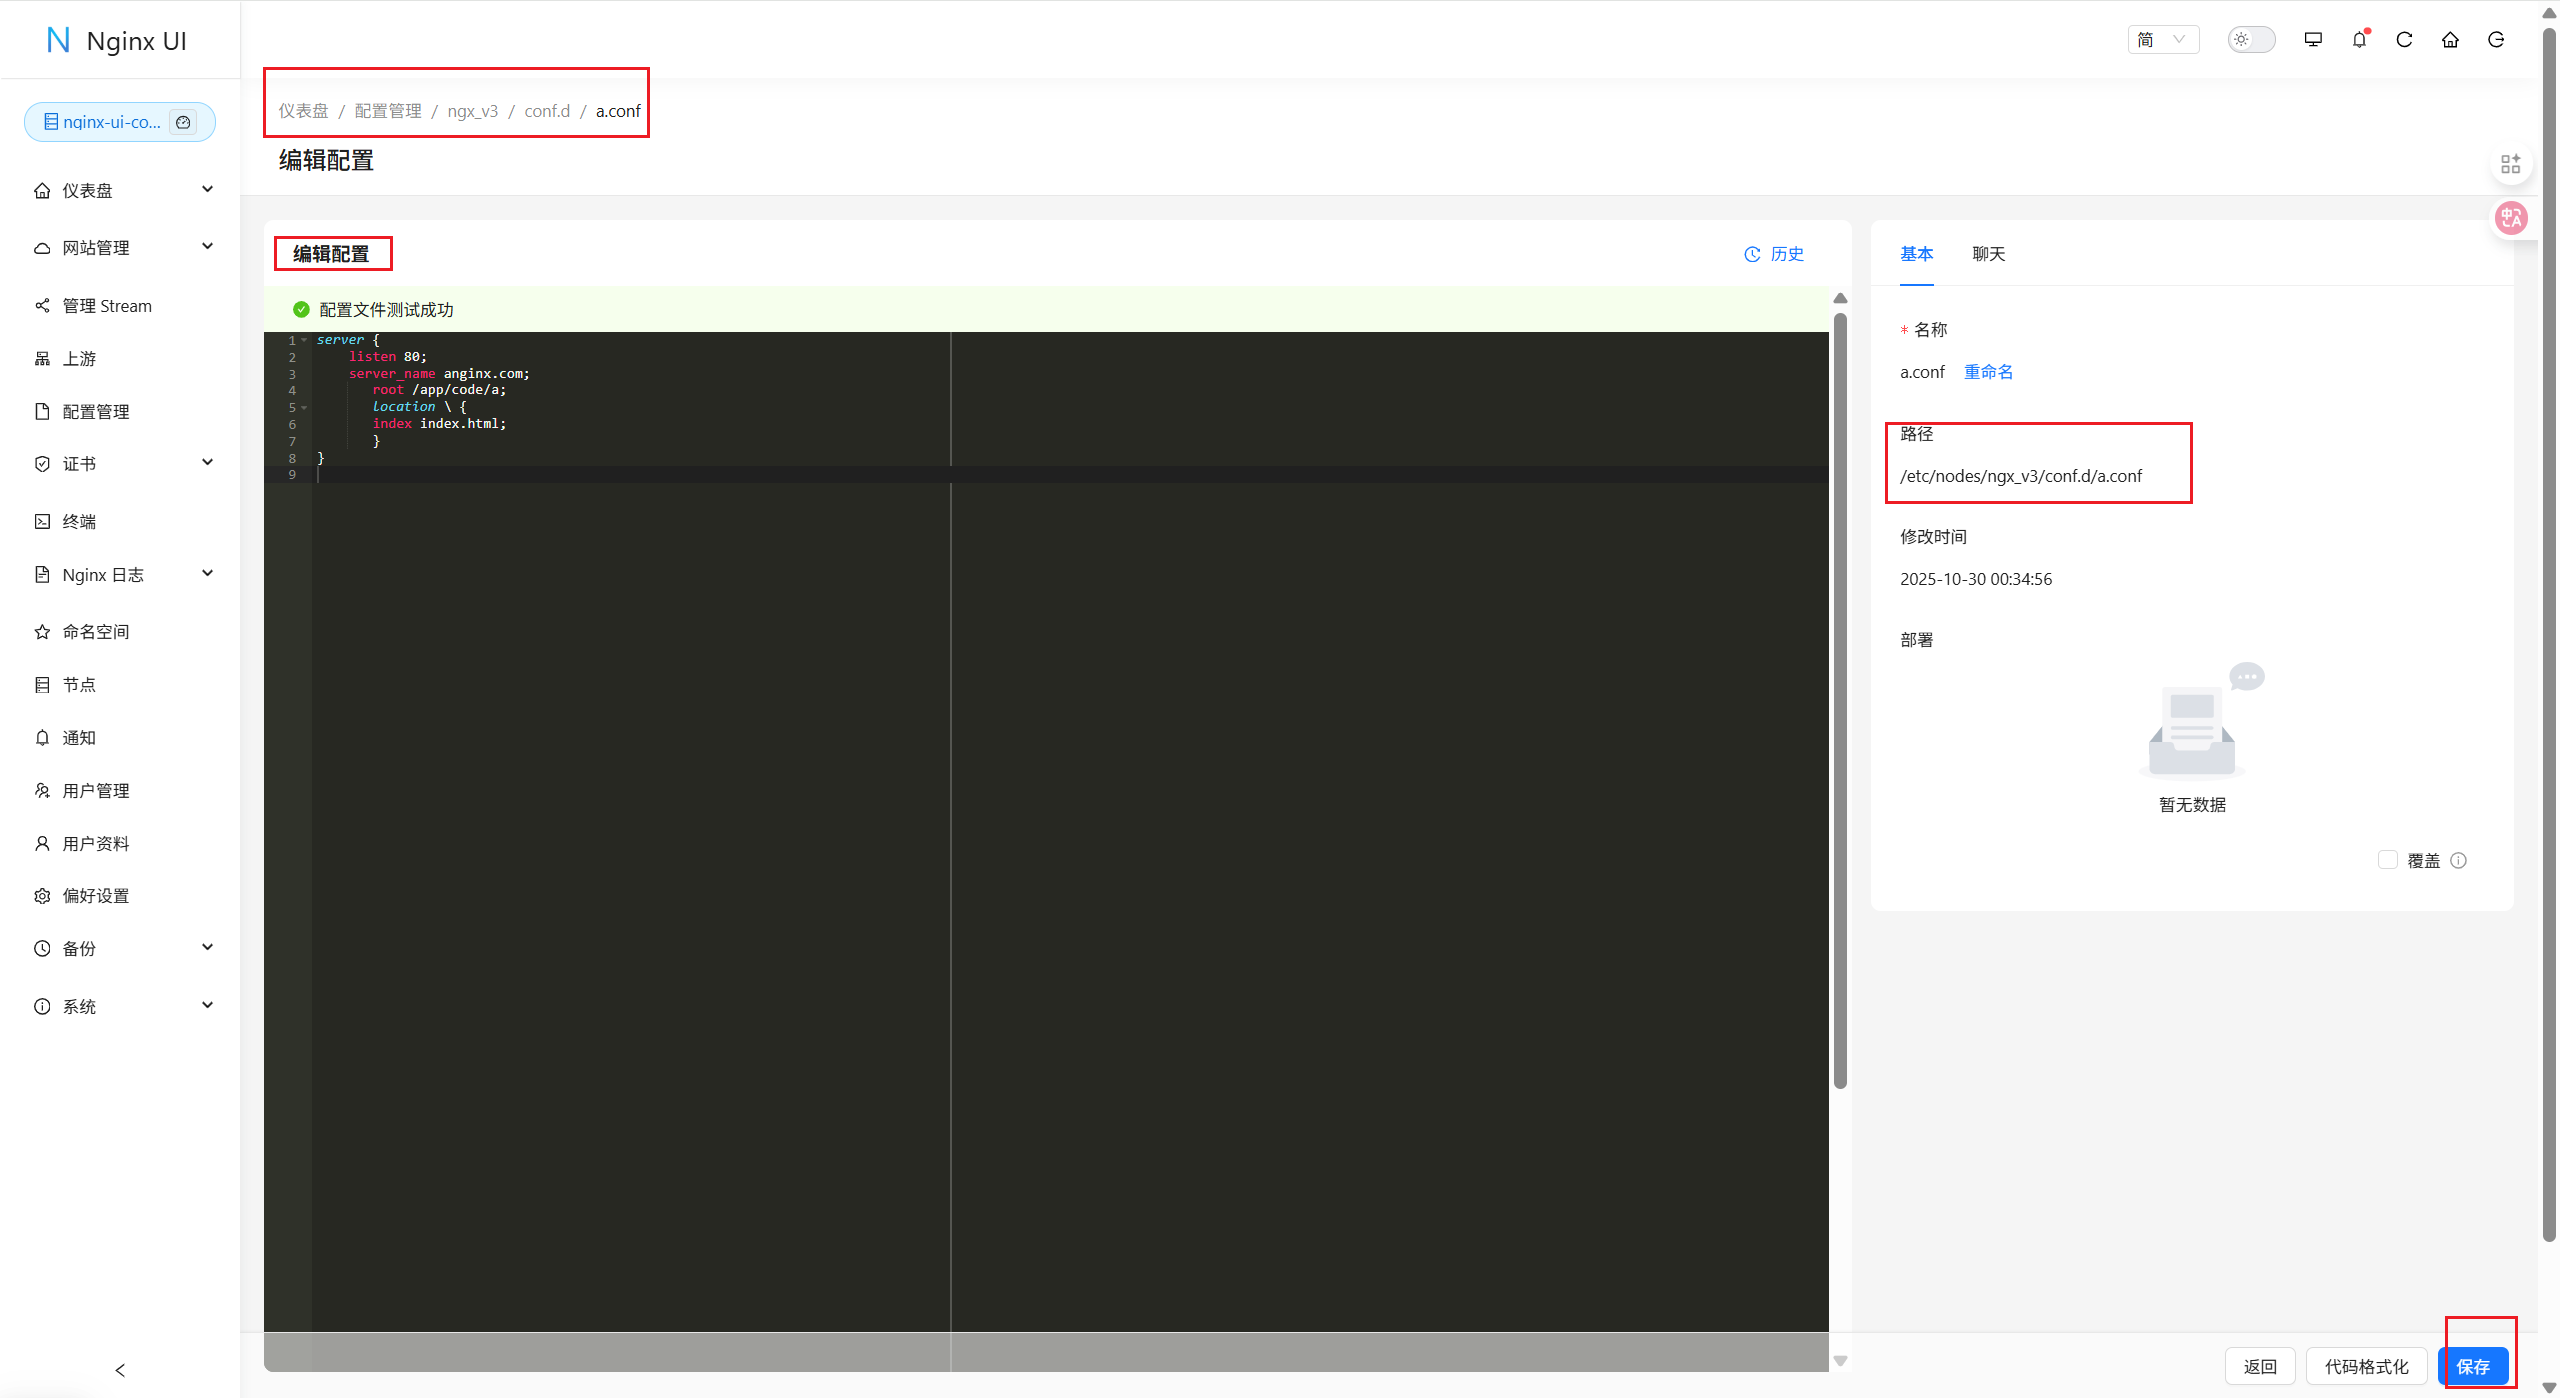
配置管理––红框中的ngx_v1即nginx容器的/etc/nginx目录,点击修改进入

docker部署可以在这个页面修改其他容器的配置文件
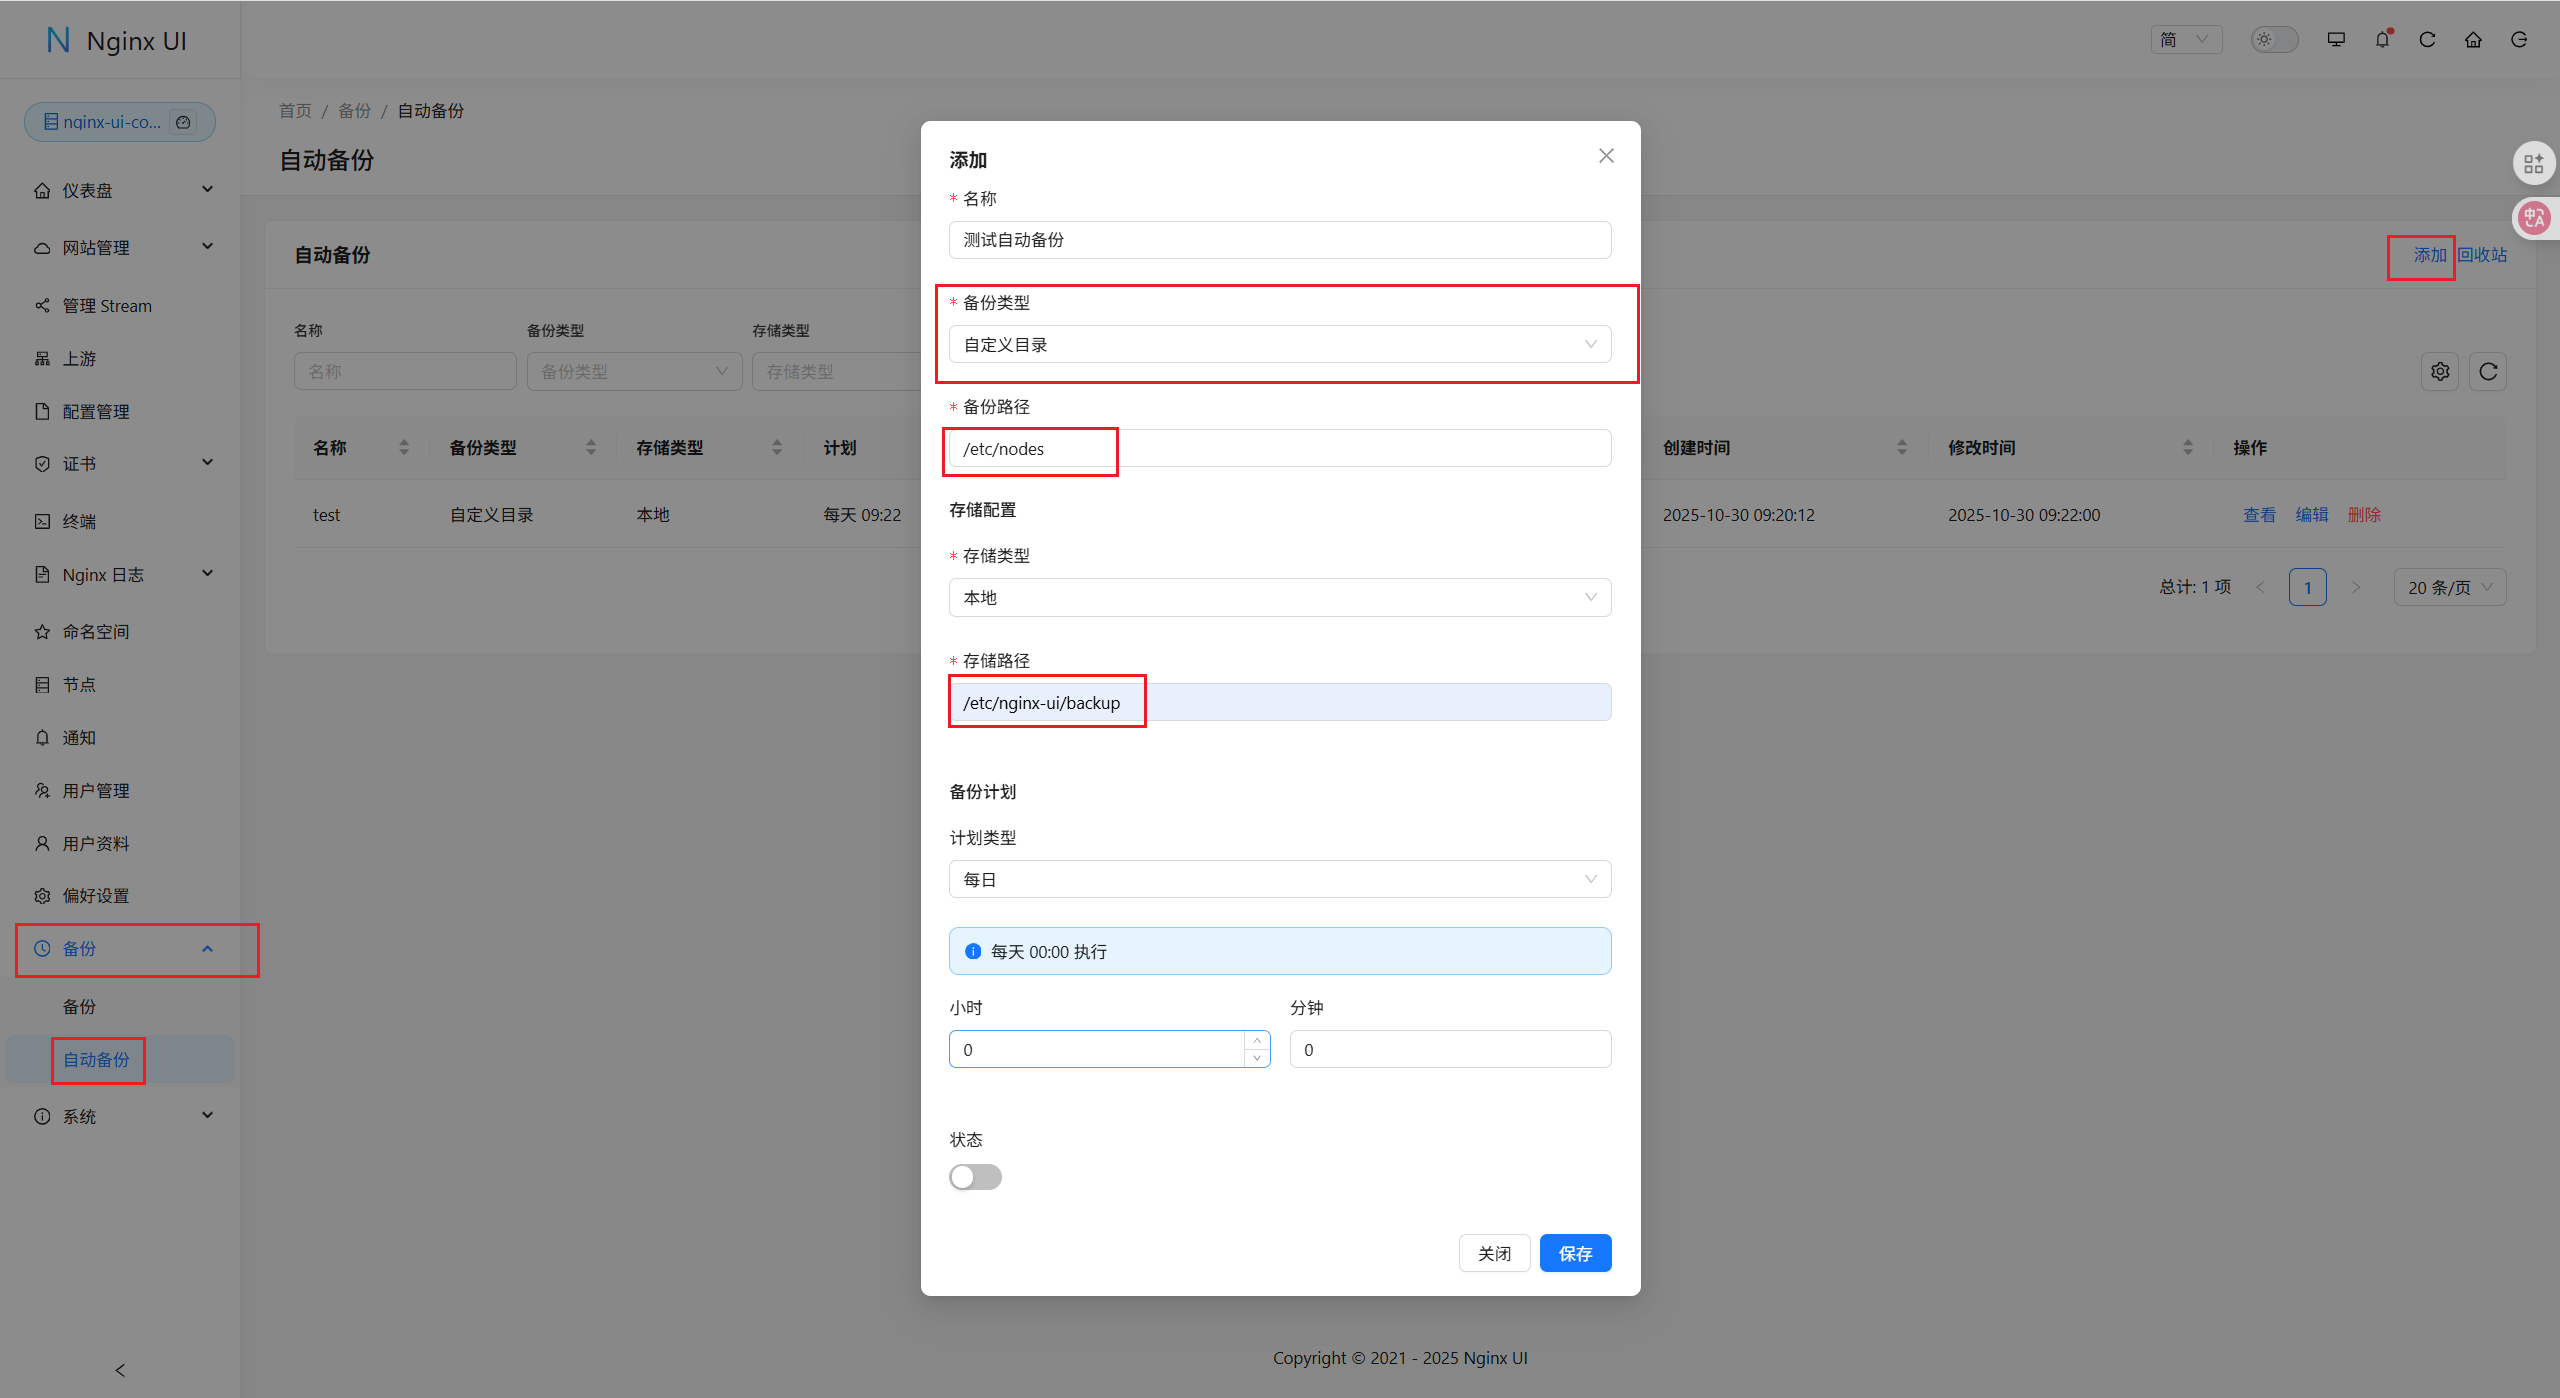
配置文件自动备份:点击自动备份页面,选择自定义目录(这里的备份路径和存储路径必须在app.ini中指定)
[backup]
GrantedAccessPath = /etc/nodes
GrantedAccessPath = /etc/nginx-ui/backup